| KIT #: | 10729 |
| PRICE: | $20.00 'used' |
| DECALS: | Several options |
| REVIEWER: | Martin McClendon |
| NOTES: | Scratchbuilt Mobile Launch Platform |

| HISTORY |
 The shuttle
transportation system (STS) and its 135 missions (1981-2011) are well documented
across multiple websites and in hundreds of books, magazines, videos, etc. Over
30 years, shuttle missions flew dozens of people and countless science
experiments into space and also to the International Space Station. Perhaps the
most complex machine ever built, the Shuttle Transportation System (STS) has
been seen by some as the pinnacle of scientific achievement; by others as a dead
end that led NASA away from returning to the Moon or venturing to Mars.
Tragically, two shuttles were lost with all hands: Challenger and Columbia. I
chose to model Discovery, which flew 39 missions, more than any other orbiter.
After a distinguished 27-year career, Discovery now resides at the Smithsonian’s
Udvar-Hazy Center in Virginia. (Wikipedia)
The two Crawler Transporters and three Mobile Launch Platforms used for the shuttle program were actually designed for the Apollo program, to move Saturn V rockets from the Vehicle Assembly Building out to the launch pad, then modified and reused for the STS.
| THE KIT |
According to Scalemates, Hasegawa’s model dates from 1985. It depicts the earliest “Columbia” orbiter configuration. My 1994 rebox, acquired on Ebay, featured decal options for the full shuttle fleet, though only in their early markings, featuring the NASA “worm” logo. The plastic is somewhat brittle, molded in white and black, with a grey plastic display stand that vaguely resembles the “mobile launch platform” used by NASA to transport the STS (Shuttle Transportation System) to the launch pad. Engraved details are limited to major panels.
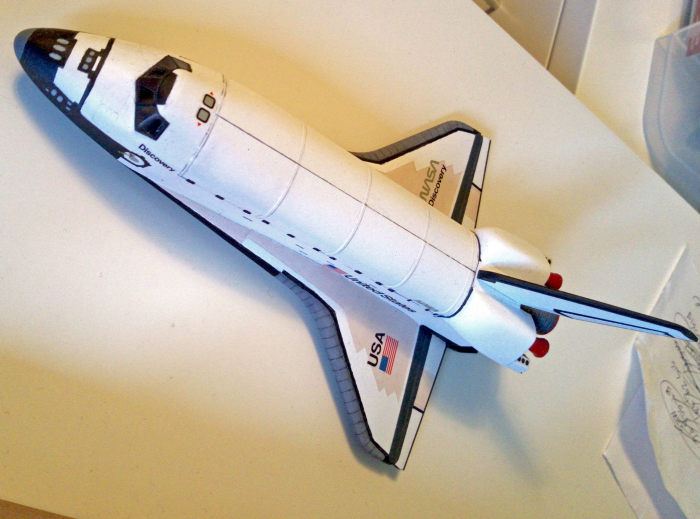 The orbiter
model is very accurately shaped and has opening payload doors with a
representative payload. The upper crew windows are a decal instead of clear
plastic (there is no cockpit provided, though the windscreen is a clear part).
The solid rocket boosters suffer from the omission of the readily visible
booster separation motors (BSM’s) on the bottom skirts of the SRB’s.
Due to the sheer number of shuttle missions and ET/SRB configurations and markings over the span of its 30-year lifetime, as well as differences between orbiters, research is required to correctly portray a given orbiter/booster configuration. Or you can just go ahead and build the model as-is, and only space fans will notice the difference!
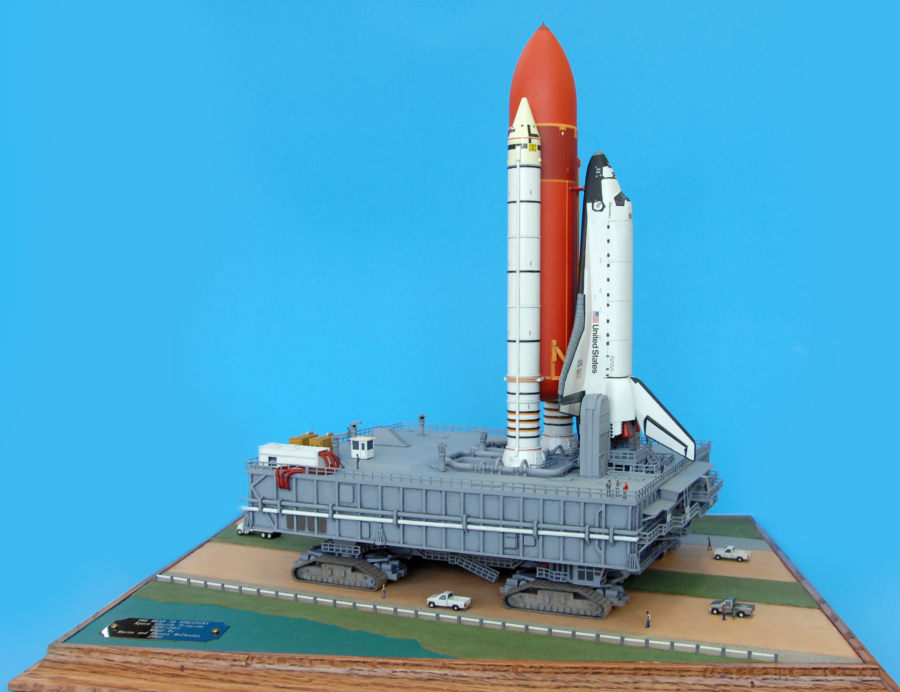
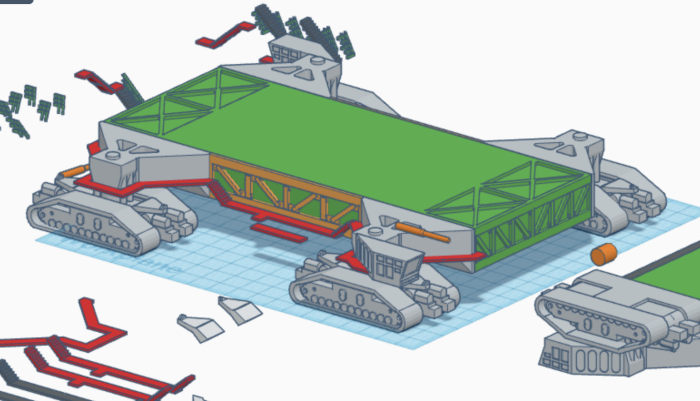
The launch platform is what transformed this project from a quick build into a months-long adventure into scratch-building and diorama-making. The stand included with the kit was created merely to provide something for the finished model to perch on, but in no other way resembles the real deal. The more I researched the Mobile Launch Platform (MLP) and the “Crawler” vehicle that carries it, the more inspired I became. These structures are no less amazing than the shuttle itself. Luckily my son was by that time well versed in using the online program “TinkerCAD.” What if I worked with him to create models of the crawler and MLP? The shapes of these structures seemed like they were simple enough for a novice like me to design with TinkerCAD. I then began to think about making a diorama depicting the shuttle on the MLP, crawling to the launch pad at its Florida home.
| CONSTRUCTION |
The kit provides no cockpit detail. I inserted sheet styrene to create the shuttle’s cockpit floor so the model wouldn’t look hollow—though almost nothing is visible through the tiny windows. This was painted Tamiya medium gray.
When gluing together the
fuselage halves, the payload bay is sandwiched between them, which also captures
the payload door hinges. I glued the payload doors shut and omitted the payload.
I took my eye off the ball and allowed the payload bay to shift slightly out of
position. When I went to glue the second half of the fuselage together, there
was now a maddening gap (just gluing the entire fuselage together all at once
would have been the better move). As usual with these small errors, they get
magnified as construction
 continues:
now the nose cone and one-piece lower wing parts didn’t fit properly. What
should have been quick work turned into several sessions with putty to smooth
over the problems. When glued closed, the main landing gear doors sit a little
lower than they should, so more putty was used here to slightly build them up.
Discovery was also retrofitted with a landing parachute below the ventral fin,
but I skipped this.
The Crawler
At this point I turned my
attention to the creation of a 3D-printed Mobile Launch Platform and Crawler
Transporter. I found drawings and plans for the Crawler transporter at various
sites including the Library of Congress, NASA, and other space modeling sites,
while my son designed the bulk of the model with TinkerCAD as I looked over his
shoulder and learned how he did it. We broke down the Crawler into printable
sections, and these were then downloaded as STL files for printing. I contacted
a vendor through Etsy who offered custom printing of the files for a very
reasonable fee. He printed all the parts and shipped them to us inside of a
week. Unboxing the pieces was exciting: here was a model we had designed,
arriving at our doorstep ready to assemble! The final parts looked good. 3D
printed parts are covered with extrusion lines from the printing of the layer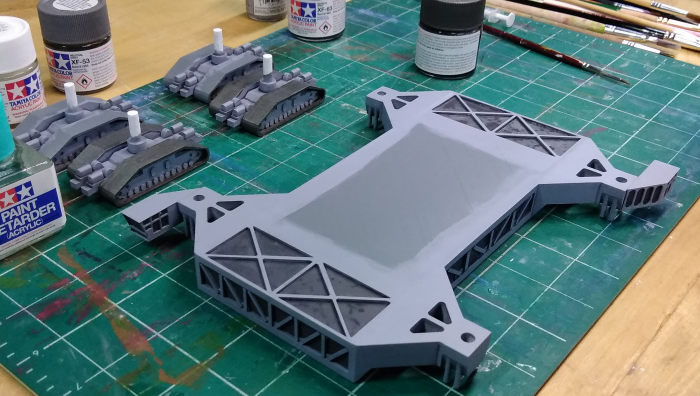 s,
but at 1/200 scale we figured these would not be too noticeable, so we didn’t
spend much time cleaning the parts up. All pieces were glued together using
superglue and 5-minute epoxy—styrene cement doesn’t work on PLA plastic.
I chose Model Master Dark Ghost Gray acrylic for the general overall color. Tamiya German Gray was applied in all the depressions representing the open spaces in the Crawler structure. The tracks were painted Tamiya Metallic Gray, then hit with a wash of rust followed by dry-brushing with Tamiya Khaki (for road dust). The running gear was also treated with rust and a dark wash to bring out details. I created a decal of the track links (basically black lines on clear decal film) using Photoshop and my home printer, and applied it to all the tracks.
Back to the shuttle: The ET and SRB’s are molded together as two halves, with a flap of plastic connecting the boosters to the tank. I removed the plastic flaps between the rocket and tank body, leaving only the actual attachment points. I used a razor saw to get rid of most of the material, then a succession of X-Acto blades and small files were used to remove the rest of the plastic. I added booster separation motors from lengths of stretched sprue.
| COLORS, MARKINGS, AND A BUNCH OF OTHER STUFF |
Using the excellent guide to shuttle markings created by AXM paper models, I chose a 1985 Discovery flight configuration for painting and markings. After a coat of Tamiya light primer I sprayed the top surfaces Tamiya flat white, thinned 50/50. I left the fin off and painted it separately. I then masked off the lower section of black thermal tiles and brush painted this with Model Master flat black.
The kit’s wings have engraved lines representing the thermal blanket materials on the first orbiter. I decided to model a later version of Discovery, with a “sawtooth” profile to the thermal material so I filled the engraving of the earlier profile and indicated the new shape as a paint line. I mixed a light tan color for the thermal blankets on the wings, masked and brush painted them. In hindsight the color looks a bit too dark, but it does add visual interest to the otherwise white surface of the wings.
 The
carbon-fiber nose cone and leading edges were also brush painted MM dark ghost
gray.
After a coat of Future, only slight weathering was applied—basically just a tiny bit of Tamiya German Gray mixed with thinner and allowed to flow into the few panel lines around the payload doors and the various vents on the sides of the fuselage. The payload door seam was drawn on with a mechanical pencil.
Decals were nicely printed but due to their age, required extra time and warmer water to release from the backing paper. I decided to hand paint the black thermal material around the windshield rather than use the decal and risk it not adhering to the complex shape. Once the decals were dry, I gave the shuttle a coat of Tamiya flat varnish from a spray can. Then the engines were glued into place. They were painted dark gray and then dry-brushed with Tamiya Silver Gray to highlight the surface details.
Since the orbiter would be depicted traveling on the MLP, I cut circles of sheet styrene to make main engine and maneuvering engine covers. I painted the covers Tamiya flat red, then brush-painted Future on them for a semi-gloss finish.
The MLP
Summer 2021 drew to a close with the orbiter and crawler now well underway, but the MLP was only just beginning. Creating plans and computer models for this structure took months, in between work and family obligations. I spent hours staring at plans and photos, and deciding which details would be printable (or even visible).
By this time it was Christmas 2021. I decided to ask Santa for a new toy: a 3D printer. The jolly elf came through with a Creality Ender 3 Pro. This basic entry-level printer would get us started on making our own parts right at home.
 Early
printing attempts were frustrating. Dialing in the accuracy of the components
took me a few weeks to figure out—the print head must be perfectly aligned with
the build plate and the whole structure must be dead-on square in order to
properly print. Frequent checking is needed to make sure the build plate remains
completely level between prints. Once these issues were addressed, I was
reliably turning out my own 3D parts.
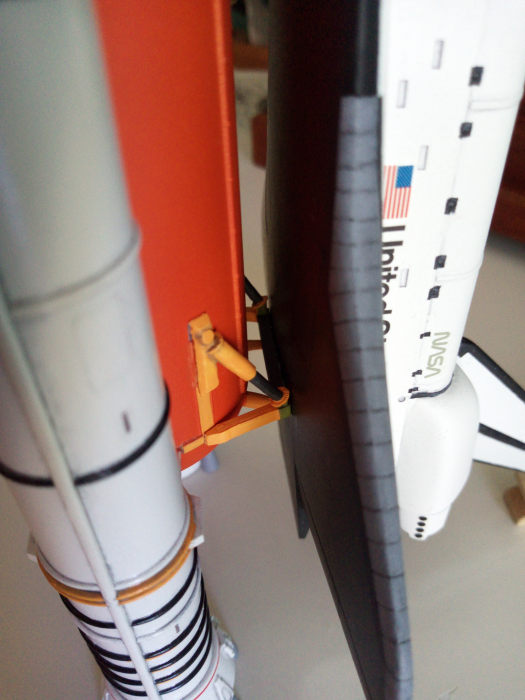
Having my own printer allowed me to quickly correct some accuracy issues. The kit part of the cradle that holds the orbiter to the ET is extremely simplified. I designed and printed a new, more accurate mounting cradle. I also needed to replicate the mounting posts that the SRBs are bolted to. The entire orbiter stack rests on eight small posts fitted with explosive bolts. I decided to incorporate the posts and the lower insulation skirt of the rocket motor (also missing from the kit) together for strength, since this would be the part of the model that was fastened to the MLP. These little ring/post structures were glued into the SRBs first, then the rocket nozzles were fitted inside them.
More Painting and Finishing: ET/SRB
Painting the ET/SRB combination began with a primer coat of white hardware store spraypaint. The SRB’s were airbrushed with Tamiya flat white. The nose cones were painted white tinted with a few drops of yellow. The SRB’s were then masked off, and I sprayed a custom mixed orange for the ET. This was basically two parts Tamiya yellow and one part Tamiya red, with a dash of Tamiya flat earth to tone it down. A darker mixture was made to paint the “intertank” section that joins the LH and LOX tanks. All paint was thinned 50/50 or more for airbrushing.
I hand-painted most of the ET/SRB details. These included the black “O” rings on the rockets, as well as light-orange insulating foam material that was applied at various places on the tank and boosters. Thinned dark gray was then run along depressions and panel lines to highlight the details.
After painting, I discovered that the kit’s early-version ET has some extra vent lines that later tanks didn’t have. I decided to leave them there, rather than sand them out and repaint everything, but I mention it here for those who wish to avoid this mistake.
I printed my own decals on clear decal film for the SRB markings; for this particular flight, the nose cones had various “L” shaped markings and circles. I also created decals of the red warning stripes at top and bottom, the tiny SRB maintenance doors on the engine skirts, as well as the “LOADED” placards on the motor segments—the kit’s placards are too large for the scale.
MLP
 The size of
the MLP was such that I needed to break it into sub-assemblies to be able to
print it. It was designed as a top, bottom, and sides, with a hollow middle to
save time and filament material.
The long sides were printed in two parts, the top in six parts, and the bottom in five parts. Inner sleeves were also printed for the three giant flame chutes that allow rocket exhaust to be directed into the flame trench below the MLP. All parts were glued together with 5-minute epoxy.
The most complicated part of the design was the water deluge system: a network of curving pipes that direct water into the path of the rocket motors to suppress the sound waves from bouncing up and damaging the orbiter’s thermal coatings during launch. After many hours of TinkerCAD work, I had a reasonable facsimile. I could have printed out the pipes separately, or even scratched them from wire, but decided to print them all in one piece, which saved a lot of scratchbuilding time, but did leave some rough spots that had to be carefully filled in with putty.
The Crawler and MLP also feature many work platforms…and miles of tiny handrails. All of these were either cut from sheet styrene or printed. Handrail stock was bulk printed and then cut to size for all of the walkways and stairways. It is as close to scale as I could make it and still be printable.
The MLP was airbrushed MM Dark Ghost Gray, like the Crawler. Shading was added with heavily thinned Tamiya German Gray with Tamiya paint retarder added to slow drying.
More Details to Print
A few more critical structures needed to be created: the Rain Birds, Tail Service Masts (TSMs), environmental systems, and the Engine Service Platform (ESP).
The rain birds are part of the noise suppression system: they spray the top of the MLP with zillions of gallons of water to deaden sound waves bouncing up toward the orbiter. These were designed in two parts: the vertical tube and the large disk shape on top. Six rain birds are situated atop the MLP.
If you look at photos of the shuttle stack traveling to the launch pad, you will see a bunch of weird boxes perched on top of the MLP. This is a portable air conditioning system (as far as I can tell) to cool off the interior of the MLP in the hot and humid Florida climate. It consists of a portable A/C unit and several generators and feeds air into the MLP through large red air hoses. I printed the main structures and used thin metal tubing to create the air hoses (it was actually a thermostat tube from a broken refrigerator part!)
The TSMs are tombstone-shaped objects that feed the liquid oxygen and liquid hydrogen into the shuttle during fuel loading. Umbilicals connect just below the shuttle’s Orbital Maneuvering Engines which disconnect and retract just before launch. These would serve as another handy attachment point to help stabilize and support the shuttle stack.
The ESP is a work platform
that sits inside the main engine flame chute, enabling crew to work on th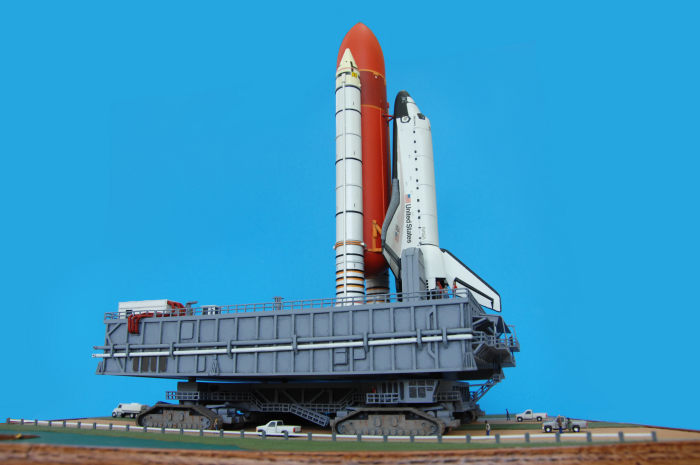 e
engines before launch. It rides up and down the flame chute on cables.
e
engines before launch. It rides up and down the flame chute on cables.
Building the Diorama
In order to emphasize the gigantic size of these vehicles compared to us puny humans, and create a place to securely display the model, I decided to create a diorama. I ordered scale vehicles from a vendor on Shapeways: pickup trucks and a water tank truck (used to spray water on the crawler way to keep down dust). I also ordered several packs of 1/200 scale people from Plastruct. Everything was painted with Tamiya and Liquitex artist acrylics.
The “crawler way” was built up using modeling paste on a plywood base. Pieces of scouring pad and foam rubber were dabbed into the wet paste to create the textures of gravel and ground cover respectively. Everything was painted with Liquitex acrylics, and a tiny guardrail was printed to add the finishing touch. At last, after two years, I attached the crawler to the base, using epoxy and screws. The MLP was attached with epoxy and lengths of wire inserted in between the two structures for strength. The shuttle stack was then epoxied to the MLP, followed by the TSMs. The tiny trucks and people were distributed throughout the scene, attached with super glue. Done! The model now resides in a display cabinet in the David Straz Science Building at Carthage College in Wisconsin, in recognition of Carthage’s NASA Space Consortium program, in which students contribute to actual NASA mission engineering.
| CONCLUSIONS |
Hasegawa’s orbiter holds up well despite its age. It is still available in various versions. A beautiful replica of the shuttle can be had with a minimum of fuss, but a little research will greatly increase the accuracy for modeling later orbiters. And for those who crave a challenge, you can go nuts and spend two years building the MLP and crawler!
| REFERENCES |
Wikipedia
axmpaperspacescalemodels.com
spacefacts.de
Library of Congress website
NASA website
Martin McClendon
12 December 2023
Copyright ModelingMadness.com. All rights reserved. No reproduction in part or in whole without express permission.
If you would like your product reviewed fairly and fairly quickly, please contact the editor or see other details in the Note to Contributors.