MPC X-TIE Ugly Fighter
| KIT #: | 8?931/8932 |
| PRICE: | $ |
| DECALS: | None required |
| REVIEWER: | John Summerford |
| NOTES: | Mash-up of kits from the Return of the Jedi snap build releases circa 1990 |
| HISTORY |
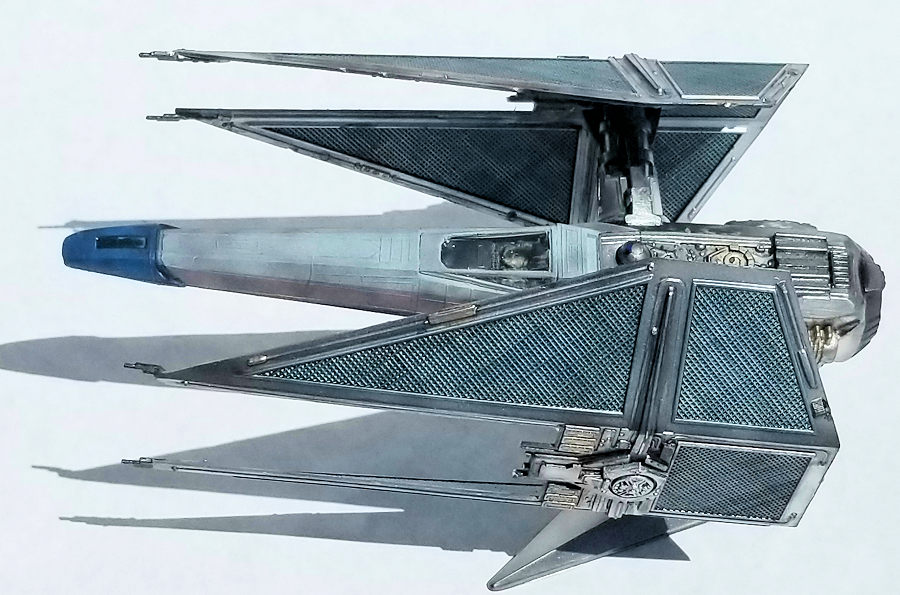
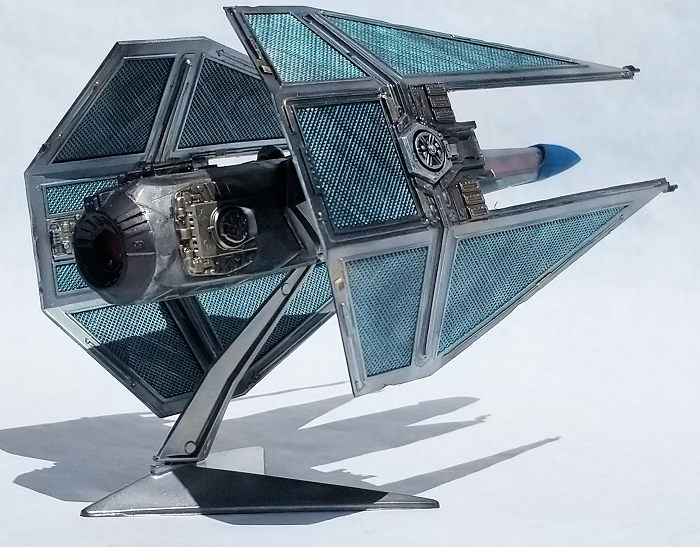
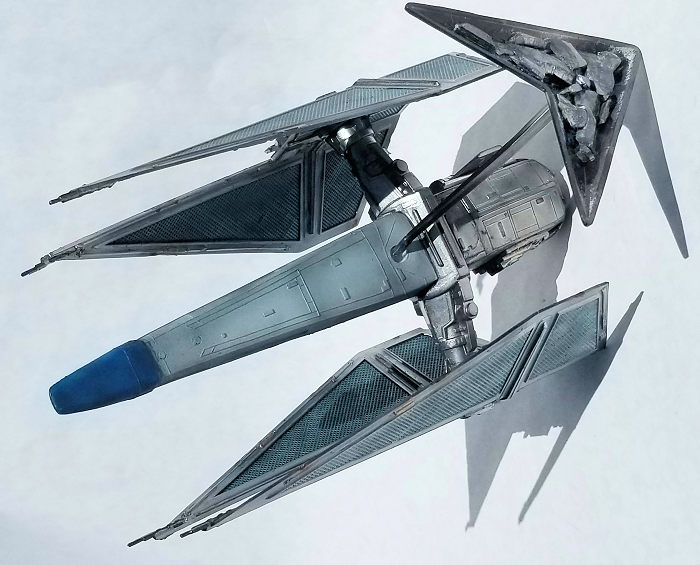
In the Star Wars universe, Uglies are generally spacecraft that have been built using the salvaged parts from damaged fighters. Operators of Uglies are typically pirates, smugglers, petty warlords, or those who want a custom racer.
 This
particular model is of a spacecraft that tries to use the best of the X-wing and
TIE Interceptor—an EX-TIE. The fuselage of the X-wing includes a repulsorlift
for flight in planetary atmospheres and, more importantly, shielding. Also
salvaged are electronic countermeasures, armored cockpit, and an inertial
dampener to protect the pilot from high-g maneuvers.
This
particular model is of a spacecraft that tries to use the best of the X-wing and
TIE Interceptor—an EX-TIE. The fuselage of the X-wing includes a repulsorlift
for flight in planetary atmospheres and, more importantly, shielding. Also
salvaged are electronic countermeasures, armored cockpit, and an inertial
dampener to protect the pilot from high-g maneuvers.
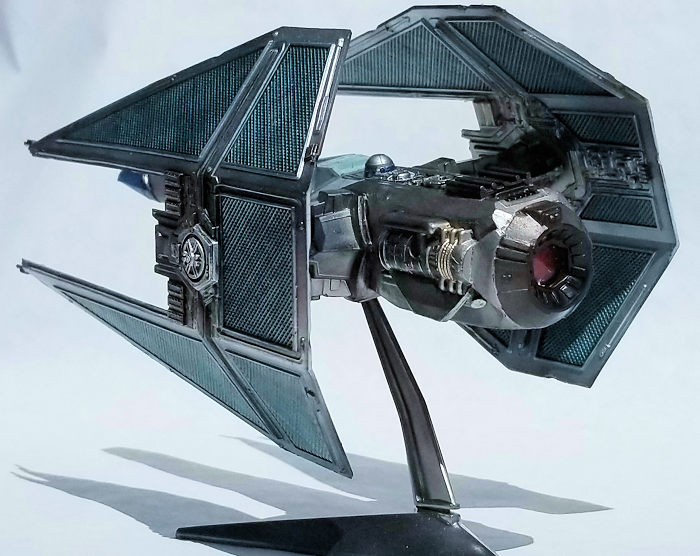
From the TIE Interceptor comes an advanced type of ion-stream projector that allows pilots to execute tight turns and rolls. Twin-port deflectors can be manipulated individually for fine control and counterbalancing, making the TIE Interceptor highly maneuverable. For weaponry, the Interceptor has four laser cannons, one at the end of each solar panel.
When (if?) all of the systems work together, this is a hot fighter indeed and a very skilled pilot is needed to fly it.
I don’t recall seeing an Ugly in the films, but I did read a paragraph about them in one of the books whose title I have long forgotten. The great thing about modeling an Ugly is that you can’t be wrong since they are each a one-off spacecraft.
| THE KIT |
Inside cardboard boxes are light gray styrene and clear sprues of minimal parts count with most of the detail raised. Sprue gates and mold seams are prominent and need tidying. Clear display stands are included. Instruction are on a two-fold sheet and the only painting guide is a referral to the box cover.
| CONSTRUCTION |
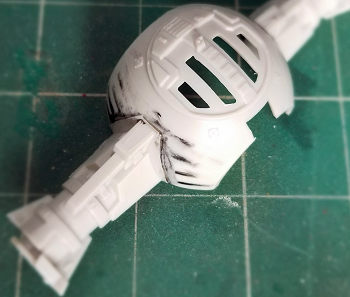 Which parts from the TIE fighter to graft onto the
X-wing was examined first. This required some test fitting of the spherical pod.
Removing the parts from the sprue resulted in some battle damage. The raised
detail of the plate at the center of the pod that anchor the booms are a
convenient place to remove them. The ion-stream projector part that attaches to
the aft end of the pod was saved for grafting to the X-wing fuselage. (The
inside of the nozzle has a clear piece that attaches to it and could be used to
install an LED to represent an active powered plant.)
Which parts from the TIE fighter to graft onto the
X-wing was examined first. This required some test fitting of the spherical pod.
Removing the parts from the sprue resulted in some battle damage. The raised
detail of the plate at the center of the pod that anchor the booms are a
convenient place to remove them. The ion-stream projector part that attaches to
the aft end of the pod was saved for grafting to the X-wing fuselage. (The
inside of the nozzle has a clear piece that attaches to it and could be used to
install an LED to represent an active powered plant.)
The primary X-wing fuselage pieces suffered battle damage from sprue removal. When pressed together they identified how to graft the TIE booms in place and also its engine. Raised rectangular panels just ahead of wing mounts make for good places to locate the booms. Blanking plates plus some plumbing for the area where of the ion-stream projector installation go where the wings mount. The circular projector part grafts to the rear end.
Surgery on the TIE commenced with a saw blade in the
roto tool. The cuts were cleaned up and the boom halves glued together. With the
fuselage halves connected, the side areas perpendicular to the R2 unit were
ground down as well as the mounting ends of the booms t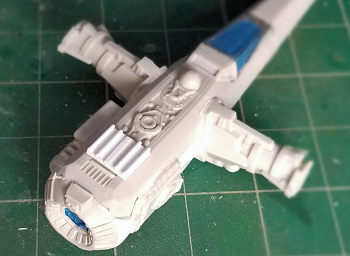 o create an acceptable
mating surfaces. Blanking plates were installed in the area where the wings
mount and the fuselage parts glued together.
o create an acceptable
mating surfaces. Blanking plates were installed in the area where the wings
mount and the fuselage parts glued together.
The only section of the ion-stream projector that is visible on the TIE is the nozzle, so its overall size and shape are unknown. I decided that the rear of the fuselage needed modification to fit the projector and that some of its parts be exposed. On the right side I glued on the back piece of the fuselage. On the left side is a half piece of an X-wing engine. Thinking some of detail behind the R2 unit isn’t relevant, I blanked that off and added detail with a piece of strip stock and four pieces of rod.
The clear part that attaches to the nozzle was glued in place and the inside face painted metallic red mixed with clear gloss varnish to make it translucent. While that was curing, the inside corners of the rear fuselage were filled in with cyano so that they could be flied and sanded to match the circumference of the projector nozzle. A bit of masking tape was taped over the clear part and the projector was glued over the aft end. Bits of styrene sheet were glued on to the fill the gap between the re-purposed X-wing parts and the nozzle in order to represent structural modifications. The entire area was tidied up with some filler and sanding.
 This was a good time to deal with the canopy, so the
cockpit and molded in pilot were painted. A test fit of the canopy revealed that
the slot for the tab at the front of the wind screen needed the rear edge
chamfered and the top of the pilot’s helmet needed trimming. Those issues dealt
with, the canopy was glued in place and masked.
This was a good time to deal with the canopy, so the
cockpit and molded in pilot were painted. A test fit of the canopy revealed that
the slot for the tab at the front of the wind screen needed the rear edge
chamfered and the top of the pilot’s helmet needed trimming. Those issues dealt
with, the canopy was glued in place and masked.
The booms were glued in place and various bits of styrene and filler were used to clean up the joints. The bottoms of the booms extend beyond the bottom of the fuselage, so that area between them was built up with sheet styrene and some detail added with rod and strip stock. I toyed with the idea of adding a cannon from the X-wing to the underside, but the display stand would interfere with it, so I dismissed it. Unfortunately, the booms have a slight forward rake, so that throws the panel alignment off. I removed material at both the boom ends and the panel mounting points so that the panels could be attached parallel to the fuselage centerline. Those areas were masked in preparation for painting.
Ejector pin marks on the solar panels were cleaned up and a couple dings were ground into them as well as the nose. The stand was assembled and lead fishing weight glued to the bottom and it was off to the paint booth.
| COLORS & MARKINGS |
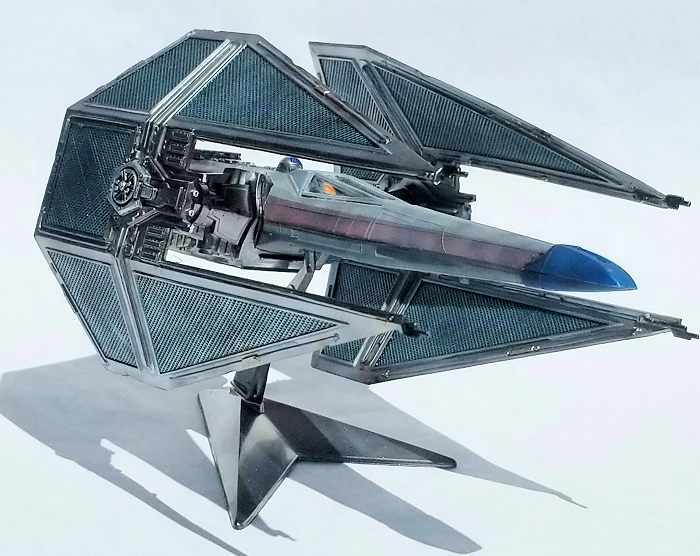 Thinking the builder/owner of the ugly doesn’t care
about aesthetics, all of the sheet metal work around the engine and booms was
left unpainted. That area, the solar panels, and the display stand were given a
coat of Alclad II gloss black base. The booms, top of the powerplant and stand
were painted steel. The nozzle was painted burnt metal. Those details were
masked and the rest of the rear sprayed airframe aluminum as well as the inside
face of the solar panels.
Thinking the builder/owner of the ugly doesn’t care
about aesthetics, all of the sheet metal work around the engine and booms was
left unpainted. That area, the solar panels, and the display stand were given a
coat of Alclad II gloss black base. The booms, top of the powerplant and stand
were painted steel. The nozzle was painted burnt metal. Those details were
masked and the rest of the rear sprayed airframe aluminum as well as the inside
face of the solar panels.
The outside faces of the panels were sprayed white aluminum. Areas that suffered dings were touched with burnt metal as did the laser cannon tips. Pale burnt metal highlights were applied to some of the junction boxes on the solar panels as well as portions of the powerplant. The R2 unit received a chrome highlight.
The rear area of the fuselage was masked and rest of it was given a coat of RAF sky enamel (just because I have it in my paint rack) as a base, then lightly over sprayed unevenly with flat white.
While that was curing, the solar collector areas on the panels were giving a wash of acrylic metallic blue darkened with metallic black and clear gloss plus water mixed in also. The raised plumbing detail on the panels was washed with thinned black ink to great effect.
 The nose was masked and burnt sienna stripes were
painted on the sides followed by more splotches of white. Flat black was added
to the paint cup to make a dark gray and this was used to “dirty up” the front
half. The nose was salvaged from another fighter with blue trim, so that was
masked, painted and given the same dirt treatment plus chips from a silver
artist’s pencil.
The nose was masked and burnt sienna stripes were
painted on the sides followed by more splotches of white. Flat black was added
to the paint cup to make a dark gray and this was used to “dirty up” the front
half. The nose was salvaged from another fighter with blue trim, so that was
masked, painted and given the same dirt treatment plus chips from a silver
artist’s pencil.
All the masks were removed and the final bit of painting was the head of the R2 unit.
The right solar panel was glued in place and alignment checked as the glue cured. The left panel followed and aligned with the other panel and the fuselage. Caps that trap the panels to the booms were glued in place. The completed spaceframe was glued to the stand at a jaunty angle and the project was complete.
| CONCLUSIONS |
This figure-it-out-as-you-go-along project can satisfy a super detailer freak and/or inner-engineer. An Ugly is also a great platform for trying out new painting and weathering products or techniques. Most importantly, this provides hours of change-of-pace enjoyment. I enjoyed this so much that I ordered the Bandai Star Wars 1/72 Resistance X-Wing fighter and Star Wars 1/72 Tie Striker and plan on building a racer with a nifty, metallic paint scheme and a number on it.
John Summerford
17
August 2020
Copyright ModelingMadness.com. If you would like your product reviewed fairly and fairly quickly, please
contact
the editor or see other details in the
Note to
Contributors. Back to the Main Page
Back to the Review
Index Page
Back to the Previews Index Page