| KIT #: | 6551 |
| PRICE: | $60.00 MSRP |
| DECALS: | One option |
| REVIEWER: | Greg Ewald |
| NOTES: | Smart Kit |

| HISTORY |
Considered to be one of the best tanks of the World War II, with it’s
sloped armor and heavy 75mm gun, the Panther really stands out in the world of
armor. The command version of the G model was bristling with antennas, and
capable of communicating with other units in the formation. It also made them
stick out like crazy, and become a prime target. “The best of the best of the
best SIR !”
The biggest problem with the Panther series was that of maintenance, many were
lost to just breaking down rather than to enemy action. Most of them wore out
important drive parts after only 150 km! The interwoven wheels were almost
impossible to repair in the field, requiring skilled engineers and specialized
equipment that were hard to mass produce, especially with the constant bombing
of industrial plants by the Allies. Prying off the outer wheels to access the
damaged inner structure while looking over your head for incoming P-47’s must
have been a real “blast”.
The antenna sections of the command tank could be added on as needed to lift the
sending and receiving signal mast according to terrain. I would imagine these
woul d be removed as fast as possible after sending out a signal. Some variants
were used to coordinate air strikes, but most were used as armed mobile HQ’s.
The Germans had this down to a science, and coordinated tank attacks were often
devastating, with up to a 12/1 kill ratio in some theatres. Of course the
massive number of Shermans and T-34’s just overwhelmed them, small consolation
to the Allied tank crews that were on the receiving end of the German tanks.
The engineering that went into the manufacture of this tank was amazing, in
fact, restorer’s today often have problems replicating the tight design
specifications that were milled out in the 40’s. This was also the downfall to
much of the German military armor construction. Though brilliant, it meant that
every tank was somewhat custom built, instead of being mass produced like the
bulk of the Allied armor.
“Zippos”…but a lot of them…
The Panther’s 75mm gun actually had better penetrating power than the Tiger’s
88, and was hugely successful at long range. The sighting systems were far
better than anything the Allies could field. The price of this, though, was the
long barrel of the tank was ineffective in the hedgerows of France, and the
combat often took place in close quarters, rendering the advantages of the
Panther somewhat useless. However…in the desert?
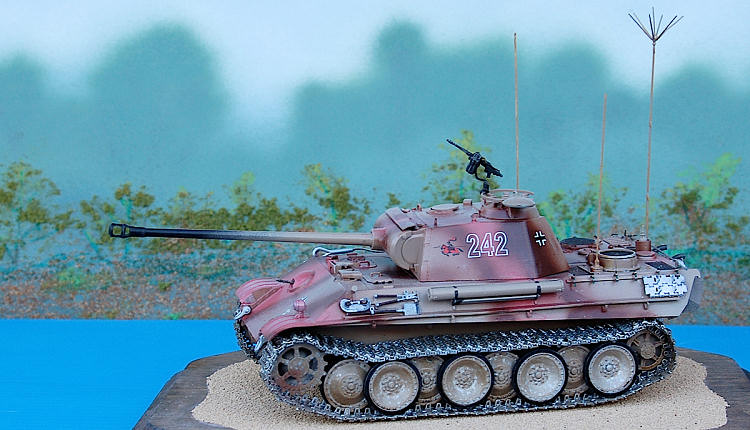
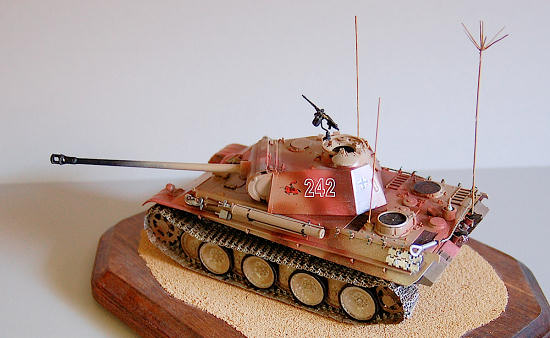
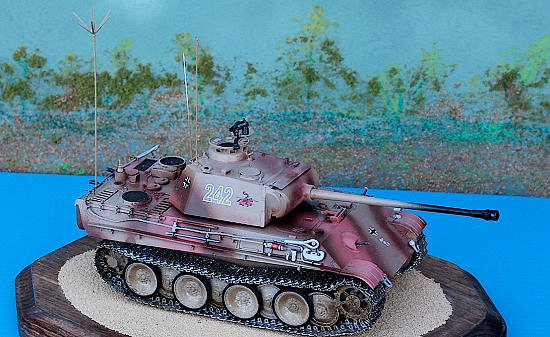
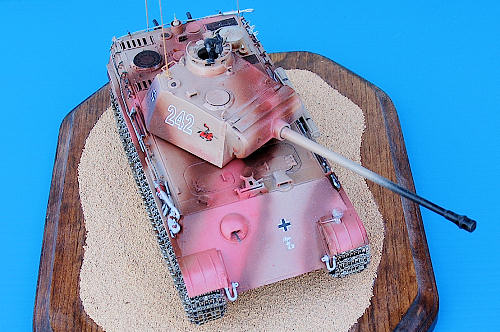
In this case, I once again have gone into “46” mode, building a supposed command tank to be used in North Africa, as Rommel’s resupply had actually worked, and the Germans had been able to hold at Tobruk. I know, it was unlikely, if not impossible, but I live in my own world. Deal.
| THE KIT |
One of the new “smart kits” marketed by CyberHobby, this re-release of the
Dragon basic Panther G kit really stands out. It includes some lovely photo
etch, but is fairly basic in construction, and easy enough for a middle of the
road dark-side (armor) modeler. The fit is nice, with a minimal need for the
putty beast to have to crawl out from its bondo den.
 The tracks are CH’s standard “magic tracks” that are reasonably easy to put
together, and give you the ease to get that German droop to their slack track
systems.
It does not have a turned barrel, but at least it is a one -piece unit, which
means a heck of a lot less PSR to make a good cylinder. The photoetched bits are
quite well done, and too large for the carpet monster to really be a problem. I
did not care for the tow cables, though…they seem too rough and out of scale.
There are a lot of optional pieces in this kit, you could almost build a second one with the spare bits. 23 main sprues make up the kit, as well as two photo etch sprues, tow cables, and 90 (yep, that’s right) 90 magic tracks. The instructions are well printed, if a little uninformative. You will need some reference material to get the tank just right. There is a fair amount of information on the net, but a book might be a better route.
| CONSTRUCTION |
If you want a nice weathered effect, start by painting the sprues (see below in
the painting section).
The road wheels are the biggest of the P.I.T.A. things about armor modeling.
As in my other builds, I do them in sections, and use a black sharpie
marker to mark the rubber part. This kit also comes with steel wheels, so make
sure you pick one or the other. All
of the reference pics I could find of this G variant had rubber road wheels, but
that doesn’t mean that steel wheels were never used, you know how the Germans
love to modify everything six ways from Sunday, and rubber was a scarce
commodity at the end of the war.
 As is normal for me, I paid little attention to the assembly sequence,
preferring to get the large assemblies done first, and leaving the doo-dads off
until the very end.
Back to the wheels: The tank kit
has a number of slightly different suspension rods for the wheels, which means
you really need to pay attention to what goes where. Some of the locations are a
little bit dubious, so you may want to use a slow setting glue instead of a/c,
in case you need to tweak a part in order to fit. I never glue in the rear
sprocket until the tracks are on, just in case. I would suggest that you
assemble the “magic tracks” now, and fit them over the road wheels and
sprockets. Some fiddling about is going to be necessary to get the right droop.
Once I had the tracks in place, I hit each joint with a small drop of a/c glue.
Rear Lower Hull: The fans go in
fairly simply, but make sure you glue them well in place, because they are going
to take a fair amount of knocking about when the whole tank is assembled. Don’t
skimp on the păté ! (sorry for the vague Monty Python reference…)
I left all of the fiddly stuff off of the rear hull plate for the moment, as I
could tell from test fitting that there was going to be some psr coming into my
future when the hulls, upper and lower, were joined.
 Upper Hull: There a number of options for the upper hull, vents open or closed,
a seven part machine gun that isn’t visible, and some metal mesh guards for the
engine intakes. Those of you who
want to superdetail could make quite a nice interior fairly easily.
Once again, I left off all of the extras until the base painting had been
done (spare tracks, shovels, etc).
The Turret: This is almost a model
just by itself. It took me a little while of test fitting to figure out how the
gun fits into the breach assembly…hint, the locating pin goes on the port side.
There are two different commander’s cupolas, one with a mg slide mount,
but unfortunately, no gun is provided. So that is the one I chose, and
scratchbuilt a mount using the otherwise invisible machine gun from the hull.
I installed the simple stick gun
supplied on the “J” sprue for the hull mg. The 75mm gun and mantlet fit into the
turret like a glove. No psr at all !
Upper and Lower Hull Mating: Sounds like a nature special, doesn’t it? Well instead of doing it like they do it on the discovery channel, this takes a bit of gentle finagling. I aligned the back of the upper hull against the lower hull sloped plate, and wriggled it down as far as I could in the front. Yep, there is a gap. Break out the small c-clamps and tighten her down, then use a/c glue to join the two with capillary action. Set this aside to dry completely. Psr continues, then it is off to the paint stand !
| COLORS & MARKINGS |
As with most of my armor models, I started off by painting the whole series of
sprues with Krylon aluminum. This is allowed to dry, then lightly spritzed with
my owl spritzer. (spray bottle)
Salt lightly using an old shaker and again let dry. As a side note: never use
the salt shaker from your kitchen, trust me on this one (unless y ou are single).
Now, apply the primer, in this case, a German “desert yellow” made by Tamiya.
You have to use lacquer/enamel based paints to do this process, by the way…rattlecans
work just fine. Let that dry.
Now scrub off the salt granules in some warm water. Note: Do not use the bathtub
that your spouse likes to bathe in to do this bit. Big Trouble in Little
Wherever-you-are. Let dry, and then
you can start on the assembly.
Once the main hulls were mated, sanded and filled, etc…it was time for the paint
job. I used a red primer for some
of the markings, as well as a slightly pink primer for the camouflage over the
desert yellow primer. I was going
for a “Tobruk 46” sort of feel. I
didn’t weather it all of too much, as I thought of the Panther G being fresh off
the barge, and in the hands of a young commander who probably would have had his
crew waxing the thing if possible. And, yes, I used the pink because I just have
to, you know me.
Some of the decals were spares from an Afrika Corps build of yesteryear. The kit
crosses went on smoothly, requiring no solvents at all, and perfectly in
register. (a rarity, these days.)
Painting the Tracks: I wanted this
to look factory fresh, so I didn’t age the tracks or rust them. Just a spray of
matte silver, then a wash of Minwax wood stain(red oak) was enough to give them
the look that I wanted.
| FINAL BITS (GREEBLIES) |
 Now you can go ahead and add on the greeblies…the shovels, exhaust stacks, the
bonbons, photons, whatever else. Leave the antennas off until you are completely
done. Snap. I had to replace mine twice with evergreen styrene rod. The six
-pronged upper antenna is delicate, be careful with it.
I used some picture hanging wire for the
tow cables, and was happy with the result.
The biggest difficulty in this build was installing the spare tracks and the
holding racks. It looks simple in the instruction pamphlet, but takes a leap of
imagination to get on correctly. Study lots of photos, and see how they actually
put them on the tank before you glue away.
The tank was then sprayed with a matte clear coat, not a flat…as I said, I wanted this tank looking ridiculously brand spanking new. I did not apply zimmerit, as I doubt they would have used it in the desert, where long range combat was the norm, and the Panther would have really ruled.
| CONCLUSIONS |
A very nice tank kit, with lots of detail and a ton of options. I wish there was a cupola gun for the kit, and I didn’t care for the kit’s tow cables, but these are easily remedied. It is an impressive model that took about 30 hours to complete. Highly recommended.
| REFERENCES |
 http://dietmagic.tripod.com/panther3copy.html
http://www.achtungpanzer.com/panzerkampfwagen-v-panther-sd-kfz-171.htm
Thanks to www.dragonmodelsusa.com for the review kit, via your editor. Get yours today at your local shop or on-line store.
If you would like your product reviewed fairly and quickly, please contact me or see other details in the Note to Contributors.