
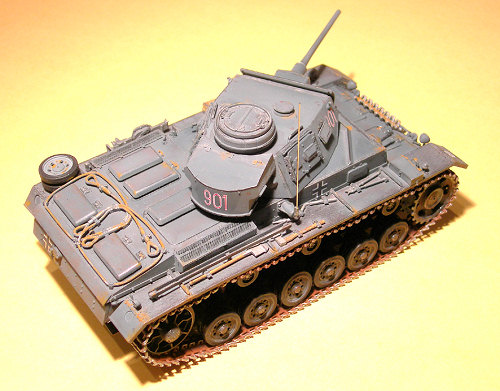
Dragon 1/35 Pz.Kpfw III ausf J
| KIT: | Dragon 1/35 Pz.Kpfw III ausf J |
| KIT #: | 6394 |
| PRICE: | $ |
| DECALS: | Eight options |
| REVIEWER: | Blair Stewart |
| NOTES: | Smart Kit version |
| HISTORY |
Check the Boss' in the box preview for a good historical summary and a quick look at what’s in the box. I’ll just skip to my impressions of the kit and the construction process.
| THE KIT |
This is my second Dragon
Smart Kit, and I have to say they have really set the bar high with these new
kits. Not only do you get 8 gazillion parts, but they have mastered injection
molding to the point where you don’t even have to drill out the gun barrels or
the exhausts anymore: they’re already essentially drilled out for you via the
molding process! They achieve this and other molding
 wonderments (such as
reduced seams) through a process called “slide molding” (I’m sure one can find a
website that explains this process in detail, so I won’t go into it here).
wonderments (such as
reduced seams) through a process called “slide molding” (I’m sure one can find a
website that explains this process in detail, so I won’t go into it here).
Needless to say, I wasn’t as shocked this time when I opened the box and found 16 plastic sprues, the separately molded lower hull, a bag of Dragon’s separate link Magictracks, and a set of photoetch. The good thing about the slide molding process is it allows Dragon to mold things in plastic that were heretofore only reproduced in the correct proportions via the dreaded photoetch process (maybe someday I’ll learn how to work with this stuff without gluing my fingers together). Other than a couple of mislabeled parts (e.g., A59 and A61), the instructions are relatively easy to follow, although there are 23 separate assembly panels. I advise keeping a pencil close by and crossing off each part or subassembly to avoid confusion if you are like me and take a while to build a model like this. In addition, you will end up will a boatload of leftover parts that are for other Panzer III models or the one version you do not construct from this kit.
The early Tamiya Pz.Kfpw.III was the first armor kit I built upon returning to the modeling hobby in the early seventies from a long hiatus, but I can tell you that this kit far surpasses the Tamiya kit: if for no other reason than the parts count (if I recall, I built the Tamiya kit in an afternoon – of course, I had much more energy and better eyesight in those days!).
| CONSTRUCTION |
 Like
most of my armor kits, I like to build in subassemblies, and this kit was no
exception. Per the instructions, I started with the lower hull and suspension
system. These latest Dragon Smart Kits include the torsion bars in the
suspension system. I also assembled the road wheels and put them aside to dry.
Once I had the finished the lower hull and the rear of the tank, I placed all
the road wheels, the return rollers and the drive and return sprockets on the
hull, but did not glue them.
Like
most of my armor kits, I like to build in subassemblies, and this kit was no
exception. Per the instructions, I started with the lower hull and suspension
system. These latest Dragon Smart Kits include the torsion bars in the
suspension system. I also assembled the road wheels and put them aside to dry.
Once I had the finished the lower hull and the rear of the tank, I placed all
the road wheels, the return rollers and the drive and return sprockets on the
hull, but did not glue them.
The next subassemblies were the left and right fenders. There are quite a few parts on each of these, so I tried to take my time and make sure that I didn’t miss anything. I like to glue the tools on the tank and then hand paint them later.
I then assembled the rear deck. This is where I used the first photo-etched parts: the grill covers for the side engine intakes. The next subassembly was the front glacis plate. The next subassembly was the middle top of the hull that supports the turret.
At this point, I decided not
to construct the spaced armor version, but did opt for the long barrel 5cm Kw.K
L/60 main gun. I assembled the gun, which is complete all the way to the breech
mechanism, and then mounted
it to the turret. I then assembled the turret as the final subassembly.
and then mounted
it to the turret. I then assembled the turret as the final subassembly.
At this stage, I decided to tackle the separate link tracks. I used methyl ethyl ketone (MEK) to glue the long straight lower sections of track, then switched to regular plastic cement to build the sections of track that would bend around the drive sprockets. I then assembled the top tracks, using a few reference photos to try and get the right amount of track sag in for a stopped vehicle. I ended up with about 5 separate sections of track for each side (this is important later on when you assemble the painted tracks).
I essentially built the kit straight out of the box, except for the antenna. I used the kit supplied plastic antenna, but decided it was too thick, so I clipped it off, drilled out the antenna base, and then replaced it with a length of guitar string that was more appropriately sized.
| COLORS & MARKINGS |
Once I completed all of the
subassemblies and the tracks, I was ready for the paint shop. I opted for the
standard panzer gray paint scheme (I was a little weary of the German three
color camo scheme). All of the subassemblies received a good spray coat of
Pactra Panzer Gray (yes, this paint bottle is over 25 years old, and it still is
good!). I painted the tracks with Pactra steel. By the
 way, I am finally using
my Iwata airbrush after 30 almost exclusive years using a Paasche, and I am
beginning to like the brush.
way, I am finally using
my Iwata airbrush after 30 almost exclusive years using a Paasche, and I am
beginning to like the brush.
Once everything was dry, I tackled the rubber on the road wheels and return rollers with a Testors acrylic paint marker. This seems to work fairly well on these and makes the job go a little quicker than it does using a paint brush.
I next gave the tracks a shot of dark brown, but not a thorough coat. I then lightly sanded the track cleats to give them that worn look, but I wasn’t satisfied with the result, so I took a silver artist pencil and marked all of the cleats plus the outside parts of the links to provide a better bare metal look.
I then assembled all of the subassemblies, and then used superglue to glue the track sections on the vehicle. Once these are glued on, you can then superglue all of the road wheels and drive sprockets on the tank, but leaving them unglued helps align and position the tracks as you assemble them.
 I decided not to gloss coat the
entire vehicle, so for the decals, I placed a puddle of Future Floor Polish
where each decal was to go, and then slid the decal into those puddles. This
works really well, and actually obviates the need for setting solution.
I decided not to gloss coat the
entire vehicle, so for the decals, I placed a puddle of Future Floor Polish
where each decal was to go, and then slid the decal into those puddles. This
works really well, and actually obviates the need for setting solution.
I then used a small paintbrush
and Model Master Wood paint to paint the handles on the axe and shovel as well
as the jack support box. I painted the rest of the tools on the fenders with
Testors Steel.
I then began the weathering process, starting with a wash of Delta
Creamcoat dark burnt umber acrylic paint (you can get this stuff at any craft
store). Next, I dry brushed the vehicle with Polly S Fantasy Goblin Flesh to
simulate rust (ever since Floquil stopped making their rust wash, I have found
it difficult to locate a paint that actually looks like real rust. This fantasy
paint is about as close as I have come lately). The final weathering was to take
a number 2 lead pencil and rub it on sharp edges where there normally would be
wear to simulate bare metal.
| CONCLUSIONS |
Another great kit from Dragon. For the money, they are about as good as it gets. I highly recommend these Smart Kits to all armor aficionados, but be prepared for a lot of small parts and a little bit tedious construction process. Have fun!!
| REFERENCES |
 1.
R. Stern, “SS Armor: A Pictorial History of the
Armored Formations of the Waffen-SS,” Squadron Signal Publications, Inc., 1978.
1.
R. Stern, “SS Armor: A Pictorial History of the
Armored Formations of the Waffen-SS,” Squadron Signal Publications, Inc., 1978.
2. B. Culver and B. Murphy, “Panzer Colors,” Squadron Signal Publications, Inc., 1976.
February 2008
Thanks to www.dragonmodelsusa.com for the review kit. Get yours at your local shop or have them order it for you.
If you would like your product reviewed fairly and fairly quickly, please contact the editor or see other details in the Note to Contributors.