The British were impressed by
German mobile artillery encountered in the desert of North Africa. These
vehicles were able to keep pace with the tanks they were designed to
support, and could be quickly brought into action.
The most important British artillery piece in early 1942 was the 25 pounder
field gun, and it was decided to mount this on a tank hull. Birmingham
Railway Carriage & Wagon had already used the Valentine as a pilot SPG, and
they were asked to modify the design to mount the 25 pounder. The resulting
vehicle was named the Bishop and was ready for production in mid-1942.
It was simply a 25 pdr gun and 32 rounds of ammunition housed in a lightly
armored box built over the tank's fighting compartment. Though the idea was
good, the Bishop had several major deficiencies: slow speed, limited gun
range (6,300 meters) and high silhouette. At least 100 Bishops were built,
and saw action in North Africa and Italy until replaced by the American M7
Priest and Canadian Sexton.
The box art has a profile of a Bishop pulling it’s
ammo trailer posed against a jet black background. It and the trailer
are in a base color of sand. The Bishop has large bands of red brown
across the turret sides and down the bow. A small black serial no. 53241
is on the sides of the gun compartment and a blue and red square with a
white letter A is centered in the red brown band. This scheme is one
that is offered in the kit. On the scheme illustration in the
instructions a black square with a white 2 that has a white horizontal
bar above the 2 is on the center of the Bishop’s side skirts. These 2
square markings are repeated on the front of the hull. This Bishop is
with the 121st Field Regiment, Royal Artillery, Libya, 1942. The trailer
is just overall sand with no markings what-so-ever.
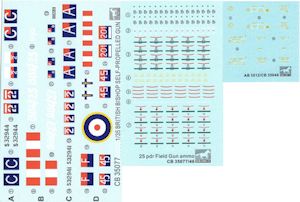
One side panel has illustrations of a British flag, the decal sheets and
the PE fret in full color. The kit is said to be designed for modelers
over 14 years of age. Bronco’s street address, e-mail address and web
site are also given here. The other side panel repeats the box art and
shows a second scheme for an overall sand Bishop and ammo trailer. This
one has a blue square on the center of the sides of the gun compartment.
The upper right corner of this square has a small red square on it. A
large white letter C covers this square. A small black serial number
S32944 appears on this shield towards the front. On the forward end of
the side-skirts is another square that is divided in half with the top
half being red and the bottom half blue. This has a white number 2 on it
with a horizontal white bar above the 2. It is a vehicle of the same
unit as the box art subject. The 2 square insignias appear on the front
and rear of the hull. Again, the traile r
is just overall sand and unmarked. This is the second of the 4 marking
options provided on the kit’s decal sheets.
There are 15 sealed cello bags in the kit that contain what I count as
being 34 light tan parts trees. Wow! This box is jam packed with no
voids around the contents! The single hull part and 2 tires for the ammo
trailer are in their own cellos. A zip-locked type cello holds 3 decal
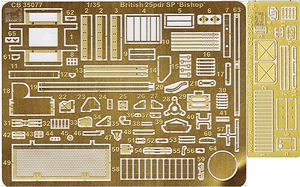
sheets and 2 brass photo-etched (PE) frets. The instructions complete
the kit.
The instructions consist of a staple bound booklet of 36 pages and one
loose sheet all printed on slick coated stock. These are all in 8 ¼” x
11 ½” page format and partially printed in color at times.
Page 1 of the instructions begins with a full color repeat of the box
art subject, followed by the history of the Bishop in English, German
and Chinese.
Page 2 begins with decal application instructions, international
assembly symbol explanations, a color listing for Mr. Hobby, Hobby
Color, Humbrol and Tamiya brands of paints, suggested for use to
complete the kit and READ BEFORE ASSEMBLY instructions in the same 3
languages.
Page 3 gives the parts trees illustrations. Some parts are shown here as
having diagonal lines over them, indicating that those parts are excess
and not needed to complete the kit.
Page 4 continues with the balance of parts tree illustrations and
illustrations of the 3 decal sheets and the PE fret.
Pages 5 through 32 give a total of no less than 62 assembly steps.
Needless to say, this kit is NOT for the novice modeler and definitely
not a week-end project. Steps no. 1 through 52 are for the assembly of
just the Bishop. Steps 53 through 62 are for assembly of the ammo
trailer.
Pages 33 & 34 have 4-views of the 2 schemes for the Bishop in full
color, already described above.
Page 35 has a 4-view of the ammo trailer in full color, already
described.
Page 36 gives thanks to Mr. Phil Greenwood and Mr. Wojciech Garwrych
(Armor Color Gallery) for their assistance with producing this kit.
Below this, is the cover art for a book titled “British Infantry Tank
Mk. III Valentine”, author: Dick Taylor, Armor Plate History #3, part 2.
The copyright date for this kit is 2011.
The loose single sheet in the kit gives 2 more 4-views of other schemes
and markings for the Bishop:
Scheme no. 3: A Bishop with the Royal Artillery Regiment, 6th Armored
Division, Sicily 1943. This one is in overall olive drab. On the sides
of the gun compartment is a triangle divided into red – white – red
equal size vertical bands. Above this is hand painted letters and number
in white: BB6/25. On the front of the gun compartment there is a white
number 69/2 that is not hand painted and to the left of it a small blue
square that has a red square in the upper left corner of it. A white
letter F is on the small red square and a
 white
letter D on the blue. Below this is the white number 45. The
red-white-red triangle is repeated on the front of the hull. A storage
box mounted on the fender is wood color.
Scheme no. 4: A Bishop of the same unit as scheme no. 3, in overall
olive drab with the wood colored storage box on the fender. This one has
the red-white-triangles on the gun compartment sides and forward hull.
The one on the side has hand painted in white BB6/27 above the triangle.
No other insignia appear on it.
The second decal sheet in the kit provides stenciling and bands to go on
the ammo rounds. However, the instructions are vague to say the least
about just where these go. Also, if you load the ammo in their boxes
into the trailer, you will not see a lot of these stencils on the
shells.
A third small decal sheet has yellow markings on it of stenciling that I
cannot find pictured in the instructions and have no clue as to where
these go. Maybe on the wood ammo cases???
My usual procedure with in-box reviews is to tell the names of the parts
on the trees. However, because of the daunting amount of parts (most of
the quite small) this would be a real chore and I know I would miss-name
stuff.
To see an image of the parts from the instructions, please
visit this preview.
This is a very, very detailed model and has full interiors for both the
Bishop and the ammo trailer. The hatches on the Bishop and the doors on
the trailer can all be posed open or closed. The ammo boxes full of
shells can be either mounted each into the trailer or not and the shells
can be either in or out of the boxes for diorama purposes. Neat!
Like I said above, this is not a shake the box kit at all. It will make
up into a real show piece. No figures are included.
Ray
Mehlberger
July 2013
My sincere thanks to Dragon Models USA for this review sample!


 r
is just overall sand and unmarked. This is the second of the 4 marking
options provided on the kit’s decal sheets.
 white
letter D on the blue. Below this is the white number 45. The
red-white-red triangle is repeated on the front of the hull. A storage
box mounted on the fender is wood color.