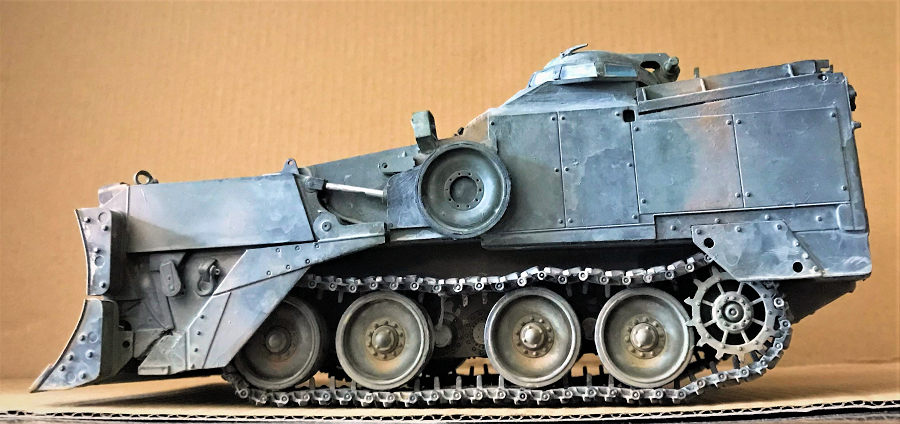
| KIT #: | 03.03.2020 |
| PRICE: | $50.00 |
| DECALS: | Eight options |
| REVIEWER: | Donald Zhou |
| NOTES: | Advantages: Extremely detailed, Esoteric subject, Easy to build. Disadvantages: Individual track links, crew hatch bottom is blocked, a lot of moving parts |

| HISTORY |
Ever since man first got angry at another man, and decided to throw a stone….or is it a wooden branch….or a stick…..or…….Anyways……..No matter what the object being thrown, or later shot out of, arrows, lead shots, bullets etc….. Even later on, far more deadlier explosives such as cannon and howitzer shells, the great Great GREAT equalizer have always been earth or other prepared obstacles such earthen berms, ditches or other defensive positions dug into the good ol’ mother earth itself. To this end, armies and fighting men have always thought of ways to either get around this or find some way to punch through defensive positions thrown up by the enemy, many of which are either ditches or earthen berms. To this end, the first “engineers” was created. They would go in with shovels or other construction implements to either dig their own defensive positions for their fellow brothers in arms or go up front and dig through the enemy’s position so their fellow comrades can advance.
As armies begin to be mechanized, so were the engineers. In World War II, many American engineers borrowed or utilized many civilian engineering equipment such as the Caterpillar D6 bulldozers and backhoes. However, these are not armored or armed. To rectify this, many of the bulldozers were wielded with ad hoc armor to at least protect its crew from enemy fire. After the war, the U.S. eventually developed the ABC or All-purpose Ballastable Crawler to replace the civilian version of the bulldozer in 1958. To replace the ABC, the UET or Universal Engineering Tractor was developed.
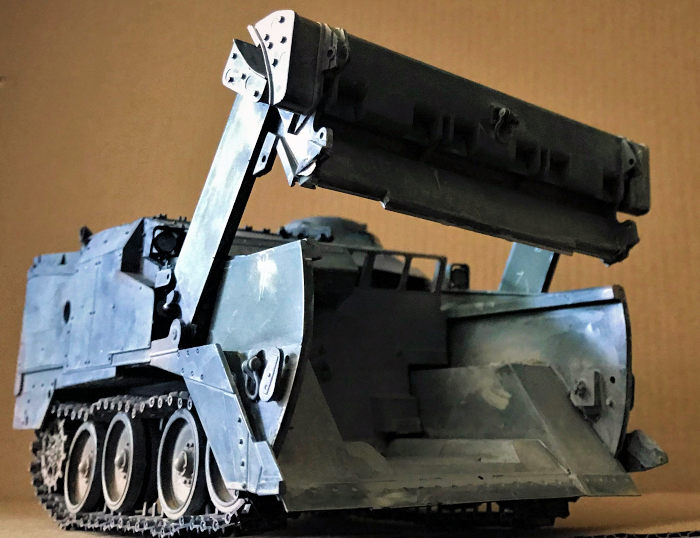 UET was an exciting concept. It had a bowl in front to save
weight and can do the jobs of either the bulldozer or the scraper. It even had
the concept of an armored cargo carrier, carrying some cargo in the bowl or even
carry a squad of infantry in there in a pinch. However, interests sank,
literally, when one sank during a swim demonstration.
However, the Army persisted. Like many things, it was time to dumb things down. The bowl/scrapper and dozer blade was kept. But cargo and infantry carrying ability was dropped. The swim ability was refined and the armor was lightened because there are several requirements, one of the main ones was the new engineering vehicle would be carried by the C-130 and be air droppable and swimmable. To this end, the new vehicle full weight was 21.3 tons. However, empty it was less than 19. To achieve this, the bowl was enlarged. This is because in order to bulldoze effectively, the vehicle need some heft up front to weight down the blade, allowing to dig into the earth and also to absorb the shock of the force transmitted to the arms. However, this heft ran right against the weight saving measures that was required to allow the vehicle to be airliftable by the C-130, air droppable, and the ability to swim. The bowl not only solved this problem, but also can be doubled as a scraper. When arriving at the spot, the entire dozer blade is designed to be raised well over head, exposing the bowl and the scraper blade. The vehicle then lower the front end against the ground, where it can scrape as much as 8 tons of dirt into the 8.7 cubic yard/6.7 cubic meter bowl to weight the vehicle down and to effectively bulldoze. Once done and time to get moving, a powerful hydraulic ram will clear the “apron” clean of dirt. Because of this, the vehicle also can scrape and act as a scooper/backhoe with the bowl. It can bulldoze a clearing, then raise the dozer blade, and scrape the line deeper into a trench for infantry or clear out a ditch for tanks so they can get into “hull-down” position or a larger emplacement for artillery. Or conversely, it can scrape 8 tons of dirt into the bowl, take it to a clearing, push it out, and then pack it with either the dozer blade or even itself to build up a defensive berm.
To provide a smooth ride and help with the bulldozing/scraping operations, the vehicle is equipped with hydropneumatic suspensions. Each of the eight suspension arms are attached to a hydropneumatic actuator arm. The arm can raise or lower the vehicle into three main positions. 1. A bottom lowered and front raise “lock down” position where the vehicle can be transported by either aircraft or systems like the M1070 HETS. 2. Travel position in which the vehicle is even and the dozer blade raised above ground. 3. Digging position in which the front is lowered against the ground where either the scraper or dozer blade can dig into the earth.
Behind the bowl, to the left is the single crewman station with an armored hatch. The vehicle is not equipped with any defensive armament. To the right is the Cummings V903C diesel engine developing 295HP, giving the vehicle a top speed of 30MPH and a range of 200 miles. In the center is the powerful hydraulic ram used to push the dirt clean from the bowl. Behind that is a small open air compartment where other engineering tools and personal belongings can be placed. The vehicle is armored with laminate and aluminum armor capable of defeating small arms and fragmentation fire and can swim at a top speed of 3MPH in optimal conditions through water, propelled by its tracks. To save costs, the entire running gear was borrowed from the M2 Bradley IFV.
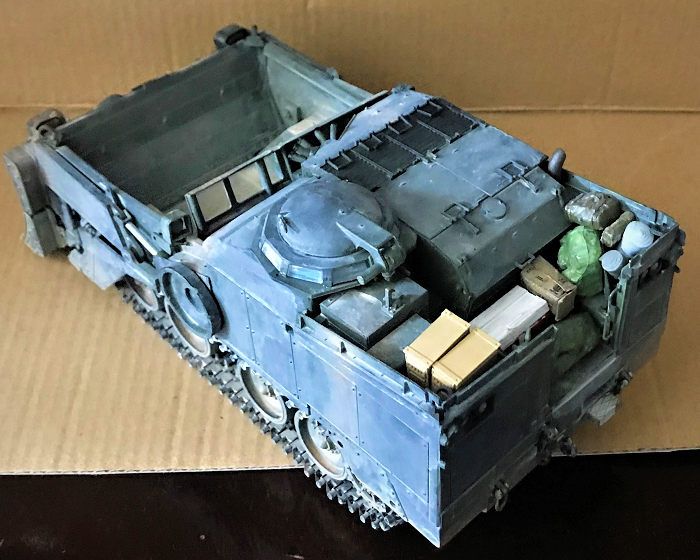 The new vehicle, now designated the M9 Armored Combat Earthmover
first entered service in 1986. A total of 449 Aces were ordered, each
engineering battalions were given a total of 22 vehicles, 7 per company. The
vehicle’s main missions are mobility, to help an armored thrust by breaching
various obstacles such as filling ditches and clearing out berms. Anti-mobility.
This is in reverse of the first mission where the vehicle is now employed to
create the said ditches, berms and trenches etc. and/or any other tasks that
involves either scraping or bulldozing, such as the aforementioned preparing
positions for tanks or artillery.
The Ace's baptism of fire came during the 1991 Gulf War. These were send as soon as other fighting vehicles were ready since they were considered a critical piece of the ground war since Sadadumb Insane’s troops build several lines of entrenchment, trenches, berms, anti-tank ditches etc right in front of what they thought were the main line of assault. Of course, we now all knew the main thrust was the famous “left hook” that took the troops completely by surprise. However, to cover the left hook, a “straight body blow” feint was also carried out. To breach the many defensive measures the Iraqis put up, the M9 was heavily utilized.
There were some hard lessons too. Namely, the Aces operators soon gained a nickname, A Yo-Yo or AUU. This stands for Alone, Unarmed and Unafraid. This literally spells out what the M9 missions entails. The M9 usually go in, with the operator sitting alone inside his small hole, without any weapons to defend himself should he be a target….And he usually is a BIG target since any enemy with two brain cells, once seeing this thing comes up, instantly will realize what it’s up to and will make an effort to kill it! And it doesn’t take much to kill an Ace since its armor is so thin it can only block small arms fire and shell splinters. Yes, it takes two big ones to do this. After the war, a review stated that the vehicle should’ve have two crew members, a driver and a commander sitting at a higher position and armed with a remotely controlled weapon station to defend itself in a pinch. Otherwise, when the thing came under heavy fire, some commanders are forced to send in two Bradley IFV’s to cover the small vehicle! This is why some also felt that some sort of strap on added armors can be given to the vehicle and can be attached if the need arises.
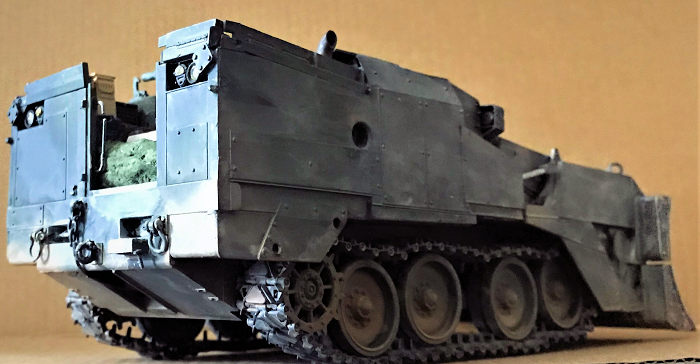 The other is the position of the driver’s position. Namely,
since the right is taken up by the engine, the single crew man is screwed way to
the left and can’t see a damn to his right. Especially at night, this problem is
compounded at night when if the vehicle lifts up while working, the operator
can’t see a thing and have no idea what is happening if any problem arises.
Hence why a second crewman is so recommended at a position right above the
engine at a much higher elevation so he can tell what is going on on the right
side. Also, revolving CCTV cameras also were highly recommended since they can
cover any other blind spots that the vehicle may have when the crew is forced
under his lid.
However, none of these recommendations were taken since money was tight after the Cold War was over. One thing the Army did strengthen was training as it was found out some problems were simply lack of experience in scraping and bulldozing a position. And another is that the swimming ability was dropped since the vehicle, like the early version of the Bradley, was BARELY capable of swimming and usually require the crew time to prepare it. During the Gulf War and later in Bosnia etc, it was found the thing barely if at all, did any swimming. By 2003, the same basic vehicle was used again, to great effect in the Second Gulf War. However, the same problems, namely, the operator is still A Yo-Yo, he is still very much blind on the right persists. However, after the invasion was over, add on applique armor were given to the crews to add strength against IED’s. As for operating under heavy fire, that problem eventually was finally solved by a different kind of monster, a literal monster of a different kind in the M1 ABV, or Assault Breacher Vehicle, which is now known as the M1150 Shredder.
| THE KIT |
See the preview here. Whatever Is said was true…Why took so long? Simple…Those DARN two piece track had me throw a few hissy fit where I put the kit up in the shelf of doom until recently, when I finally worked up the courage to finish it!
| CONSTRUCTION |
Whatever you do, the first thing you do is decide which position you want your vehicle to be in. If you want this as a loadout on a transporter, say the new Meng or Trumpeter’s M911 C-HET or HEMTT hauler kit, then the only option is the first, rear end down, front end up “lockdown” position where the breaks are firmly applied so the vehicle can be chained down to be hauled away. The second is the all level, dozer blade raised above ground self-traveling mode and the third option, the one I chose, front lowered, rear raised digging mode…As you are about to see though, I completely forgot to take the tracks into account and didn’t lower the vehicle low enough with the end result it looked more like traveling mode instead!
The main construction begins with the running gear. The arms, the drive sprocket and wheels are assembled. Again, be sure to check the arms and which pegs you want to use and how to assemble it to the position you like and make sure all the arms touch the ground. Same with the wheels and sprocket. I had to keep on check them throughout the build to make sure the arms and wheels are where they should be. I left the tracks till the end.
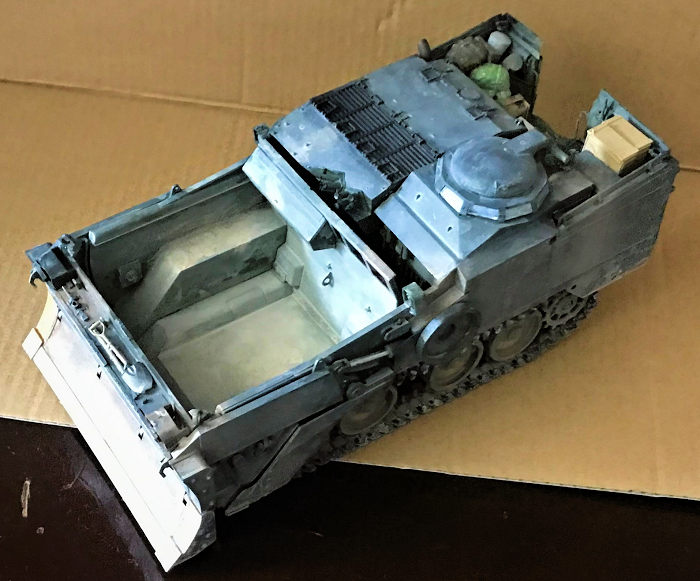 The next is the
“bowl”, the large opening in front of the crew compartment and engine. Again, to
bulldoze, the vehicle would scrape around 3 tons of dirt into this opening to
help keep the vehicle down, add heft and transfer the load to the dirt, instead
of its hydraulic arms. The first to add on is part B25. Becareful and check and
double check since the instruction isn’t clear here and added it wrong, like I
did the first time, will knock the entire top and rear compartment construction
askew! The massive hydraulic ram that would clear the “bowl” and “apron” of dirt
is also assembled at this stage.
The engine and crew compartments are next. Multi-stage assembly. However, most of the parts are large so as long as you follow the instructions, should be no problem. I skipped the two jerry cans until later and only just cement on the crew entry hatch with two very small drops of cement so it can be pried off later since I did not add the clear viewing prisms and just put it on there to facilitate painting. Now, this hatch can be made to be operable but since as mentioned, the hole beneath the hatch is solid, I did not made it operable but instead cement it shut. Afterwards, the big rear end bulkhead plate was added. I skipped the clear tail light lens until later. Just be a note, the rear door B28 was left off most of the ACE’s in operational areas. This is because 1. These are heavy maintenance vehicles due to all the hydraulics inside and the crews removed the door so they can get in and out easy. 2. The door blocked all views to the rear so to clear out view, especially when it comes to clearing and bulldozing operations at night, the crews removed the door also to facility rear end view. I left the tow cable wire and hook until main painting was done.
Side assembly is next. Be sure not to cement the hydraulic linkages E11 as this is designed to be movable.
Then comes the front dozer blade. This assembly is complex since it’s divided into the top and bottom blades like the real thing and can be moved like the real thing. When it comes to insert it onto the vehicle’s side, be sure to carefully insert the hydraulic linkage holes onto the correct links and careful not to cement the side connection pegs so the dozer blade can be swung upwards.
All in all, main assembly is pretty hassle free…The painting and the tracks not so much!
| COLORS & MARKINGS |
I chose the famous “Dirt Diggler” marking! A famous photo of this in front of its brethren, the “Quicker, Picker, Upper, Bounty!” was taken just before Operation Iraqi Freedom. It’s still in its NATO three tone camouflage. Guess the higher ups decided they were not as important so didn’t give the crews their Desert Sand paint….Dirt Diggler was a very dirty vehicle so heavy weathering will also be required. Except the name, it’s also devoid of any unit markings. Guess higher ups ordered them to erase their markings so Saddum wouldn’t be able to guess what unit they belonged to.
Ohh yeah, before I continue, I gotta introduce this to you: http://www.carlspot.org/iraq-at-last/ This contains a very interesting tale about one ACE operator’s experience from the build-up to the invasion of Iraq itself and finally to the “mission creep” after “mission accomplished” where everything started to go to hell! It’s a good and very interesting read about what this guy saw, heard and experienced. I still get a laugh about him learning and getting good at taking a dump out of the moving M9 cause his unit’s order was basically “keep moving no matter what!” (basically, take your pants down, throw on the cruise control, open the hatch, lean out until you are sitting on the bend near your knees in order not to soil your own vehicle, keep both feet on the steering wheel, blast S**T out of your bottom!). It’s long but trust me, very entertaining! It offers some very great “what ifs”…Such as this guy one time, tied a bunch of empty 5-gallon oil drums onto the back of his vehicle to prevent insurgents from climbing on (remember, that back door have been taken off to give the driver a clearer rear view). Why am I mentioning that article? It’s because it contains many pics of ACE’s in action during the Operation and show just how dusty and dirty the vehicle became under those conditions. Anyways…
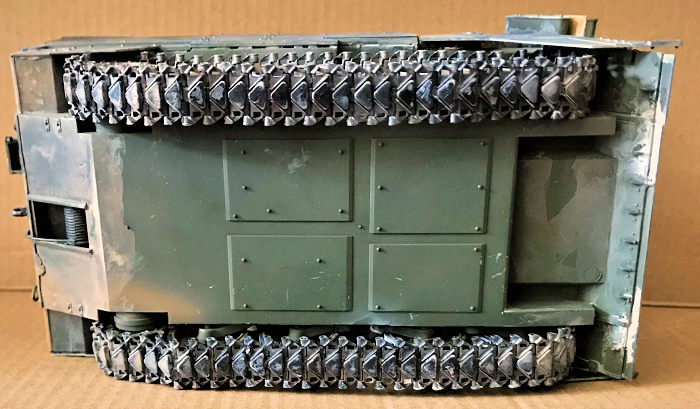 Main painting
started with Tamiya “NATO Green”, this was sprayed on in two coats. Then the
NATO Black and NATO Brown were sprayed following my eyeball…Why? As you about to
see, with the heavy weathering later, it didn’t matter.
Now, the project get put up on the shelf for two years while I work up the courage to build those tracks.
Finally, this February, before the super virus hit, I started with the tracks. It was slow going. Yes, it’s snap tight, but getting them off the sprue, cleaning them up, and then assembly them nearly wore a sore spot in my figure since they are so small! Not only that, the pegs are so small and thin, they kept on breaking, forcing me to leave them in pieces. After one side of 58 was done, I put the thing up on the shelf again until recently, when I finally got it done! Once the tracks are in place on the vehicle, which took a while…Remember they are in pieces, and I had a hard time wrapping them around the first wheel and sprocket, weathering can begin in earnest!
Weathering begin with a coat of Beachcomber Beige, which is very light to denote dust. This is heavily occluded into the bowl area since dust and mud and other grim collect here easily. Then the rest is washed all over the vehicle. From the Dirt Diggler and the above link, all the M9 I saw are dirty and dusty, but barely any paint stripping (except the frontal blade) and no rust. No surprise as again, modern polymer based paints are very resistant to rust or paint scratching. What look like rust on track are actually mud and dust. I really went to town on the bowl area, especially the raise level parts since I would wager dirt especially will gather here so beachcomber beige, khaki, and caramel are heavily used here to denote the various color of earth that get scooped up, and then left here…Ahh, from that link, that hilarious story of how enterprising and quick thinking of some of the crews and their higher ups come up with in using that bowl….In one instant, the author and one of his pals were flagged down along with a command 113 track to a local Iraqi weapon depot. There, the 113 and both M9 were loaded with tons of grenades, AK rounds, artillery rounds, Mortar rounds, RPG’s, etc etc etc. They loaded up the author’s M9 with so much that he had to scream cause it was too full. On the way to out of town, he had to drive at only 20 MPH when he saw this egg carton filled with around 16 grenades started to jump around before falling to the bottom…He was saying HAIL VIRGIN MARY like crazy when that happened…Finally, at the disposal ground, some wise guy started smoking and set off what initially thought was donut shaped styrofoam, which later turned out to be slow burning mortar booster pads that can be inserted on the bottom of a mortar and when fired, will give an extra “OOMPH” to the mortar to boost their range…..The author clearly remembers how the det cords already attached to C4’s to set off the ammo, one of the det cord green plastic outer coverings had melted through enough, that the white explosive powder was showing through………………………………Anyways……………..
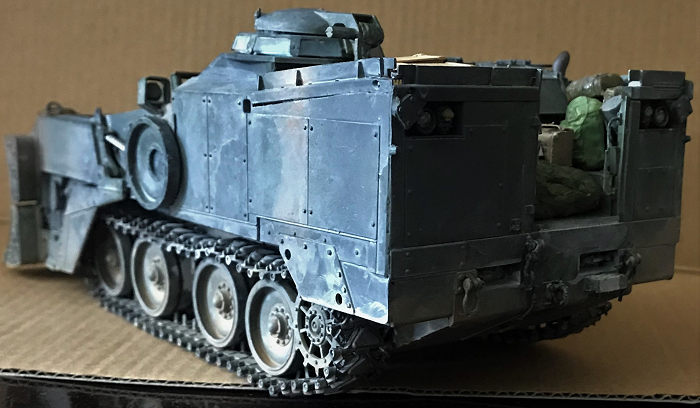 After the
vehicle is dirty enough, I turned to the front dozer blade. From the pictures
taken of Dirt Diggler, its obvious the top of the blade was clean, the bottom,
not so much. Me thinks the crew might had cleaned the top part off since the
paint don’t adhere too well to mud and grime. However, the top of the blade was
scratched to the point the metal underneath was shown. Polymer paints are
resistant to paint scratching, but NOT that resistant and dirt and rocks and
sand etc acts as a grinding agent and soon ground the paint off of the blade. To
this end, to replicate this, I first used silver paint, dabbing just a little,
“scratched” all over the top of the blade until the silver look natural as if
the paint has grounded off. For the bottom of the blade, I first took khaki
acrylic paint, heavily applied it to the bottom, then waited till that is dry,
before taking burnt umber, and apply a somewhat thinned coat to it, this I
waited till it’s about half dry, then took some caramel and smother the bottom
of the blade with it. The end result is the burnt umber, some of the khaki and
the caramel all mixed together to look like rust, and various mud and dirt had
caked all over the blade, which is what the pics showed. After this mess had
dried, I finally put on the “Dirt Diggler” decal since this was applied directly
onto the blade with a spray can. It was too bright so after the decal was dried,
I went over it with a thin coat of flat black to tone it down but no too much
since the name was pretty new when the photo was taken. Finally, I ripped the
crew hatch off, cemented on the clear viewing prism before supergluing it back
in place.
Finally, since nearly all American vehicles are usually loaded with some sort of personal gear and equipment, I raided my Tamiya U.S. Modern Military Equipment set for an extra ALICE pack, some bed rolls, and made a tarp and sleeping bag out of tissue paper (since those are already raided empty), some MRE packets, a small muslin bag, painted a cooler (from my RMF M1 kits), 2 40mm grenade ammo box and then loaded the rear compartment until it’s full. I didn’t load it up too high since the reason the rear door was removed was because it blocked the driver’s view to the rear so you can bet the height wasn’t too great to keep that view clear. Finally, with the dirt and equips, the vehicle looks complete and an operational vehicle. Model Done!
| CONCLUSIONS |
To say this vehicle looks like nothing else on the shelf is to say the least! It doesn’t have a big long cannon barrel, it’s small, and look really vulnerable! Speak volume about most engineering vehicles except maybe the M1150 Shredder..Sigh, gotta get that out of the “Waiting to be finished” line…That pesky mine plow is what’s holding it up right now. But anyways, if you want something esoteric and interesting, then this kit is for you. Just watch the track and interior assembly and you should do fine!
2 February 2021
Copyright ModelingMadness.com. All rights
reserved.
If you would like your product reviewed fairly and
fairly quickly, please
contact
the editor or see other details in the
Note to
Contributors. Back to the Main Page
Back to the Review
Index Page
Back to the Previews Index Page