Pavla 1/72 Robinson R-22
| KIT: | Pavla 1/72 Robinson R-22 |
| KIT #: | 72069 |
| PRICE: | £9.00 |
| DECALS: | Four options |
| REVIEWER: | Carmel J. Attard |
| NOTES: | Multi-media kit. |
| HISTORY |
The
Robinson R22 is essentially a lightweight civil helicopter which would be
competitive in price compared to other rigid wing aircraft then on the market.
The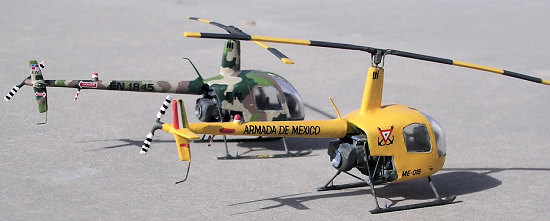 prototype R22 flew for the first time on 22.8.75. The second prototype flew
in early 1977 and both prototypes were used to gain FAA and CAA certification in
1979 and 1981 respectively. 510 R 22s type Alpha were built before the Beta R22
evolved and sold in huge numbers at cut affordable price for private use. . In
1996 the new version produced became known as the R22 Beta and the R22 Mariner
having the option of fitting inflatable float gear in place of the ski
undercarriage.
prototype R22 flew for the first time on 22.8.75. The second prototype flew
in early 1977 and both prototypes were used to gain FAA and CAA certification in
1979 and 1981 respectively. 510 R 22s type Alpha were built before the Beta R22
evolved and sold in huge numbers at cut affordable price for private use. . In
1996 the new version produced became known as the R22 Beta and the R22 Mariner
having the option of fitting inflatable float gear in place of the ski
undercarriage.
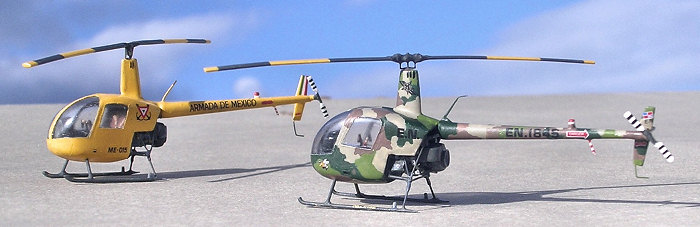
The type also entered into the military market. These included ten for Turkey for use in pilot basic training; the Mexican Navy; and the Air Force of the Dominican Republic besides other buyers. Over 3000 R22 of all versions were built. The R22 remains one of the most interesting and much sought after type in its category and the manufacturer’s intention was to act as a replacement for ageing types as the Hughes 269 and the Bell 47Js
| THE KIT |
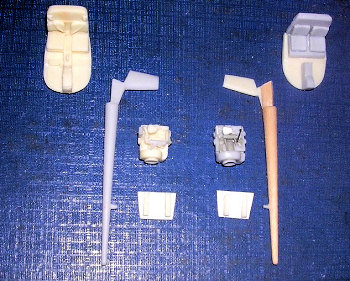
Pavla
Models issued the kit as a multi media type and contains parts with high detail.
The impressive surprise of this kit in my opinion is that besides the extra
bulbous clear canopy made of acetate there is also a good number of injection
moulded parts 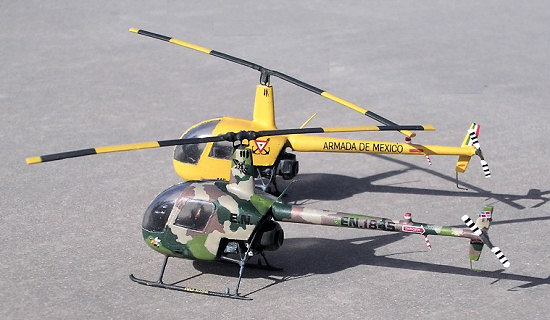 which are repeated in a somewhat greater detail in cream coloured
resin parts. One will only need a certain amount of basic experience to scratch
building of tiny parts and with an extra effort there exists the opportunity to
make a second kit out of a single buy.
which are repeated in a somewhat greater detail in cream coloured
resin parts. One will only need a certain amount of basic experience to scratch
building of tiny parts and with an extra effort there exists the opportunity to
make a second kit out of a single buy.
The R22 kit comes in a new style of packing from the type we are used to with Pavla kits. This comes in a smaller box measuring 7”x51/4”x11/2” being more durable and strong and having a top opening cover. This makes it more modeller friendly and most ideal for holding the parts once out of their sealed polythene packing, thus avoiding the risk of losing any of the tiny parts during handling. The kit has 20 small parts in grey plastic, 10 resin parts and 18 brass etch parts and a 2 part canopy which is in duplicate. The decal sheet is of excellent quality and caters for two civil registered and two military examples, thereby suggesting a variety of attractive colour schemes as explained in the kit preview by Scott Van Aken that appeared some time ago. The injection moulded parts need careful cleaning up. The extra parts that are attached to the runner are indicated with an X mark on the instruction meaning they are not for use since alternative detail parts comes in resin. DO NOT THROW THESE AWAY if you want to make a second R22 like I did.
| CONSTRUCTION |
 In building the kit I followed the instructions sequence of
stages. First I carefully removed the heavy runner from the resin parts and
shaped the part with a file. These consist of parts like the cockpit base,
interior instrument panels, seats, back plate, column and engine parts fitted at
the rear of the fuselage. I did not throw the heavy resin feeder/runner that was
cut from the heli cockpit base as it has the same outline dimensions as the kit
base part and all that was needed was careful shaping with a smooth file, maki
In building the kit I followed the instructions sequence of
stages. First I carefully removed the heavy runner from the resin parts and
shaped the part with a file. These consist of parts like the cockpit base,
interior instrument panels, seats, back plate, column and engine parts fitted at
the rear of the fuselage. I did not throw the heavy resin feeder/runner that was
cut from the heli cockpit base as it has the same outline dimensions as the kit
base part and all that was needed was careful shaping with a smooth file, maki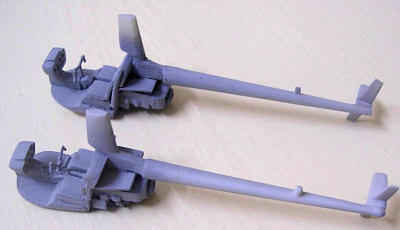 ng
reference to the kit part as you do so. Most of the other parts for the second
kit came from the retained extra plastic parts mentioned earlier. Other items
can be copied using plastic card.
ng
reference to the kit part as you do so. Most of the other parts for the second
kit came from the retained extra plastic parts mentioned earlier. Other items
can be copied using plastic card.
The engine is a sub assembly and is best to make the second
one too at the same time when assembling the kit one. The cockpit interior is
then assembled and the tail boom attached to the rear of the cockpit and on top
of the engine support horizontal firewall. This is just about it as far as the
fuselage goes. All that 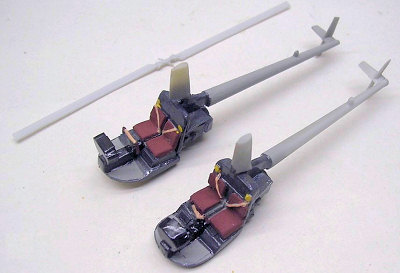 was needed then was to detail painting of the interior
and cut the Perspex canopy to suite and fit in place. The propellers for the
second kit were made from plastic card of same section and width etc as the kit
parts. The tail boom was shaped from the end wooden handle of a worn brush. This
was reduced to size with a smooth file and then cut to required length.
was needed then was to detail painting of the interior
and cut the Perspex canopy to suite and fit in place. The propellers for the
second kit were made from plastic card of same section and width etc as the kit
parts. The tail boom was shaped from the end wooden handle of a worn brush. This
was reduced to size with a smooth file and then cut to required length.
The kit supplies rear engine supports and brackets made of brass etch. I discarded these in preference to using steel pin parts. I used the brass pieces just to obtain the dimensions. In doing so I had my kit having these parts in a round section like the real R22. The fuselage skids for the second kit were shaped from two parts of stretch sprue. It is impressive how detailed the kit engine comes once assembled in spite of the size. In the end the propeller was fitted in place complete with the control links that comes in metal etch items. Aerials were then added to the top front of boom and thin metal wire at the rear as a skid.
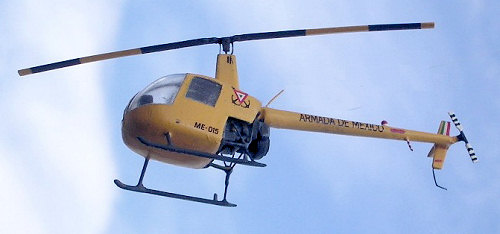
| COLORS & MARKINGS |
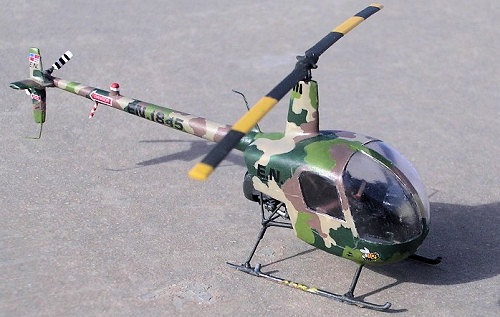 I
have a soft spot for military helicopters and I made mine in the two schemes
representing a Mexican and a Dominican Rep. examples contained in the kit
decals. The scratch built R22 was made as a Mexican Navy one. This was overall
yellow which I applied after the kit had the clear cockpit masked using Maskol,
and applied a white undercoat. I used Humbrol paint for this operation. As for
the Pavla kit, acquiring the correct shades of the four tone camouflage was also
not a problem since the correct shades required consisting of sand and brown,
and olive and light greens were clearly depicted on the colour side views
appearing on the kit box art. Again I used enamel Humbrol but also Tamiya paint
for the brown colours. The engine was then painted overall engine grey like I
did to the interior at an earlier stage and as per instructions.. The engine had
lighter shades of grey to pipes and other fitting creating a contrast in spite
of size. The camouflaged was applied with a hand brush. The two kits were then
given a overall coat of gloss varnish, allowed to dry for 6 hours and applied
the kit decals. The next day both kits were given an overall coat of semi matt
varnish using Revell brand mixed 50:50 in proportion.
I
have a soft spot for military helicopters and I made mine in the two schemes
representing a Mexican and a Dominican Rep. examples contained in the kit
decals. The scratch built R22 was made as a Mexican Navy one. This was overall
yellow which I applied after the kit had the clear cockpit masked using Maskol,
and applied a white undercoat. I used Humbrol paint for this operation. As for
the Pavla kit, acquiring the correct shades of the four tone camouflage was also
not a problem since the correct shades required consisting of sand and brown,
and olive and light greens were clearly depicted on the colour side views
appearing on the kit box art. Again I used enamel Humbrol but also Tamiya paint
for the brown colours. The engine was then painted overall engine grey like I
did to the interior at an earlier stage and as per instructions.. The engine had
lighter shades of grey to pipes and other fitting creating a contrast in spite
of size. The camouflaged was applied with a hand brush. The two kits were then
given a overall coat of gloss varnish, allowed to dry for 6 hours and applied
the kit decals. The next day both kits were given an overall coat of semi matt
varnish using Revell brand mixed 50:50 in proportion.
| CONCLUSIONS |
 I enjoyed making the R22 helicopter in fact I recommend this
kit build to anyone who is used to building multi media scale models. Having 60%
extra parts coming in same kit will encourage any one to build a second one like
I did. I found no need to add weight in balancing the kit on its nose as the
forward fuselage is sufficiently heavy. This is a limited run scale model and
the helo fans in particular should grab a sample before it disappears from
circulation
I enjoyed making the R22 helicopter in fact I recommend this
kit build to anyone who is used to building multi media scale models. Having 60%
extra parts coming in same kit will encourage any one to build a second one like
I did. I found no need to add weight in balancing the kit on its nose as the
forward fuselage is sufficiently heavy. This is a limited run scale model and
the helo fans in particular should grab a sample before it disappears from
circulation
January 2008
If you would like your product reviewed fairly and quickly, please contact me or see other details in the Note to Contributors.