AMT 1/72 AC-130U
|
KIT # |
8326 |
|
PRICE: |
@$40 on Ebay |
|
DECALS: |
Two Aircraft |
|
REVIEWER: |
Peter Fey |
|
NOTES: |
Buy an extra tube of putty! |
|
HISTORY |
The AC-130U is yet another variant of the C-130 Hercules airframe, this time especially produced for the USAF Special Operations. Commonly referred to as the 'U-Boat', it is the latest in a long line of heavily armed, side-firing gunships. Its official name is "Spooky II" in honor of the first gunship model, the AC-47D, (all other AC-130s are referred to as "Spectre").
The AC-130U Gunship program consists of 13 new Lockheed C-130H airframes, modified by Rockwell, (now Boeing). Although it still uses the venerable Lockheed C-130 airframe, the AC-130U has one of the most complex aircraft weapon systems in the world today. It contains more than 609,000 lines of software in its mission computers and avionics systems! The improved armament and advanced sensors include the APG-180 fire control radar system, GPS, the ALQ-172 Electronic Countermeasure System, an ALR-56M radar warning receiver, an APR-46A panoramic receiver, and an AAR-44 infrared warning receiver integrated with a series of ALE-40 chaff & flare dispensers.
 The APG-180 fire control radar
offers a dual-target attack capability. With this capability, two targets up to
one kilometer apart can be simultaneously tracked by two different sensors, and
then attacked by more than one of its big guns which include the 25mm Gatling
gun, (capable of firing 1800 rounds per minute), a single-barrel, rapid-fire
40mm Bofors cannon, (capable of 120 rounds per minute) and a 105mm Howitzer,
(capable of firing 6 to 10 rounds per minute). The AC-130U is also pressurized,
enabling it to fly at higher altitudes, above the threats posed by most AAA and
shoulder launched missiles. Higher altitudes also save fuel, allowing for
greater range than the AC-130H. An inflight refueling capability is also
provided.
The APG-180 fire control radar
offers a dual-target attack capability. With this capability, two targets up to
one kilometer apart can be simultaneously tracked by two different sensors, and
then attacked by more than one of its big guns which include the 25mm Gatling
gun, (capable of firing 1800 rounds per minute), a single-barrel, rapid-fire
40mm Bofors cannon, (capable of 120 rounds per minute) and a 105mm Howitzer,
(capable of firing 6 to 10 rounds per minute). The AC-130U is also pressurized,
enabling it to fly at higher altitudes, above the threats posed by most AAA and
shoulder launched missiles. Higher altitudes also save fuel, allowing for
greater range than the AC-130H. An inflight refueling capability is also
provided.
If you’ve been following Operation Enduring Freedom in Afghanistan, you know that this plane has been used extensively to support our Special Forces as well as troops from a multitude of nations. These planes are all assigned to the Air Force Special Operations Command (AFSOC) and serve with the 4th SOS, part of the 16th SOW, at Hurlburt Field, Florida.
|
THE KIT |
 Essentially the kit is AMT's AC-103H repackaged
with an extra sprue for the U model's parts. This means that wings, fuselage,
tail and so forth are the H model parts. It also means that extra work is
required to revamp it as a U model. The kit contains gray injected plastic with
AMT’s normal attention to panel lines. However, this kit must have been made in
Mexico vice Iowa, as there was very heavy flash and monstrous ejector pin marks
everywhere. The parts on the 'U' sprue will need a bit of cleaning to get rid
of some of the crudeness and you can tell at a glance that it appears these have
been added to an H kit. The tail on the U model is different from the H model,
so the fuselage must be cut to mate the U model part. In addition, the 20 mm
five barrel cannon from the H sprue is chopped to make the 25 mm six barrel
cannon for the U model.
Essentially the kit is AMT's AC-103H repackaged
with an extra sprue for the U model's parts. This means that wings, fuselage,
tail and so forth are the H model parts. It also means that extra work is
required to revamp it as a U model. The kit contains gray injected plastic with
AMT’s normal attention to panel lines. However, this kit must have been made in
Mexico vice Iowa, as there was very heavy flash and monstrous ejector pin marks
everywhere. The parts on the 'U' sprue will need a bit of cleaning to get rid
of some of the crudeness and you can tell at a glance that it appears these have
been added to an H kit. The tail on the U model is different from the H model,
so the fuselage must be cut to mate the U model part. In addition, the 20 mm
five barrel cannon from the H sprue is chopped to make the 25 mm six barrel
cannon for the U model.
The big bulbous windscreen of the Hercules is crisply molded in clear plastic. However, the side fuselage windows may need to be taken care of as they are poorly done. Instructions are okay but a bit vague on the exact positioning of many of the parts; especially antennas, vents and the guns. Dry fitting is necessary, or you’ll end up in a sticky spot… (Pardon the pun!) Also some parts are wrongly named, for example the fire control center is called the ammunition box.
|
CONSTRUCTION |
 I started off the kit by gluing together the
major subassemblies such as tail, and wings. Right from the start, it’s evident
that this will be a huge kit—the size of the tail is bigger than the wingspan of
a 1/48 spitfire! The finished kit is about 18” long with a 24” wingspan, so I
can’t even begin to comprehend how big the 1/48 kit by Italieri is! While these
were drying, I assembled the interior, including flight deck and cargo floor.
Construction problems were those generally experienced with AMT kits; the fit
was reasonable but needed a bit of extra work to get in place. The cockpit is a
simple affair, w/ raised details on the instrument panel, and three simple
seats. Then it came time to test fit the cargo floor to fuselage… and NO JOY!
I’m not kidding; the thing would not fit on the right fuselage half! The cargo
floor was off by over an inch from where it should have met the starboard
sponson. Because of this, and a general lack of detail, the interior is close
to worthless—the flight deck was so horrendous that I just closed up the doors
and painted the windows black. Because the AC-130U is pressurized I figured I
could get away with closing the cargo ramp thus preventing me from having to
scratch build the entire inside with guns and fire control stations etc… I
know—a cheap way out, but I figured I’d save my sanity.
I started off the kit by gluing together the
major subassemblies such as tail, and wings. Right from the start, it’s evident
that this will be a huge kit—the size of the tail is bigger than the wingspan of
a 1/48 spitfire! The finished kit is about 18” long with a 24” wingspan, so I
can’t even begin to comprehend how big the 1/48 kit by Italieri is! While these
were drying, I assembled the interior, including flight deck and cargo floor.
Construction problems were those generally experienced with AMT kits; the fit
was reasonable but needed a bit of extra work to get in place. The cockpit is a
simple affair, w/ raised details on the instrument panel, and three simple
seats. Then it came time to test fit the cargo floor to fuselage… and NO JOY!
I’m not kidding; the thing would not fit on the right fuselage half! The cargo
floor was off by over an inch from where it should have met the starboard
sponson. Because of this, and a general lack of detail, the interior is close
to worthless—the flight deck was so horrendous that I just closed up the doors
and painted the windows black. Because the AC-130U is pressurized I figured I
could get away with closing the cargo ramp thus preventing me from having to
scratch build the entire inside with guns and fire control stations etc… I
know—a cheap way out, but I figured I’d save my sanity.
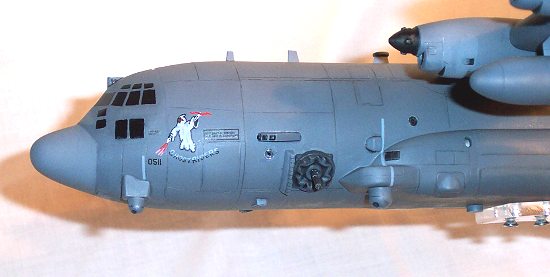
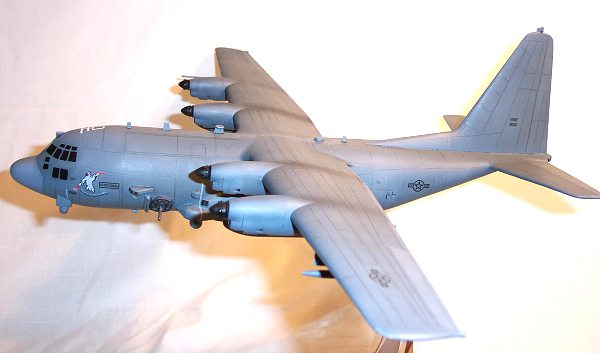
With the fuselage together, I began the
painstaking process of cleaning up the seams. As you can see from the pictures,
I used a lot of Squadron’s green putty to fix the seams on this kit. The new
tail required to make the kit a ‘U’ variant left a seam that was a bear to
hide. So did all the wing seams, the cargo ramp and the sponsons on both the
port and starboard side. However, the wings caused me the most problems as far
as alignment and gaps are concerned. It took me three different attempts of
putty and sanding to get the seams to look right.

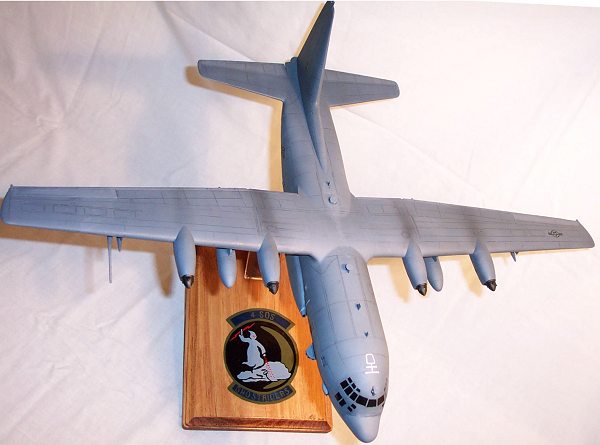
To display my airplanes, I mount them to a wooden base bought at the local craft store for 99 cents. The base is sanded, stained and urethane finish applied. I use a ¼” sheet of Plexiglas cut 1” wide, which is molded to shape in a pot of boiling water. To mount the airplane to the base, I drill holes in both ends of the Plexiglas, and then screw the plane to the base. When screwed to the wooden base—complete with a hand painted squadron logo on it—it really looks quite sharp. It took me several attempts to learn to do all this before painting the model. That way, if a seam bursts when I’m screwing the plane to the stand, I can fix it without having to redo the paint.
|
PAINT & DECALS |
 After taking the plane off its base, I headed for
the spray booth. Did I mention this plane was BIG?! It’s so big that I had
problems painting it. Basically, I could only put one wing in the booth at a
time, so painting it was a definite challenge. I painted the model with Model
Master Gunship Gray (FS 36118). After painting, I sprayed a lighter shade on
the top of the fuselage and wings. Then as I was maneuvering a wing out of the
spray booth, I caught an engine nacelle, and the plane took flight crashing down
at my feet. Of course, the seam across the top of the fuselage and wings that
I’d already had so many problems with split... Auuuuugh! Back to the sanding
shop for awhile…
After taking the plane off its base, I headed for
the spray booth. Did I mention this plane was BIG?! It’s so big that I had
problems painting it. Basically, I could only put one wing in the booth at a
time, so painting it was a definite challenge. I painted the model with Model
Master Gunship Gray (FS 36118). After painting, I sprayed a lighter shade on
the top of the fuselage and wings. Then as I was maneuvering a wing out of the
spray booth, I caught an engine nacelle, and the plane took flight crashing down
at my feet. Of course, the seam across the top of the fuselage and wings that
I’d already had so many problems with split... Auuuuugh! Back to the sanding
shop for awhile…
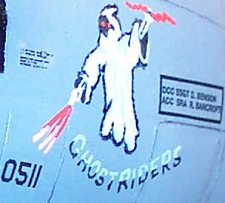 There are two sets of decals for the aircraft.
They are acceptable, but not totally correct for an AC-130U. The tail numbers
are correct for two of the first planes, and that’s about it. The nose art is
not correct for the 4th SOS. I believe they are for the 16th
SOS flying the AC-130H Spectre . To make an accurate 4th SOS
aircraft, I painted a small version of their Ghostrider character just behind
the cockpit, complete with the squadron name underneath. I’ve seen some
gunships that are void of all national markings save the tail number (makes one
wonder what they’re doing, and where they’re flying!), and wasn’t too sure of
the markings for this particular squadron or aircraft, so I used some markings
from the spare decal box.
There are two sets of decals for the aircraft.
They are acceptable, but not totally correct for an AC-130U. The tail numbers
are correct for two of the first planes, and that’s about it. The nose art is
not correct for the 4th SOS. I believe they are for the 16th
SOS flying the AC-130H Spectre . To make an accurate 4th SOS
aircraft, I painted a small version of their Ghostrider character just behind
the cockpit, complete with the squadron name underneath. I’ve seen some
gunships that are void of all national markings save the tail number (makes one
wonder what they’re doing, and where they’re flying!), and wasn’t too sure of
the markings for this particular squadron or aircraft, so I used some markings
from the spare decal box.
|
FINAL BITS |
As I wrapped up the kit, I noticed there were a few antennae and tubes missing from the aircraft fuselage. I added a couple of noticeable ones from spares and stretched sprue, although I left off some smaller items such as the Pitot tubes because I was afraid they’d just be knocked off when I shipped the kit to its future owner. In reality, only a crazed gunship fanatic is going to spot the rest.
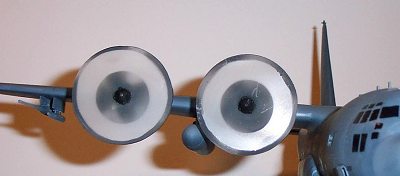 A dilemma I face every time I build a propeller
driven aircraft, is how to simulate it in in-flight conditions. To me, just
leaving the propellers on isn’t really an option because not only do they not
look right to me, but also they’ll also probably be broken when I ship the model
to its new owner. Because of this, I usually just mount the spinner sans
propeller blades, letting one’s imagination fill the void. This time however, I
wanted to try something new. I’ve seen products that replicate the spinning
propellers on aircraft, and thought I’d give it a shot. I cut out four discs
from clear plastic and attached them to the spinners. Then I masked them and
attempted to use my airbrush to replicate the blur of the spinning prop. The
spinner, propeller hubs and prop tips are black, while the rest of the propeller
is a silver finish. I tried to replicate this as best as I could, but the end
result I think just took away from the quality of the kit, (if you look at the
photo, you’ll probably agree with me). In the end, I wasn’t happy with my
effort, and just used my usual spinners without the props.
A dilemma I face every time I build a propeller
driven aircraft, is how to simulate it in in-flight conditions. To me, just
leaving the propellers on isn’t really an option because not only do they not
look right to me, but also they’ll also probably be broken when I ship the model
to its new owner. Because of this, I usually just mount the spinner sans
propeller blades, letting one’s imagination fill the void. This time however, I
wanted to try something new. I’ve seen products that replicate the spinning
propellers on aircraft, and thought I’d give it a shot. I cut out four discs
from clear plastic and attached them to the spinners. Then I masked them and
attempted to use my airbrush to replicate the blur of the spinning prop. The
spinner, propeller hubs and prop tips are black, while the rest of the propeller
is a silver finish. I tried to replicate this as best as I could, but the end
result I think just took away from the quality of the kit, (if you look at the
photo, you’ll probably agree with me). In the end, I wasn’t happy with my
effort, and just used my usual spinners without the props.
|
CONCLUSIONS |
Overall, this is a decent kit. However, it isn't going to win any awards for complete accuracy or ease of build. I spent roughly 20 hours on this kit, with the majority of it spent fixing the seams. On the plus side with a little bit of effort, it makes a nice representation of an AC-130U, and in a size that isn’t going to overwhelm your display case. If you can find it, and are interested in the little known and covered Special Operations Command, this kit is for you.
|
REFERENCES |
Popular Mechanics, April 2002 (Great shot of the 4th SOS nose art!)
http://www.fas.org/man/dod-101/sys/ac/ac-130.htm (this site has links to anything related to gunships!)
If you would like your product reviewed fairly and fairly quickly, please contact the editor or see other details in the Note to Contributors.