
Kitty Hawk 1/48 Jaguar GR.1
| KIT #: | 80106 |
| PRICE: | $20.00 second hand market |
| DECALS: | Four options |
| REVIEWER: | Shanee Cowland |
| NOTES: | Xtradecals 012-48, aftermarket pitot |

| HISTORY |
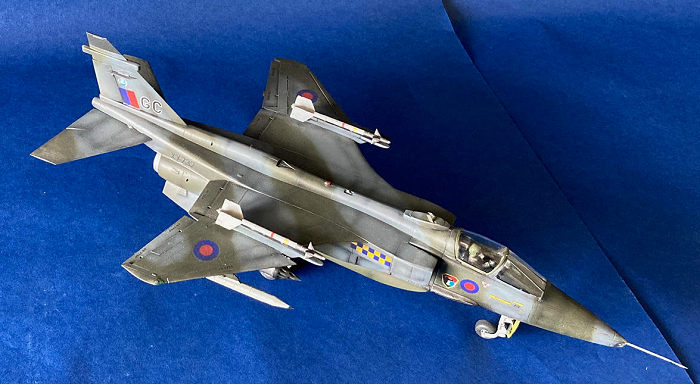 The SEPECAT
Jaguar was an Anglo-French attack fighter developed for use by the French Air
Force and the Royal Air Force. More than a dozen variants were built including
the Jaguar A (French Air Force) GR1/GR3 (RAF) and the Jaguar B/T2/4 (2 seater
trainers). Jaguars have also seen service in the air forces of India, Ecuador,
Nigeria and Oman. Over five hundred have seen service around the world between
1973 and the present day.
The Jaguar has seen service in several theaters including Mauritania, Chad, Bosnia, Pakistan and in Iraq. It was retired from service in France in 2005 and in Britain in 2007 but is still in service in India at time of writing. Its roles have involved tactical strike, ground attack, all weather tactical strike as well as training (two seater version).
During the Gulf War, British Tornados and Jaguars were widely photographed and reported and commonly seen in their dessert pink colors. The GR1 and GR3 Jaguars were easily identified through their wing top hard points that carried AIM 9L Sidewinders.
| THE KIT |
The GR1/GR3 kit is the third of four Kitty Hawk Jaguar kit in 1:48 scale including the French Air Force Jaguar A and the T2/T4, two-seater trainer (which has recently been updated). Two other series of kits are available in the same scale: (Heller/Airfix/Revell) and (ESCI/ ERTL). Iíve built the Airfix Jaguar and found a number of fit challenges so Iíve been looking forward to building this Jaguar for quite a while.
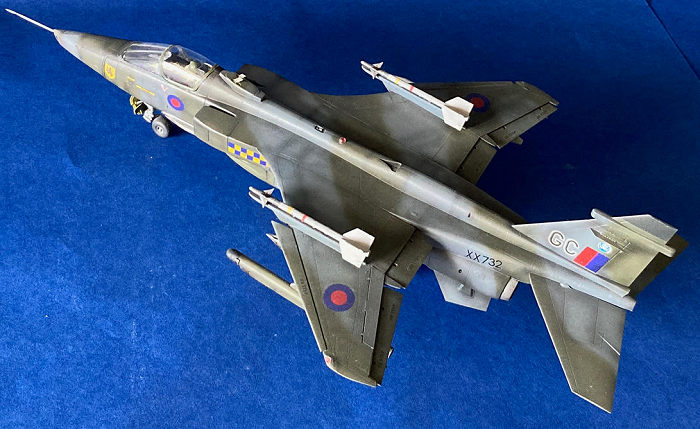 The Kitty
Hawk kit arrived in a surprisingly compact 12 x 8 x 3 ,top opening box parts
were on seven light tan sprues labeled D to J, a clear part sprue, a photo etch
sheet and two sheets of decals. The instructions came in a 24 page booklet with
color front and back fold outs depicting three Royal Air Force color schemes.
GR1 XZ364, Gulf War, (1991), GR1 XX732 54 Squadron, Coltishaw (1979), GR3 54
Squadron. I found out later (as I was building) that the instructions had a
misprint and instructions 19, 20 and 21 were missing. For those I used the pdf
of the instructions found on scalemates.com (see link).
The parts (and there area lot of them) are carefully detailed with light engraving of panel lines. Photo etch parts add fine details to cockpit, engine etc. There are a large array of weapon options including all those that are found on the GR1/GR3 RAF Jaguar and also the French Jaguar A. These include a number of different bombs, AS 30 and AS 37 AGMs, MATRA 155 rockets, Magic 2 and Aim 9L air-to-air missiles. Additionally included are PHIMAT Chaff pod, ATLIS and BARRACUDA ECM pods and centerline fuel tank. One negative in all these riches for your spares box is that the weapons pylons are incorrect for the GR1/GR3. The pylons are correct for the Jaguar A but these are different on the RAF Jaguars.
| CONSTRUCTION |
This kit was purchased Ďusedí on Ebay at a considerably reduced price. A few of the parts had been glued together but almost all of the parts were removed from the sprues in a zip-loc bag. This resulted in the construction being a puzzle as well as a build. The first task was to organize the parts into what I thought that they were based on nothing more than observation. For each sub assembly I gathered the parts for the assembly based on the images in the instructions. This was time consuming and really made me appreciate parts being on the sprues and numbered.
Construction began with the cockpit tub, avionics panel, front landing gear bay and front fuselage. In assembling the fuselage it became clear that fit of the parts were very Ďsnugí fitting. The joystick was missing from my kit so I had to recover one from my stash. In addition I installed a pilot as none was provided with the kit. This came from a Hasegawa US Navy Pilot/Deck Crew Set(not entirely accurate I know but sufficient).
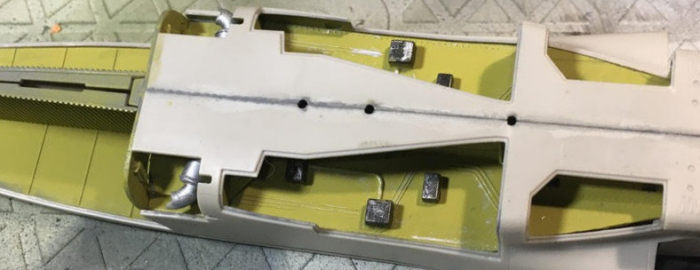 The rear
fuselage left and right sides included spaces where landing gear, gun bays and
air brakes could be installed. This made the fuselage parts themselves a little
on the weak side. Once the bays were fitted, they slotted together in the
fuselage sides acting as something of a chassis in that they provided rigidity
to the skin of the aircraft.
It was at this point that I realized my first mistake. I had decided to not follow instructions and leave the landing gear off until after assembly and painting. Big, big, mistake. I was successful in putting the front landing gear strut into place without breaking or damaging either the strut or the front fuselage parts. The main landing gear was more trouble. I could not get the landing gear to fit onto its attachment in the bay. I was left with the choice of splitting fuselage sides and adding the landing gear properly, or jimmying it into place in a clumsy and ad-hoc fashion Ė which was what I did. Ultimately this proved reasonably successful and the landing gear is reasonably well aligned.
Following the instructions I noticed that they only gave the option of the gun bay doors opened. This was not how I wanted my build and found that the gun bay doors did not fit closed. At first I thought that this was because of the gun mechanism inside the bay. This was removed and I found that it still didnít fit. At this point the only option was to remove material from the bay door until it fit. This is always something I dread as the part tends to go from too big to too small (as it did here). The parts were fitted and filled to a satisfactory level and I moved on.
Each engine was comprised
of seven parts including two photo-etch parts, which went together nicely. Kitty
Hawk designed the Engine bay to be kept open or closed with basic detail on the
outside of the engine. They went together without a hitch. Again, my plan was to
have the engine bay closed. Fitting the engines and closing the bay doors was
fiddly. No matter how much I tried to wrestle each one into place I
 could not
make it fit. Eventually I resorted to removing the detail from the exterior of
the engine to make it fit. An additional challenge was closing the engine bay
door. Ultimately I resorted to clamping and super gluing the engines to the
central divider to hold it close enough for the engine bay doors to close around
them.
The next phase of assembly was the wings. Wings required drilling for the pylon connector pins and went together without any drama. The wings showed a good amount of detail with ore delicate panel lines and riveting. In addition I added the over-wing hard points for the AIM 9s and then connected the wings to the fuselage. Again, the assembly was straightforward. The arrestor hook was comprised of two photo-etch parts. I ditched the length and replaced it with a length of cylindrical evergreen sprue of the same length. It may not be accurate but I believe it looks better.
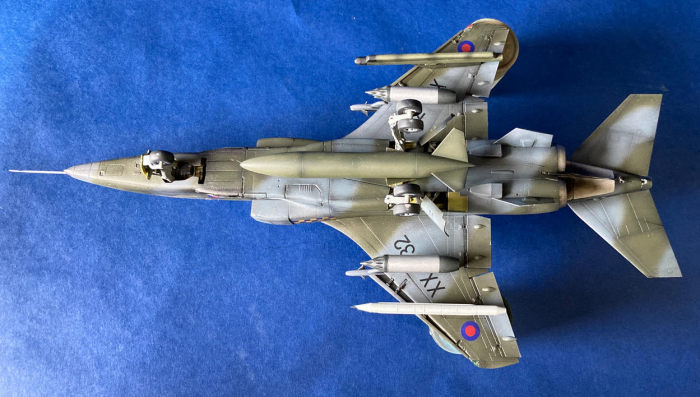
I decided that the armaments I wanted to include on my Jaguar were MATRA 155, PHIMAT pod, AN/ALQ 101 ECM pod and AIM 9s. The eagle eyed among you will note that the MATRAs are on the inboard pylons instead of the outboard ones. I decided to use artistic license here and prefer them that way. As I started putting these together I found that one of the halves of the MATRA rocket tube was missing. I was able to reach out to friends at Eagle Squadron IPMS in Raleigh/Durham. Big shout out to Ibra and Lee who both donated parts to help me complete the build. The ECM pod isnít provided but is shown in the cover art on one of the GR1 Jaguars! This was built using evergreen sprue and the nose of a Laser Guided Bomb cut to shape and filled.
There is an issue with this Kitty Hawk build in the pylons are incorrect. They are the pylons for the French Jaguar A. These are very different to the pylons on the RAF jets. My simple solution was to steal the pylons from the Airfix Jaguar kit that I was building in parallel (and then find pylons from the spares box for that kit).
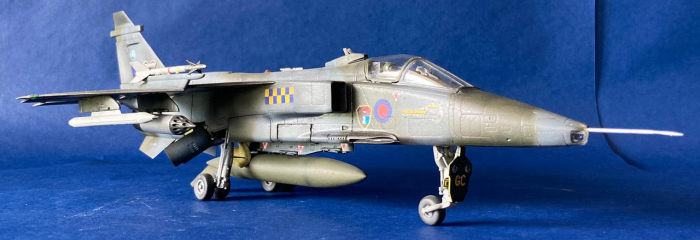 Instead of
just assembling and gluing ordinance to pylons I decided to use small neodymium
magnets to hold armaments in place. This required drilling 1 to 2 mm holes in
both the pylons and the weapons and super gluing magnets into the surrounding
plastic. This worked well for the MATRA, the ECM Pod and the fuel tanks but
proved much more difficult with the more slender armaments. Correctly aligning
the magnets and ensuring that the polarity was correct was tricky to say the
least. Ultimately I glued the AIM 9s and PHIMAT pod into place and utilized the
magnets for the rest.
The kit pitot tube was replaced with a Master-Model AM-48-057 brass alternative (the plastic one was used on the Airfix Jaguar). It required drilling into the point of the nose of the Jaguar at the very end of the build. it may be a good idea to drill this out (from the inside if possible) when attaching the clear end of the nose from the inside at the beginning of the build.
Additional: When peeling away the canopy mask, I was devastated to find that I had not fully masked and some paint had leaked onto the canopy. In trying to clean the canopy, my clumsy fingers instead cleaved it in half along the long axis. DISASTER! After some Facebook model group research I located a contact email and reached out to Kitty Hawk who were very understanding and sent me a replacement clear sprue for a reasonable sum. About a month later I received the part sprue and replaced my damaged canopy.
| COLORS & MARKINGS |
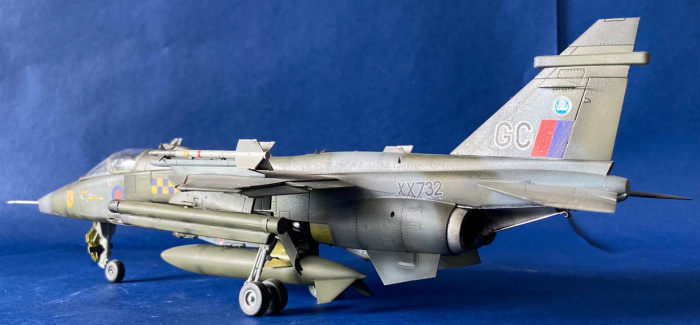 Once
assembly was complete I primed using Rustoleum grey primer, pre shading and top
coating was done using Tamiya Acrylics. Pre shading was done with Flat Black and
top coating with RAF Dark Green and Ocean Grey in a wrap around camouflage
pattern. I elected to go with soft line camouflage instead of hard lines out of
preference and I am happy with the result. As some of the pre-shading
disappeared I post shaded with a mix of Smoke and Flat Black in a ratio of about
eight to one. The top of the vertical stabilizer was masked and painted in NATO
Black.
Applying decals was more of a challenge than I initially expected. The Kitty Hawk Decals are very thin. This made them great for conforming to surface details, but equally delicate and prone to breakage (despite using Micro Set and Micro Sol during application). This was compounded by the fact that the carrier film around lettering and numbers tended to be cut close to the numbers and letters instead of (what I am used to) a rectangle of film. I lost a number of the larger decals to tears Ė some before I even got them on the model. The final markings are a mix of the Kitty Hawk and the Xtra-Decal mentioned above.
| CONCLUSIONS |
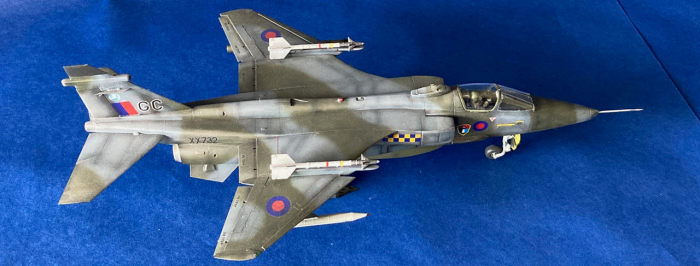 While
building this, I rebuilt the Airfix Jaguar in 1/48 scale. Although both are
representative of the same aircraft, they are significantly different builds.
The Kitty Hawk build is far more complex and provides some great surface
details. The Airfix was much more simple, but also had some real fit issues. The
addition of photo etch makes some of the finer details more crisp and refined.
There is very little tolerance for fit so everything needs to be just so and I
found several times that misfits came back to trouble me later. As mentioned,
deviating from the specified order can mess things up big time.
This is a good build but donít expect a build of Tamiya like simplicity. I enjoyed building it but it certainly isnít my best work. Maybe next time Iíll spend the extra twenty dollars and get one where all the parts are still on the sprues!
Additional: I have heard a rumor that Kitty Hawk will be/have closed their doors. This means that this kit will become more and more scarce. Although it has its challenges, in my view it is the best Jaguar kit available in this scale.
| REFERENCES |
https://en.wikipedia.org/wiki/SEPECAT_Jaguar
https://www.militaryfactory.com/aircraft/detail.asp?aircraft_id=92
https://www.scalemates.com/kits/kitty-hawk-kh80106-jaguar--185771
https://www.scalemates.com/products/img/7/7/1/185771-12-instructions.pdf
http://www.ipmseaglesquadron.org
13 December 2021
Copyright ModelingMadness.com. All rights reserved. No reproduction in part or in whole without express permission.
If you would like your product reviewed fairly and fairly quickly, please contact the editor or see other details in the Note to Contributors.