
J & L Aircraft Models 1/72 Yak-40
| KIT #: | ? |
| PRICE: | $ ? |
| DECALS: | One option, CSA OK Jet livery |
| REVIEWER: | Carmel J. Attard |
| NOTES: | Vacuformed plastic. |
| HISTORY |
 Designed
as a replacement of the Li-3, a licence built version of the DC3, the Yak 40
first flew on 31st October 1966 and over 800 of the little jet liner
are now in use. It was introduced into service in September 30th 1968
with Aeroflot who with nearly 600 of these aircraft operates the largest fleet
of the Yak 40s.
Designed
as a replacement of the Li-3, a licence built version of the DC3, the Yak 40
first flew on 31st October 1966 and over 800 of the little jet liner
are now in use. It was introduced into service in September 30th 1968
with Aeroflot who with nearly 600 of these aircraft operates the largest fleet
of the Yak 40s.
With the Yak 40 in their fleet, Czechoslovakia Aero Linie,
or CSA is the second largest operator of the mini jetliner. The Yak 40 also
proved popular with western operators. Its small size with 40 passenger capacity
makes it a good candidate for use as an executive transport. On several
occasions the type was spotted visiting Luqa in a variety of liveries including
Polish Air Force, Aeroflot, and CSA as well as in a variety of liveries in
service with ex soviet Asian states operators. Other operators are Slovak Air
Force and also the United Nations. Power of the Yak 40 is provided by three
Ivchenko AI-25 Turbofan engines of 33,000 lb of thrust giving it a
 maximum speed of 373mph at
23,000 ft and operates with a range of up to 1,240 miles.
maximum speed of 373mph at
23,000 ft and operates with a range of up to 1,240 miles.
An Air Force which operates the Yak 40 as a VIP transport is that of Bulgaria. The 16th Transport Airbase at Vrajdebna/Sofia, (established as a sole squadron in September 1994) and is the Head Quarters of the 16th Transport Aviation Regiment, acts as a relevant logistic support unit controlled by the Bulgarian AF. Initially the unit was equipped with WWII vintage Ju 52/3m, Fi 156, FW 58B, He 111 and Ju 33 German made transport and liaison aircraft. In 1948 the inventory saw a large expansion and renovation as three Li-2 transports were taken as strength followed by several Po-2 and Yak 12 liaison aircraft. In 1958 six Il-14J transports were introduced alongside two Il-14 VIP configured aircraft. Four years later a special aerial photo survey flight was formed equipped with carious types of camera ships as Li-2, An-14, An-2 and Il-14.
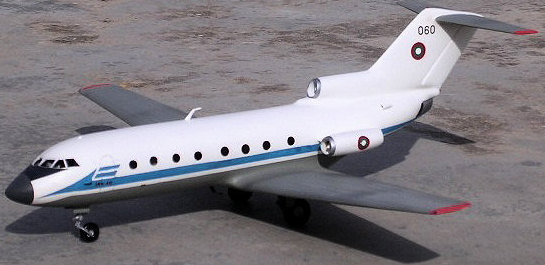
In 1964 the regiment moved to nearby Dobroslavtzi airfield, but its special VIP flight was retained at Vrajdebna. Re-equipment took place in 1970-75 taking on strength Tu-134A and Yak 40 jet powered VIP aircraft, An-30 camera ship and three AN-24 cargo/passenger transport operated alongside. Eventually the strength was increased with acquisition of a Tu-134B, six An-26 and eight Letov l-410. One Yak 40 was delivered to the Bulgarian AFin 1975 which had a serial number 9621547 and Identified as 060. This was sold in September 2000 and therefore withdrawn from service.
| THE KIT |
This is the second Yak 40 kit that I came across to assemble.
The first one being an injection moulded kit by VEB at a scale of 1/100. It had
very few parts and was very basic. The decals were yellowish and I made my own
in the livery as operated by Bakhtiar Air Lines/ Afghan Air Lines of 25 years
ago. The arrival of the 1/72 scale model of the Yak 40 was more than welcome as
it 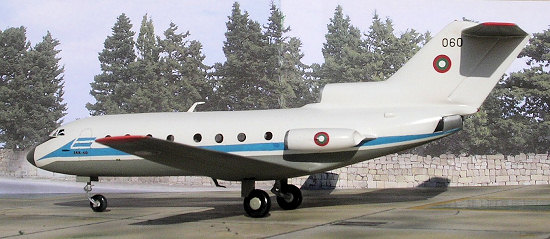 falls in line with the
scale of models that I build. Thanks to Scott Van Aken who gently sent me the
model to build among other kits. The vac formed kit comes packed in a Polytene
bag. There is a 4 page A-5 size folded instruction sheet. This depicts an
exploded view of the parts to assemble once they are cut from the backing
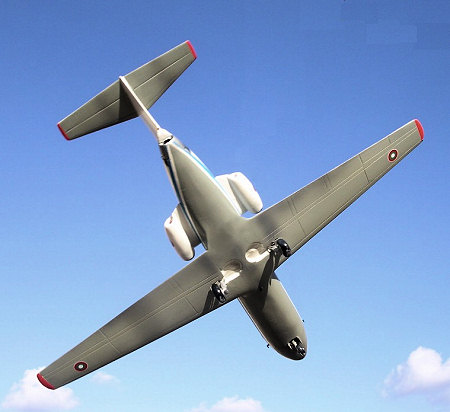
plastic sheet. There is also a most useful front view which gives the angle of
wing dihedral of 6 degrees to the horizontal which was so characteristic to the
Yak 40.
falls in line with the
scale of models that I build. Thanks to Scott Van Aken who gently sent me the
model to build among other kits. The vac formed kit comes packed in a Polytene
bag. There is a 4 page A-5 size folded instruction sheet. This depicts an
exploded view of the parts to assemble once they are cut from the backing
plastic sheet. There is also a most useful front view which gives the angle of
wing dihedral of 6 degrees to the horizontal which was so characteristic to the
Yak 40.
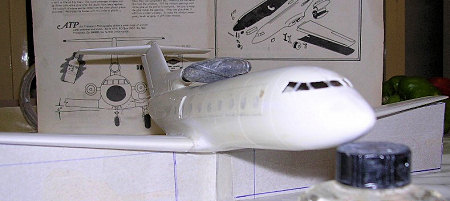
There is also a development view of the main undercarriage doors so that these are correctly cut and shaped from the surplus backing plastic sheet. The kit parts include fuselage and main plane halves, stabilisers, engines with pylons, undercarriage legs and wheels, main wheel well and all the parts totalling 38 pieces. No clear parts for the window were provided but the instructions suggest that the window apertures should be treated with white glue or Kristal kleer. Along with the vacform kit comes a Scale Master Decal sheet catering for a CSA airline attractive bright red and white trim featuring a stylised Czech Flag across the fin with the legend OK below, inspired by the Czech civil registration code ‘OK’.
| CONSTRUCTION |
This is a vac form kit and is made of soft plastic and any
glue is suitable to fix the prepared parts together even though I favour liquid
cement. With the point of a sharp knife, each part was first scored around its
periphery and gently snapped from the flat
 backing sheet by bending the
part off the backing sheet. Light sanding follows along the trimmed edge to
assure a good joint. Strips ¼ inch wide by approximately 1.5 inches long were
cut from plastic sheet and cemented as tabs along the inside of the right
fuselage half for reinforcement cementing 1/8 inches into the side and leaving
1/8 inches extending out as a cementing tab for the left side. The windows are
opened with a drill and then filed to size to conform light impressions which
are marked on the outside of each fuselage half. It is important to count the
exact number of window apertures that there are on the particular Yak 40 you
intend to do as different Yaks have different number of windows. I opened an
extra two by mistake and had to re blank them after all the work. These are in
the end filled with white glue or use kristal kleer for their transparencies. As
for the cockpit windows I worked around the window frames so that I retained
these from the same kit fuselage part. This was a delicate opera
backing sheet by bending the
part off the backing sheet. Light sanding follows along the trimmed edge to
assure a good joint. Strips ¼ inch wide by approximately 1.5 inches long were
cut from plastic sheet and cemented as tabs along the inside of the right
fuselage half for reinforcement cementing 1/8 inches into the side and leaving
1/8 inches extending out as a cementing tab for the left side. The windows are
opened with a drill and then filed to size to conform light impressions which
are marked on the outside of each fuselage half. It is important to count the
exact number of window apertures that there are on the particular Yak 40 you
intend to do as different Yaks have different number of windows. I opened an
extra two by mistake and had to re blank them after all the work. These are in
the end filled with white glue or use kristal kleer for their transparencies. As
for the cockpit windows I worked around the window frames so that I retained
these from the same kit fuselage part. This was a delicate opera tion
but I managed to complete it successfully. I have first drilled four holes to
each corner of the rectangular front window which was then gently trimmed using
a pointed sharp blade to work out the rectangular apertures. Alternatively you
can cut open a slot and add thin frame parts afterwards.
tion
but I managed to complete it successfully. I have first drilled four holes to
each corner of the rectangular front window which was then gently trimmed using
a pointed sharp blade to work out the rectangular apertures. Alternatively you
can cut open a slot and add thin frame parts afterwards.
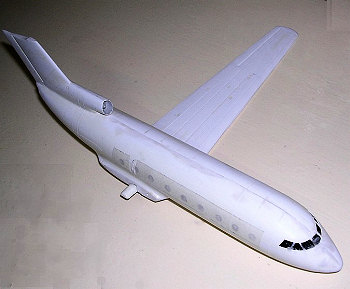
I did not detail the passenger area but instead added two bulkheads to add strength to the soft, thin plastic forming the fuselage. One bulkhead was fixed at the front forming the crew cabin which I added detail to. I referred to photos from www.airliners.net to figure out the pilot and co-pilot office, adding two comfortable seats, instrument coaming, dials and gauges, Control columns, floor, cabin door and other details visible in photo even though much of this detail will be hidden. At this stage and prior to closing the fuselage halves my attention was turned to the area around the tricycle undercarriage, adding front wheel well, main wheel wells and also a closed compartment for the lead weight situated forward. The main wheel wells compartment is provided with the kit and is so well made that it will also act as a guide to give the wings the correct dihedral as part of it protrudes to the wing compartment and when the wings are joined to the fuselage.
The engine inlet and exhaust outlet were opened as also the
nose wheel aperture using round and flat files as appropriate.. Slots were cut
for the wings and engine pods into the fuselage sides. The interior of cabin and
passenger area was painted light grey and instruments were black white and grey.
Crew seats were black with chamois colour seat cushions. Fuselage was closed and
allowed to dry for a number of hours. Wnjg halves am-nd stabilisers were cut,
 sanded down, joined together
and panel lines refreshed by scoring along the ones lightly visible. The side
pod engines were also assembled inserting the front rotor part and also adding a
rear nozzle made out of pen body of corresponding inside diameter to make the
engine outlet. The wings and engines were then joined to the fuselage. A jig was
made out of cardboard in order that the kit will rest on it and allows the wings
to take the correct dihedral as they set. These will give an angle of 6 degrees
to the horizontal as shown in the instructions front view. Joints and fillets
were then filed with plastic putty using Revell Plasto. When dry this will be
smoothened down with sanding paper followed by wet and dry paper. Any
imperfections were attended to and were also primed with a mat light colour to
produce the desired smooth finish. Finally the landing gear parts were cut,
trimmed and carefully assembled as per instructions. Careful study of several
pictures of the Bulgarian AF Yak 40 revealed the antennae mounted over the
fuselage, under the fuselage and at the side of nose.
sanded down, joined together
and panel lines refreshed by scoring along the ones lightly visible. The side
pod engines were also assembled inserting the front rotor part and also adding a
rear nozzle made out of pen body of corresponding inside diameter to make the
engine outlet. The wings and engines were then joined to the fuselage. A jig was
made out of cardboard in order that the kit will rest on it and allows the wings
to take the correct dihedral as they set. These will give an angle of 6 degrees
to the horizontal as shown in the instructions front view. Joints and fillets
were then filed with plastic putty using Revell Plasto. When dry this will be
smoothened down with sanding paper followed by wet and dry paper. Any
imperfections were attended to and were also primed with a mat light colour to
produce the desired smooth finish. Finally the landing gear parts were cut,
trimmed and carefully assembled as per instructions. Careful study of several
pictures of the Bulgarian AF Yak 40 revealed the antennae mounted over the
fuselage, under the fuselage and at the side of nose.
| COLORS AND MARKINGS |
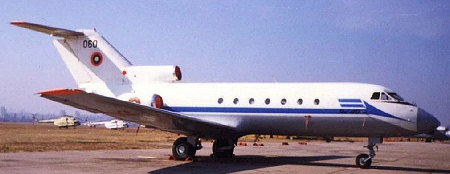 The
smart scheme carried by the military Bulgarian Yak 40 consists of a gloss white
upper surfaces and light grey lower fuselage and wings. Wheel wells were semi
matt white. Stabiliser tips and main wing tips were airbrushed Day-Glo blaze
over a base white coat. The bright blue fuselage trim detail was hand painted
using acrylic Humbrol Hobby Paint No 5043 upon careful masking using Tamiya
masking strips. Leading edges of engines was painted bright silver. Decals were
same size as those carried by Bulgarian AF Sukhoi Su-25. These were present in
reissued KP kits and hence saved my from going for aftermarket decals for same
type. The windows were in the end filled with white glue on the end of a tooth
pick and made water proof by s
The
smart scheme carried by the military Bulgarian Yak 40 consists of a gloss white
upper surfaces and light grey lower fuselage and wings. Wheel wells were semi
matt white. Stabiliser tips and main wing tips were airbrushed Day-Glo blaze
over a base white coat. The bright blue fuselage trim detail was hand painted
using acrylic Humbrol Hobby Paint No 5043 upon careful masking using Tamiya
masking strips. Leading edges of engines was painted bright silver. Decals were
same size as those carried by Bulgarian AF Sukhoi Su-25. These were present in
reissued KP kits and hence saved my from going for aftermarket decals for same
type. The windows were in the end filled with white glue on the end of a tooth
pick and made water proof by s praying
with clear enamel. 060 serial was made using Model Decal numbers of correct size
while the Yak-40 legend forward on the nose area trim came from the kit decal
sheet.
praying
with clear enamel. 060 serial was made using Model Decal numbers of correct size
while the Yak-40 legend forward on the nose area trim came from the kit decal
sheet.
| CONCLUSIONS |
This was another enjoyable build which continue to update my Bulgarian AF section in my collection. My thanks to Scott who made the kit available for this build and also to Kim Margosein of Lansing, Illinois who provided me with the right photos of the type and updated me with the relevant Bulgarian literature for the kit history.
November 2007
Copyright ModelingMadness.com
If you would like your product reviewed fairly and fairly quickly, please contact the editor or see other details in the Note to Contributors.