
1/72 C-2A Greyhound
| KIT #: | N/A |
| PRICE: | N/A |
| DECALS: | None |
| REVIEWER: | Carmel J. Attard |
| NOTES: | Scratchbuilt |
| HISTORY |
The Northrop C-2A Greyhound is the Navy’s only carrier-onboard-delivery (COD) aircraft of high-priority equipment and personnel. The C-2 is derived from the E2 Hawkeye. The first flight of the prototype took place on November 18th 1964, and the delivery of the serial planes started in 1966. The original C-2A aircraft were overhauled, and their operational life extended in 1973. In 1984, a contract was awarded for 39 new C-2A aircraft to replace earlier airframes. Dubbed the Reprocured C-2A due to the similarity to the original, the new aircraft include substantial improvements in airframe and avionic systems. All the older C-2As were phased out in 1987, and the last of the new models were delivered in 1990.
In the transport capability it carries high priority cargo
such as special stores, jet engine components, and afterburners and up to 28
passengers for carrier-o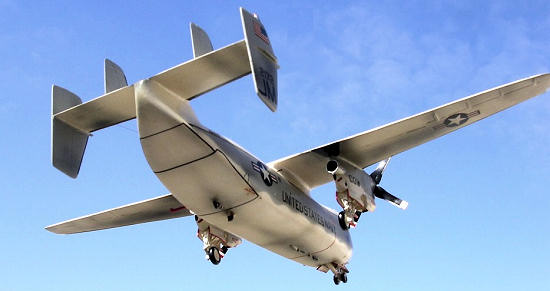 nboard-delivery.
It has the largest cargo payload of any COD aircraft. Litter patients can also
be accommodated. The maximum weight for payload and route support equipment
combined is 10,000 lbs. Cargo tie-down is facilitated by a cargo system that
restrains the cargo from the catapulting and arresting leads encountered during
carrier operations. The large ramp/door and powered winch facilitate fast
turnaround time by straight-in rear cargo loading and unloading.
nboard-delivery.
It has the largest cargo payload of any COD aircraft. Litter patients can also
be accommodated. The maximum weight for payload and route support equipment
combined is 10,000 lbs. Cargo tie-down is facilitated by a cargo system that
restrains the cargo from the catapulting and arresting leads encountered during
carrier operations. The large ramp/door and powered winch facilitate fast
turnaround time by straight-in rear cargo loading and unloading.
The C2A has a wide range of communications and radio navigation equipment and is capable with both military and civil airways on a worldwide basis. Communication equipment includes HF, VHF, and UHD; radio navigation aids include GPS, TACAN, dual VOR, UHF/DF, weather radar, Doppler radar, and two carrier approach systems. It carries a crew of four, a pilot, and Co-pilot, Crew chief and Loadmaster/Second crewman. Greyhounds with upgraded communications, navigation, instrumentation packages, and a Critical Service Life Extension Program (SLEP) will provide cost effective, carrier-on-board delivery for the next 20 years.
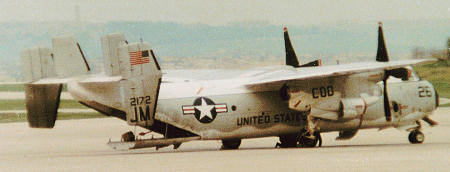
The US 6th fleet aircraft carriers in the Mediterranean often brought in several C-2A Greyhound COD aircraft to Luqa airfield in Malta. These are on routine resupply missions. In the mid 60s the US Navy COD aircraft was the C-1A Trader. In due course the Greyhound took over from the Trader and this increased the COD capability, capacity and efficiency and it will continue to provide the backbone of the US Navy COD aircraft fleet for many years to come. These are currently flown by the west coast squadron VRC-30 and by the east coast VRC-40. In Europe there is VR-24 based in Spain. Other detachments are at Iwakuni, Japan besides other bases in SE Asia.
| THE MODEL |
I started to get interested in the Greyhound, from the scale
modeling point of view, when several of these aircraft started to appear at Luqa
airfield circa end of November 1989. These were all attached to the Fleet
Squadron VR-24 normally based at Rota,
 Spain. They also called from other bases
as Sigonella in Sicily and from carriers attached to the 6th fleet.
The occasion was the Summit between the East and West that was held in Malta
between the then President George Bush senior and President Gorbachev then
President of the Soviet Union. At one time there were no less than four C-2A
Greyhounds parked at the dispersal area close to the control tower. Some were
flown in by female pilots and shuttled to and fro the carrier stationed off
Malta. This was also an opportunity to take close-up pictures of the aircraft
during flight, landings etc.
Spain. They also called from other bases
as Sigonella in Sicily and from carriers attached to the 6th fleet.
The occasion was the Summit between the East and West that was held in Malta
between the then President George Bush senior and President Gorbachev then
President of the Soviet Union. At one time there were no less than four C-2A
Greyhounds parked at the dispersal area close to the control tower. Some were
flown in by female pilots and shuttled to and fro the carrier stationed off
Malta. This was also an opportunity to take close-up pictures of the aircraft
during flight, landings etc.
During the time when I built my model of the Greyhound there was no kit readily available of the type to a scale of 1/72. In due course there was a vacform conversion kit by Falcon of New Zealand. This would merge the rest of parts from a Fujimi and later release Heller kit, which were to appear in shops years later.
| CONSTRUCTION |
 My first step was to get an accurate set of scale plans. It
so happened that an issue of Aviation News Vol 8 No 23 contained the Warpaint
section featuring the Hawkeye and the Greyhound. This was a good start however
required to be updated or revised as the production Greyhound had some
variations made to it which mainly concentrated at the rear upper fuselage in
way of tail planes. The drawing was modified accordingly and I could start
planning to build my kit. This involved building the items from scratch. The kit
basically having a fuselage curved from pine while the rest of the parts I made
out of castings in aluminium using the loose hand moulding foundry technique. I
have already developed this technique previous to this occasion when I made
patterns and
My first step was to get an accurate set of scale plans. It
so happened that an issue of Aviation News Vol 8 No 23 contained the Warpaint
section featuring the Hawkeye and the Greyhound. This was a good start however
required to be updated or revised as the production Greyhound had some
variations made to it which mainly concentrated at the rear upper fuselage in
way of tail planes. The drawing was modified accordingly and I could start
planning to build my kit. This involved building the items from scratch. The kit
basically having a fuselage curved from pine while the rest of the parts I made
out of castings in aluminium using the loose hand moulding foundry technique. I
have already developed this technique previous to this occasion when I made
patterns and 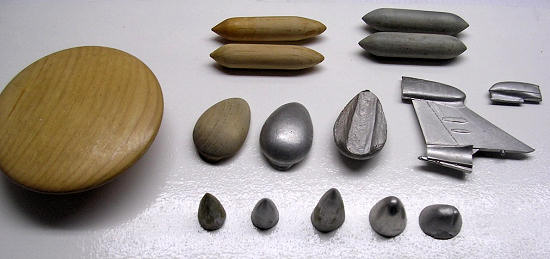 castings to produce belly radomes for the Skyraider, Avenger and
Gannet AEW, besides other conversion parts.
castings to produce belly radomes for the Skyraider, Avenger and
Gannet AEW, besides other conversion parts.
Loose hand moulding involves bench moulding to produce the
one off items required. This is a simple technique consisting of producing a two
part mould, cope and drag half, and pour a suitable alloy to fill the mould
cavity which in the end form the casting required. One can use a split pattern
or a solid pattern. In my case I used solid patterns in which case I had to use
a dummy mould so that I can embed half the pattern in the sand and start to
mould the drag mould. Sufficient parting powder (Separit 77) is sifted over the
pattern and a synthetic type of oil based sand with fine grain size was used as
facing sand. The type used had a trade name, ‘Petrobond’. This was backed with
clay bonded floor sand and rammed sufficiently to promote good green strength in
the mould and at the same time retain sufficient permeability to the mould for
aggress of gas generated during pouring of liquid metal. The
 mould is turned
over and the cope is moulded in same way as the drag mould with a difference
that the cope also contains the down-gate and in-gates running system. The two
part mould is then opened and the pattern gently withdrawn to leave a clean
mould, fee from loose sand or dirt which if left will cause inclusions and other
surface defects. The mould is then closed and secured by weight. The alloy that
I used was aluminum LM6 BS1490.which contains 11-13% silicon content giving the
advantage of good fluidity in view of thin sections such as the main planes and
tail planes, propellers etc. metal was melted in a pit crucible furnace. The
aluminium was cast at a temperature of 723 degrees Celsius after degassing with
sodium fluoride powder. The cast components were allowed to cool, cleaned from
sand. and checked for any surface defects that may be present. The runners were
cut and the component given the final shape with a smooth file. In this way I
produced all the necessary items to assemble an accurate Greyhound.
mould is turned
over and the cope is moulded in same way as the drag mould with a difference
that the cope also contains the down-gate and in-gates running system. The two
part mould is then opened and the pattern gently withdrawn to leave a clean
mould, fee from loose sand or dirt which if left will cause inclusions and other
surface defects. The mould is then closed and secured by weight. The alloy that
I used was aluminum LM6 BS1490.which contains 11-13% silicon content giving the
advantage of good fluidity in view of thin sections such as the main planes and
tail planes, propellers etc. metal was melted in a pit crucible furnace. The
aluminium was cast at a temperature of 723 degrees Celsius after degassing with
sodium fluoride powder. The cast components were allowed to cool, cleaned from
sand. and checked for any surface defects that may be present. The runners were
cut and the component given the final shape with a smooth file. In this way I
produced all the necessary items to assemble an accurate Greyhound.
 The fuselage was built up from flat layers of pine in
laminated construction. In building it in this manner this allowed me to curve
the interior crew space. The pine layers were glued together and given the final
shape to the outside with careful curving and checking with template sections. I
also produced a wooden mould to form the canopy from clear acetate. The wooden
fuselage was given two coats of sanding sealer with smoothening in between and
in the end, until finally a glossy finish is achieved. Other cast items as the
engine nacelle air intakes were drilled open, props were gently thinned down by
filing etc. The fuselage to wings was joined using quick drying araldite. Upon
drying and checked for correct alignment the assembly was further strengthened
using super glue. Smooth finish at joining areas were obtained by shallow layers
of filler and in doing so avoided shallow sinking of the filler itself. The
engine nacelles and wing parts were also joined together using super glue. The
Undercarriage was scratch built from stretch sprue and surplus bits and a set of
wheels of the correct size came from the spares box.
The fuselage was built up from flat layers of pine in
laminated construction. In building it in this manner this allowed me to curve
the interior crew space. The pine layers were glued together and given the final
shape to the outside with careful curving and checking with template sections. I
also produced a wooden mould to form the canopy from clear acetate. The wooden
fuselage was given two coats of sanding sealer with smoothening in between and
in the end, until finally a glossy finish is achieved. Other cast items as the
engine nacelle air intakes were drilled open, props were gently thinned down by
filing etc. The fuselage to wings was joined using quick drying araldite. Upon
drying and checked for correct alignment the assembly was further strengthened
using super glue. Smooth finish at joining areas were obtained by shallow layers
of filler and in doing so avoided shallow sinking of the filler itself. The
engine nacelles and wing parts were also joined together using super glue. The
Undercarriage was scratch built from stretch sprue and surplus bits and a set of
wheels of the correct size came from the spares box.
The cockpit area was attended to by inserting two crew seats and figures, a control column, instrument console. The Perspex canopy already trimmed to size to fit was then fitted with white glue. When it set firmly, I hand painted the window frames in white and masked the clear windows with Maskol. Various antennae, drainpipes, and intakes were fashioned from scrap plastic pieces and added to the model. The fuselage port holes were formed with Kristal Kleer.
| COLORS & MARKINGS |
The completed model was given an overall good base coat of
matt white. The upper surfaces were airbrushed in semi matt white and the rest
of the model in light gull grey FS36440 using Compucolor paints. This includes
fuselage, to of wings, and vertical tail
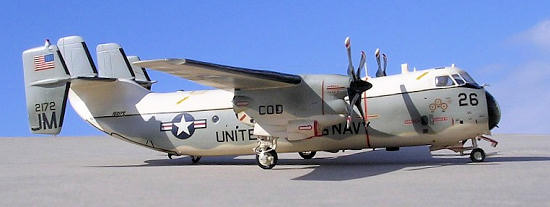 surfaces. Ailerons, elevators, and much
of the fuselage upper were painted white. The wheel wells and undercarriage oleo
were also painted white with details in silver. Interior of wheel doors was
white and had a red periphery.
surfaces. Ailerons, elevators, and much
of the fuselage upper were painted white. The wheel wells and undercarriage oleo
were also painted white with details in silver. Interior of wheel doors was
white and had a red periphery.
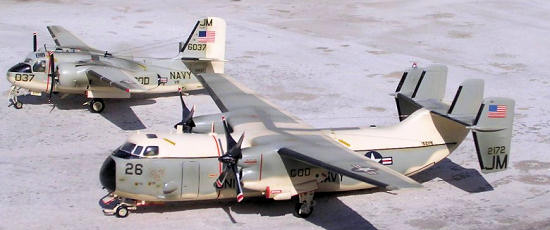
The legend United States Navy on lower fuselage and the star and bars of different size were obtained from two decal sheets by Microdecals. Lettering and number figures came from AeroMaster decal sheets 72-011 and -011b. Dark gull grey walkways were cut from micro decal colour sheet while the US flag and other stencil came from the spares decal box. The black long trim that runs the length of the fuselage was also micro decal strip. Finally the two propellers were painted matt black and the tips having stripes in alternate red and white. These were the last thing to go on the model. The Greyhound was completed as JM2172 / 26 which I captured with my camera during the end of November 1989 and which belonged to the USN squadron VR-24. The completed model was given a final overall coat of semi matt varnish and areas in way of exhaust and weathering made from a mix of varnish with a few drops of engine grey.
| CONCLUSIONS |
 This was a long but enjoyable process to complete, and in
doing so added yet another fully scratch built model to my collection. I often
wondered why this aircraft along with several others that saw operational
service were never considered by the mainstream kit manufacturers. Nevertheless,
why wait for manufacturers to issue the kit and not do as the saying goes: where
there is a will there is a way.
This was a long but enjoyable process to complete, and in
doing so added yet another fully scratch built model to my collection. I often
wondered why this aircraft along with several others that saw operational
service were never considered by the mainstream kit manufacturers. Nevertheless,
why wait for manufacturers to issue the kit and not do as the saying goes: where
there is a will there is a way.
March 2008
Copyright Modeling Madness.com. All rights reserved.
If you would like your product reviewed fairly and quickly, please contact the editor or see other details in the Note to Contributors.
Back to the Review Index Page 2020