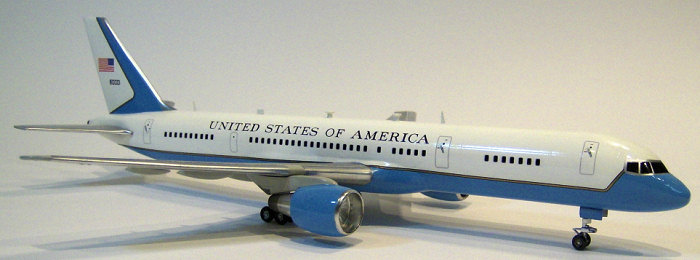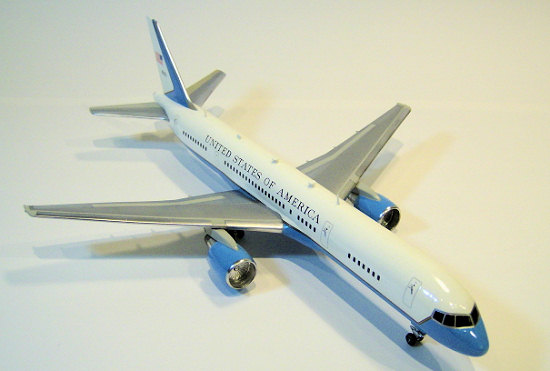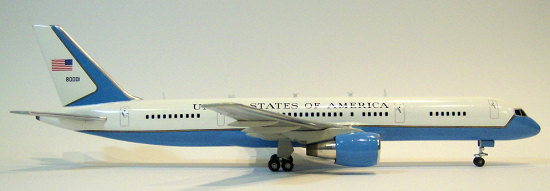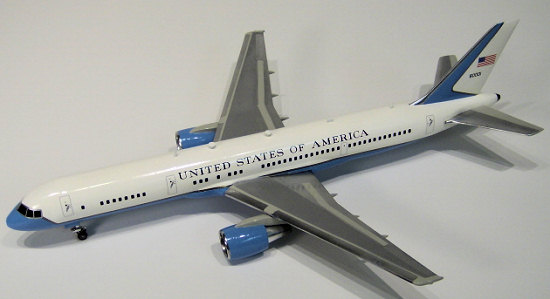
Minicraft 1/144 C-32A
| KIT #: | 14451 |
| PRICE: | $15.99 |
| DECALS: | One option |
| REVIEWER: | John Kauck |
| NOTES: |

| HISTORY |
When the venerable 707-based VC-137 aircraft was retired from the presidential/VIP airlift fleet, the C-32A, a military version of Boeing's 757-200, joined the 89th Airlift Wing and assumed the duties of air transport for the vice president, cabinet secretaries, heads of state, and various dignitaries. Built in Boeing's Seattle plant, four C-32As were delivered to Andrews Air Force base in 1998.
Often dubbed “Air Force Two” because of its service to the vice president and secretary of state, the C-32A is configured for 45 passengers and a crew of 16, and performs missions up to 4,150 nautical miles, or roughly the distance between Washington DC and Frankfurt, Germany. Passengers are provided with state of the art amenities including the latest in communications technologies, a passenger flight information display with real-time global positioning on a moving map as well as increased comfort and storage over its predecessor. The two wing-mounted high-bypass-ratio Pratt & Whitney 2040 engines, producing 41,700 pounds static thrust each, combine with an advanced wing design to provide one of the quietest, most fuel-efficient jetliners in the world.
Given
the nature of the C-32A’s duties, the aircraft is also equ ipped
with TACAN military navigation equipment, a military Identification Friend/Foe
transponder, a UHF satellite communications
radio, secure voice and data transmission capability,
and the Traffic Collision Avoidance System that gives advance warning of
potential contact with other aircraft.
Specifications:
Length: 155 feet 3 inches (47.3 m)
Wingspan: 124 feet 10 inches (38.0 m)
Tail Height: 44 feet 6 inches (13.6 m)
Engines: Pratt & Whitney PW2040
Maximum Takeoff Weight: 220,000 pounds (99,790 kg)
Fuel Capacity: 11,526 U.S. gallons (43,625 L)
Maximum
Range: 4,150 nautical miles; 4,550 statute miles;
7,315 kilometers
Altitude Capability: 39,000 feet (11,885 m)
Cruise Speed: Mach 0.80
| THE KIT |
Despite the knock on them for a lack of fine detail, I like Minicraft kits. The parts generally have minimal flash and usually fit together well. They are fairly easy to build and the kits are generally accurate, albeit simple, renditions of their subject aircraft.
But the
best part of a Minicraft kit is its decals. The subjects are well-rendered.
They are thick, unquestionably opaque, and hold up very well under Micro Sol
solution making it easy to get them to nestle down into and around complex
curves. I also like the fact that Minicraft 1/144 cabin windows are usually
represented with black decals rather than molded in. To me, it’s easier and
 more fun sliding decals than
dealing with all those clear parts and masking, etc. But I find it curious that
the Minicraft cockpit windows are usually clear, as they are on this kit. I
therefore black out the cockpit windows to give the finished plane a more
consistent appearance. More on this later.
The instructions are simple yet thorough, noting when and when not to glue, and indicating right next to the drawing what colors small parts or assemblies should be painted. A good painting/decal diagram is provided on the back page. Best to always check references for proper markings as painting/decal diagrams may have minor inaccuracies, although I found none with this one. Most of the time simply typing in the designation, i.e., “C-32A,” of the aircraft into any Internet search engine’s images search should find plenty of reference photos, as it did with this aircraft.
The kit has three parts sprues and a single clear part, the cockpit windshield/roof. One sprue contains the right fuselage half and upper wing halves. Another contains the opposite parts. And the third contains all the other smaller parts to construct the engines, landing gear, and stabilizers, etc. Some had minor flash to be lightly sanded, but nothing out of the ordinary.
| CONSTRUCTION |
After first gluing a few good size fishing weights into the nose cavity so the plane will sit properly on its tri-landing gear after completion, the two fuselage halves went together well and were clamped and bonded with a few touches of Zap CA super thin glue, letting capillary action draw the glue along the seam.
Next, the clear cockpit window/roof section was attached with thick super glue to fill any gaps, then sanded quite a bit to get the surfaces to completely align after first covering the windshield frame lines with masking tape to preserve them.
After cleaning up all the seams, I re-scribed any sanded down panel lines across the top and bottom of the fuselage with my #11 blade. Checking for any remaining gaps with my silver Sharpie pen along the seams, I spot filled any imperfections with thin super glue and final sanded.
I use the Flex.i.File system to sand my models. I work thru the sticks down to the #3210 Polisher/Finisher file to get a nearly glass smooth finish. This is especially important if your model will have silver and/or metal finishes (which this one does) because silver/metal finishes reveal every imperfection. This is also why I spot check all my seams with a Metallic Silver Sharpie - it shows any little imperfections to be corrected.
 The
front wing halves fit well and were tacked together with thin Zap. After
sanding/smoothing the edge seams, I attached the front wings to the fuselage.
The rear wings were molded as single pieces and required only very light sanding around the edges. I left them off after carefully dry fitting so it would just be a matter of tacking them in place with a tiny drop of CA in the receiving holes after applying decals.
The engine cowlings require some special attention. Like most kit jet engines, these are molded in two halves with the fan blades as a third piece to be set inside the two joined halves. Upon dry fitting I found the leading edges of the cowlings to be way too thick, almost bulbous as compared to my references. Therefore, I left the fan blade piece loose inside when I glued the two cowling halves together and cleaned up the top and bottom seams. Then I sanded not only around the outside of the cowlings, but from the inside as well to bring the leading edges to the proper thickness.
The inside sanding was done with progressively finer grit small rolled sandpaper sheets which I twisted back and forth inside the opening to bring the interior of the cowling up to a finer edge. Having achieved the correct thickness, I then finally glued the fan blade pieces into place inside the cowlings, pushing them from behind with the eraser end of a pencil.
I also attached the engine cowlings to their mounts so that I could fill, sand, and achieve clean seams where they met. Again my references showed that the front top of the engine mounts rose way too high off the engines. I sanded and smoothed each down to the proper height and angle.
Next I cut the under-wing stabilizers and engine exhausts from the sprue, cleaned them up, and left the exhaust pieces out of the cowlings and left the engine mount/cowling assemblies and under-wing stabilizers off the wings for painting separately.
 Caution: The instructions are
incorrect has to how the landing gear pieces fit together. They show parts #19
and #20, the angled support struts, upside down. The “Y” should open upwards,
so to speak. I cut and cleaned all the pieces, i.e., the tire/hubs, struts and
gear doors, then dry fit them to each other and to the aircraft and then left
these assemblies and pieces off the aircraft/wings for painting separately.
Finally, my references revealed that the C-32 has several antennae on the fuselage roof. The kit does not provide any. Since they are a fairly prominent feature, (and given that I had already built the Hasegawa VC-25 Air Force One kit which provided similar antennae to use as examples) I decided to scratch build them. I cut two small triangles and a small rectangle from flat styrene stock for the flat antennae. For the other antennae, I used propeller backstops from the spares box and trimmed and sanded them to fit the bill. I set these aside for separate painting and attachment later after decals, which I used as guilds to the antennae placement.
| COLORS & MARKINGS |
This kit requires both metallics and colors. For the metallics, I used the Alclad ll metal painting system. For those not familiar, the Alclad system consists of an enamel black primer coat, which dries as smooth as glass, over which the metallic carrier coats are sprayed. While the primer requires at least 24 hours to cure, the subsequent metallic carrier coat(s) dries within a half hour and then may be masked and painted over if needed. The carrier can also be sprayed over any high gloss paint coat, as I did here with the leading edge of the white tail.
For the colors, I used enamels. As the instructions indicate it, I used Testor #1108 Blue on the engines and fuselage bottom. I used Testors #1145 Gloss White on the fuselage top. For the light gray on the stabilizers, engine mounts, rear gear doors, and wings, I used Model Master Gloss Gull Gray, FS #16440. And flat black for the tires.
I almost always make actual size copies of the decal sheet. In this case, they particularly came in handy as the gold trim line separating the white top and blue bottom of the fuselage is only 1/16th of an inch wide. I used the copies of the decals as templates to determine where to mask along the separation line as well as for blue section on the tail fin.
 I cut out each entire decal
copy and trimmed it right on the bottom edge of the gold line. I used the decal
door outlines over the scribed door detail on the model to get the required
alignment and taped them in place. I then slightly folded back the decal
template and masked under the gold line. Afterward, I spot checked by holding
my thumbnail at the top of the gold line and folding back the template to see
masking tape to know I didn’t mask too high and that the decal gold line will
cover the line between white and blue when I put them on. For the tail, I cut
out the tail decal gold line copies and used them as templates for the edge of
the masking tape covering the white section. And also I masked the leading edge
of the tail which I previously painted with Alclad Polished Aluminum.
The following is the order in which I primed, masked, and painted the aircraft:
1. White Primer, then White Paint:
· Mask wings
·
Paint entire fuselage and tail
2. Alclad Primer: (In retrospect, I probably could have just painted the entire plane, including the wings gloss white instead of using the Alclad primer.)
· Mask fuselage where the wings meet it
· Spray front wings; top & bottom
· Spray rear wings top and bottom
· Spray engine exhausts
· Spray entire engine mount/cowling/fan blade assemblies
· Spray landing gear pieces
· Spray tire hubs
·
Spray gear
door interiors
3. Alclad Polished Aluminum:
· Mask tail fin leading edge
· Mask around cockpit window frame (and mask windows if leaving clear)
· Spray Front wings; top & bottom
· Spray Rear wings top and bottom
· Spray Tail fin leading edge (the carrier will work fine on the smooth gloss white surface)
· Spray Engine cowling leading edge & fan blades
· Spray Cockpit frame ( and windows if blacking them out, as I did)
4. Alclad Chrome:
· Engine exhausts
5. Alclad White Aluminum (where instructions portray flat aluminum):
· Mask front wings, rear wings
· Mask rear wings top and bottom
· Spray front wings; top & bottom
· Spray rear wings top and bottom
·
Spray landing gear, tire hubs, & gear doors
interiors
6. Alclad Burnt Steel:
· Mask engine mount lower tips, engine exhaust tips
· Mask rear fuselage tip
· Spray engine mount lower tips & engine exhaust tips
·
Spray rear fuselage tip
7. Flat Black:
·
Carefully brush the tires around the aluminum hubs
8. Blue:
· Mask engine cowling/mounts, tail fin, upper fuselage (as explained above and shown in picture)
· Spray engine cowlings, tail section, & fuselage bottom
·
Spray front gear door exteriors
9. Light Gray (FS 16440):
· Mask engine mounts, rear gear doors, front wings, back wings
· Mask front and rear wings, top and bottom, as indicated in instructions
· Spray engine mounts, rear gear doors, front wings, back wings
· Spray stabilizers
| FINAL CONSTRUCTION |
 After everything was allowed to
dry for at least 48 hours, I attached all the remaining parts and assemblies to
the plane, except for the engines and rear wings, which I left off until after
decaling to make that task easier.
Attaching the landing gear, struts, and gear doors, etc., with just a tiny drop of super glue is an extremely delicate task. Precise placement of these often tiny parts without unsightly gobs of glue is always difficult at the 1/144 and smaller scales. I find the use of a “third hand” indispensable. Available at most hobby shops and on-line, it is a small stand with a heavy iron base and one or more ball joint mounted arms with alligator-type spring clamps to hold a part in any angle required. I use them in combination with plastic hemostats (i.e., scissor clamps,) so as not to scratch the part, to position and then hold these small parts in place while the super glue dries, as using super glue accelerant will mare the finish and maybe even dissolve surrounding paint.
Again, to make it easier to put on the decals, I attached the engines and the rear wings after decals. They went on with a tiny drop of super glue in each of the receiving holes, placed with a toothpick, and then held in place a few moments. On this kit, the engine mounts are specific to each side of the plane so make sure to place them on the correct wing. The mounts fit to the wings quite well on my kit. However, yours may not be the same. The engines are so prominent on this aircraft that proper alignment is crucial to a good-looking finished subject.
As mentioned, the kit provided excellent decals. Again, for some reason Minicraft provided cabin window decals but clear cockpit windows. I used black decal stock and my dividers to make black decal windows to fit into the scribed cockpit window lines within the aluminum painted window frame area.
Next, I placed the flags and tail numbers on each side of the tail fin. Checking my references, I found the flags were pretty much right in the middle of the tail fin. Using my dividers, I ensured the space between the top of the tail fin and the top of the flags was an equal to the space between the base of the tail fin and the bottom of the flags. This ensured both were in the same spot on each side. Then I used the dividers to make sure the tail numbers were the same height from the base of the tail fin on each side.
The
fuselage decals are delivered in 4 large sections, 2 for each side, with half of
the “United States of America” above half the windows/doors above half the gold
trim line. I se parated the
gold trim lines from the windows/doors and words above them and laid the lines
down first all the way around the plane. I then trimmed away the excess clear
carrier film from below the windows and between the front door and first window
and between the rear door and last window leaving as little clear carrier as
possible, i.e., only what’s necessary to keep the words/windows together.
I used the scribed doors to properly align the decals as I laid them down. The horizontal scribed panel lines helped with the horizontal alignment of the words which are just about 1/32” above the closest panel line beneath them.
After letting the decals dry over night I attached the engines, the rear wings, and the antennae, using the decals as reference points for the antennae placement. I then gave the entire model a coat of Future to give it a gloss finish.
| CONCLUSIONS |
While technically not a presidential aircraft, I felt the C-32A, “Air Force Two” rounded out and completed the theme.
I enjoyed the kit. It’s a relatively easy kit to build with the only pain points being the engines and some slightly tricky masking and painting, which should be a good challenge/practice for a beginner and a fun build for the intermediate (me) to expert modeler.
| REFERENCES |
· Planes of the Presidents: An Illustrated History of Air Force One; Bill Holder; Schiffer Military History Books, Atglen, PA, 2000
· Various/numerous web sites for reference photos, generated by search engine entries on each plane’s military designation, callsign, and/or nick name. As mentioned, I generally use the internet for my reference photos, particularly for a fairly popular aircraft such as this. Just type C-32 into Google Images and scroll through the results and you’ll get at plenty of good photos from many angles. Save the photos (right click on them and click “save photo as”) to your hard drive, then just zoom in on the area you want. Pay particular attention to the landing gear as the instructions are wrong.
Happy Modeling!
January 2008
If you would like your product reviewed fairly and fairly quickly, please contact the editor or see other details in the Note to Contributors.