
Tamiya 1/48 F-117A Nighthawk
| KIT #: | 61059 |
| PRICE: | Around $45 SRP |
| DECALS: | Three options |
| REVIEWER: | Scott Lyle |
| NOTES: |

| HISTORY |
One of the most painful lessons learned
by the US Air Force during the Vietnam War was that its aircraft were very
vulnerable to Soviet-designed radar-guided guns and anti-aircraft missiles.
During the 1970s Air Force planners began to analyze ways for its
aircraft to survive in that environment, and the concept of making aircraft less
visible to radar rose to the top of the list.
In 1976 a top secret project, codenamed Have Blue, was begun to study
different ways to do that.
The idea of reducing an aircraft’s radar signature had been around long
before the 1970s, but aerospace technology was never advanced enough to allow
truly stealthy designs to take shape.
Advanced designs of the 1950s and 60s like the U-2 and the SR-71 did
feature low radar cross sections, but they tended to rely heavily on their high
speed and high altitude capabilities to escape detection and
 countermeasures.
By the mid-1970s the analytical abilities of computers had grown to the
point where engineers were able to contemplate the design of a truly low
observable aircraft that would be very difficult to detect at normal combat
altitudes.
In 1975 Lockheed
engineers used computer programs to design a “faceted” airframe, the surfaces of
which would be set at various angles to direct radar energy away from the
aircraft instead of back to the receiver.
This technology seemed to hold the highest potential for the creation of
a truly stealthy aircraft - if it could be made to fly.
In 1976 a contract was awarded to Lockheed to develop two such low
observable prototypes.
They were
scaled down versions, just 60% of their full size, and they were constructed in
Lockheed’s Burbank plant in just a few months using off-the-shelf components to
save time and money.
The engines
were General Electric J85 engines without afterburners, the main landing gear
were borrowed from the A-10, and other internal systems from other existing
aircraft were also utilized.
The
prototypes flew late in 1977, and testing showed that the aircraft were highly
difficult to detect by ground-based and air-based radar alike.
During 1978 funding of a full-sized aircraft, now designated the F-117A,
was authorized by Congress under the code name Senior Trend.
The stated mission of the new aircraft was the precision attack of high
value, highly defended targets in total secrecy – and almost always at night.
Testing of the secret aircraft was performed at the former Sandia Labs
nuclear testing site in the northern part of Nellis AFB in Nevada.
The Air Force rebuilt the site and renamed it the Tonopah Test Range just
for the new F-117 program, and Lockheed proceeded with the construction of five
full-scale aircraft.
One of the
prototypes first flew in June 1981, and soon Congress authorized the
construction of fifty-nine aircraft, which began in October 1983.
A secret unit, the 4450th Tactical Group, was formed in
October 1979 just for the F-117A.
Based at Tonopah the group eventually formed four squadrons and trained with
their still secret aircraft throughout the 1980s until it was reformed as the 37th
Tactical Fighter Wing in October 1989, by which time the USAF lifted the veil of
secrecy and admitted to the world that the fabled Stealth Fighter existed.
Just two months later the F-117 would receive its baptism of fire when it
was used to attack targets in Panama during Operation Just Cause.
Undefended skies such as those over Panama would provide no comparison
for what was to come however.
 On August 2, 1990 Saddam Hussein ordered his armies to roll into the
unsuspecting country of Kuwait.
With worldwide condemnation as usual meaning nothing to a despot, US President
George HW Bush ordered the Pentagon to begin planning a rapid but overpowering
response aimed at destroying the Iraqi forces and hurling them back into Iraq,
else they could march into Saudi Arabia and occupy that nation’s huge oil
reserves.
Soon US and Allied forces
began moving to Saudi Arabia and on August 13, 1990 the 37th TFW was
ordered to send the 415th Tactical Fighter Squadron, consisting of 22
jets, to the Middle East.
Doing its
part to support Operation Desert Shield (the operation covering the buildup of
forces in the desert), the unit trained and gathered intelligence about its
likely future Iraqi targets throughout the fall of 1990.
And then finally, on the night of January 16, 1991, Operation Desert
Storm began.
The opening strikes of the war were executed by the F-117A, flying
directly into the teeth of perhaps the most heavily defended airspace the world
had yet seen.
Saddam Hussein had
spent a fortune on a state of the art Soviet air defense system that consisted
of some 16,000 radar-guided Soviet SAMs and even more anti-aircraft artillery.
Coalition intelligence also estimated the Iraqi Air Force possessed
roughly 750 combat aircraft dispersed around the country.
Despite this the allied air offensive was remarkably successful, in no
small part due to the F-117.
 Though
the F-117 force made up just 2.5% of the American aircraft in Iraq, it attacked
more than 40% of the enemy’s strategic targets, all without losing a single
aircraft.
The achievements of the
F-117 will go down as one of the greatest feats of military aviation of all
time.
In April 2008 the Air Force retired the F-117 from service, ending it’s
roughly twenty-five year long career.
At the time the rationale for retirement was the pending introduction of
the F-35 Lightning II.
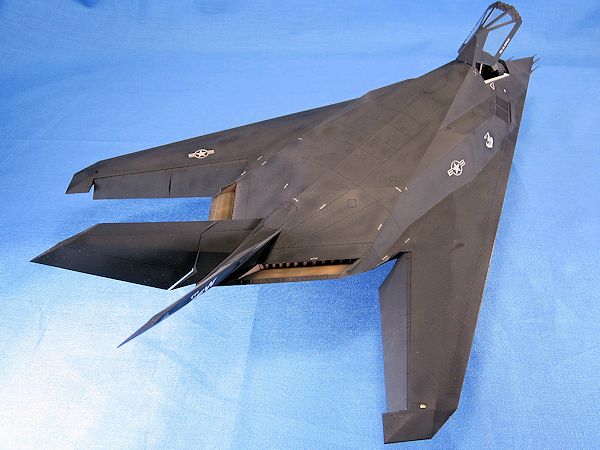
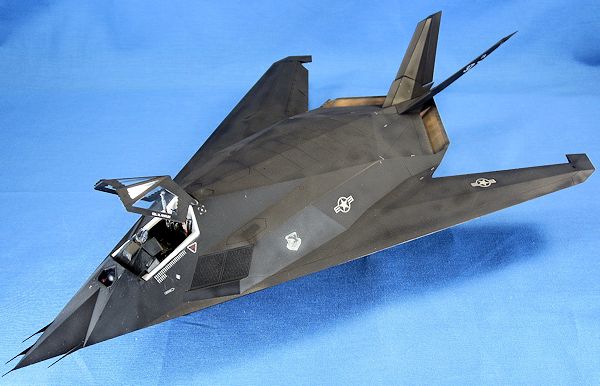
The F-117 has been on my “to-build” list for a while now. About ten years ago I had the Monogram kit in my stash ready to go, but I opted for other kits and eventually sold it on eBay. Recently I picked up the Tamiya version, and once I read about the exploits of the real aircraft I became more interested in it than ever. The Tamiya kit provides markings for the “Toxic Avenger”, the aircraft assigned to Colonel Alton Whitley who was the CO of the 37th TFW while stationed in Saudi Arabia. Whitley flew the aircraft in the second wave of attackers on the first night of the war. The Toxic Avenger would be flown for 35 missions during the conflict. I decided to model that aircraft.
| THE KIT |
Building a
Tamiya kit is akin to pure modeling pleasure for many of us, and it starts with
opening the box.
There actually
aren’t an overwhelming number of sprues in this one, but each one is sealed in
its own plastic bag, including the large lower and upper fuselage h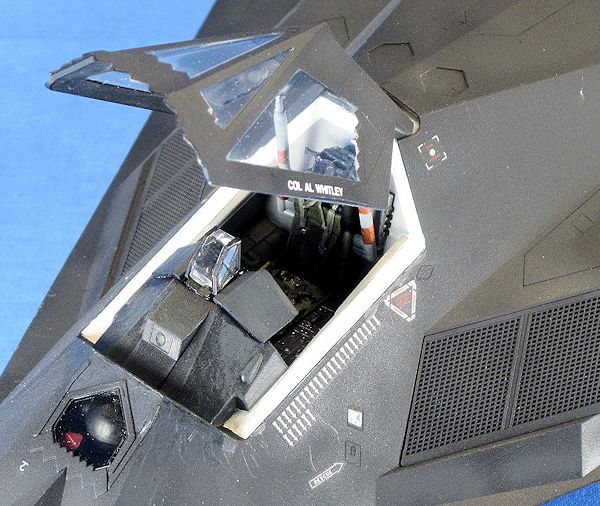 alves.
In true Tamiya style the upper half is held against a protective sheet of
cardboard in a plastic bag.
Decals,
instructions, clear parts, masking material for the clear parts, a nose weight,
a pilot figure, parts for two GBU-27 Paveway III bombs, and the F-117’s unique
boarding ladder round out the package.
Spreading everything out and studying it, I began drooling.
No one does it better than Tamiya, and this kit is 1998 vintage.
My one complaint is the color of the plastic – everything is molded in
black except for two sprues of landing gear and bomb bay parts, which are molded
in white.
I’d much rather have
everything be molded in a neutral color, like light gray or beige.
It doesn’t matter much because I’d be painting everything any way, but
it’s harder to see small details in black plastic when you’re working with it.
Unable to build anything straight out of the box these days, I purchased a resin ejection seat from Quickboost. When it arrived, I started building my first model of the famed Stealth Fighter (shouldn’t that be “Stealth Attack aircraft”?) – very stealthily.
| CONSTRUCTION |
The
instructions start off with the cockpit as usual, and that meant painting the
Quickboost resin seat first.
I
picked out the colors by hand, using the Squadron/Signal Walk Around reference
as a guide.
The seat’s sides were
painted Testors Acrylic Dark Gull Gray, while the seat cushion was painted
Testors Acrylic Dark Green.
Up next
was the cockpit tub and instrument panel, which meant more brush painting.
I painted the sidewalls and floor Testors Acrylic Dark Gull Gray, while
the instrument panel and consoles were painted Flat Black.
Details were picked out by hand, and Tamiya gives you three decals to
apply to the instrument panel.
The
completed cockpit tub glues to the upper fuselage section, but before doing that
I painted the cockpit sidewalls Dark Gull Gray and the sill white per the
instructions.
With the cockpit complete the bomb bay was next.
A large, detailed structure, Tamiya includes nicely detailed ordnance
racks and bomb bay doors.
With
modern US jets generally having Gloss White bomb bays and wheel wells, I
assembled the bomb bay parts and ordnance racks and then sprayed those parts and
the landing gear bays Tamiya XF-2 Flat White.
I gave each a subtle wash of MIG Productions
 Dark Brown wash,
concentrating more on letting the raised details stand out than making the
assemblies look dirty.
Once the
paint was dry I finished assembling the bomb bay and then glued it and the three
wheel wells to the lower fuselage half, leaving off the various struts and doors
lest they get demolished during the painting process.
The next step was to glue the upper and lower fuselage halves together.
To preserve the very sharp leading edges of the airframe Tamiya designed
the lower fuselage half to fit into a recessed pocket in the upper half with its
edges shy of the leading edge by about ¼”.
Checking with the line drawings in my references, there didn’t appear to
be a seam there on the real aircraft, so I resolved to putty and sand it smooth
– a process that took me a couple of nights.
With that minor unpleasantness finished I moved onto the flaps and tail
assembly, which went together without a fuss.
I posed the flaps in the down position and the twin tails slightly
rotated.
To complete the major part
of the assembly process I masked off the canopy using the Tamiya mask (it’s not
precut but outlined, so you just have to cut it yourself using a sharp knife)
and then temporarily glued the canopy to the fuselage in the closed position
using a couple dabs of rubber cement.
Using Tamiya masking tape I masked off the wheel wells and bomb bay, and declared the model ready for paint.
| COLORS & MARKINGS |
Well, how do
you paint a completely black jet?
The real F-117A is covered in the rather nebulous “radar absorbent material”,
which apparently is some sort of, well, non-metal stuff.
As a result pictures of real Nighthawks always look to be a very uniform,
very flat black, with very little weathering. I knew I had to apply some
weathering techniques, but I wasn’t going to follow the usual template I follow
when I build a WW2-era aircraft.
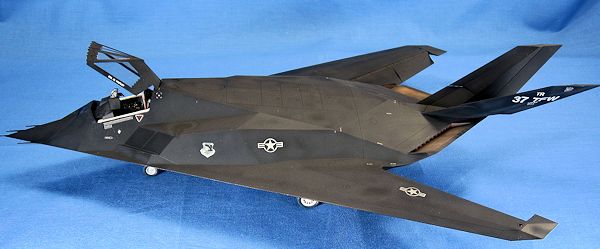 I started off by spraying the entire model with Tamiya XF-1 Flat Black,
creating a very flat base coat.
To
add a little variation I added a few drops of Tamiya XF-2 Flat White into the
mix and randomly sprayed the centers of the panels, keeping it very subtle.
Up next was a coat of Future over the whole model, to create a nice
glossy surface for the decals.
The
decals went on easily and behaved well with the Walthers Solvaset decal solution
that I usually use.
To seal the
decals and create a matte finish I then airbrushed the whole model with Testors’
Lacquer-based Flat Finish.
The
slightly faded look I had hoped to achieve seemed to get lost under the layers
of Future and Flat Finish, so I re-sprayed some random areas of very dark gray
onto the centers of the various panels.
Using Tamiya’s paints for this helped to achieve the very matte finish I
was after, as Tamiya’s paints seem to dry dead flat.
Looking at photos of the real thing showed some exhaust staining on the
rear surfaces behind the engines.
I
duplicated this by brush painting the tiny vanes with Testors Leather.
I then airbrushed some subtle stains behind the vanes using the same
paint, using Post-it Notes to mask the areas around them.
Up next was the painting of the bomb bay doors, wheel well doors, and
landing gear, but first I added some tiny wire brake lines to the main landing
gear legs.
I then primed all of the
parts and then sprayed them Tamiya XF-2 Flat White.
Once that was dry I sprayed some Future onto them to achieve a gloss
finish, and then sprayed the backs of the various doors Tamiya XF-1 Flat Black.
I gave the doors a subtle wash of MIG Productions Dark Brown, and then
applied the various decals to them.
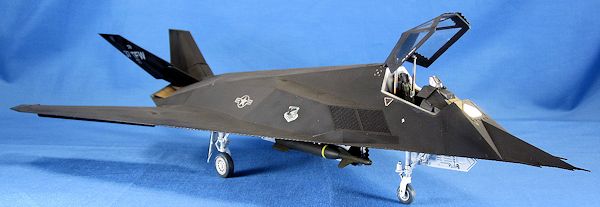
Attaching the lan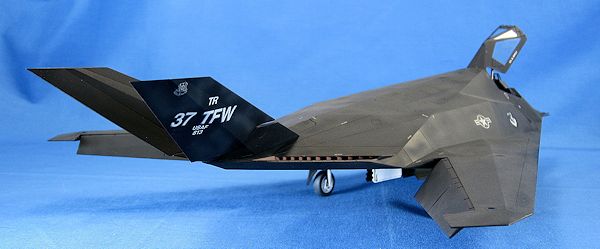 ding gear and doors to the model was next; the landing gear
have good, robust attachment points and easily support the model.
At this point I had two steps left before completion; mounting the canopy in its open position and then painting and attaching the bombs. Before painting the model I had temporarily fixed the canopy in its closed position, so I popped it off and glued it in place using the two struts provided by the kit. To paint the bombs I airbrushed them a custom shade of 50/50 Tamiya XF-62 Olive Drab and XF-58 Olive Green (for some reason my jar of Tamiya Olive Drab seems to have gone too “brown”.) I brush-painted some Testors Gloss Finish where the decals go, and once they were dry I sealed them with some Testors Flat Finish. I glued one onto the bomb rack on the model, and left the other separate for use in a diorama someday. And with that, the model was finished.
| CONCLUSIONS |
Tamiya’s
1/48 F-117 is everything we’ve come to expect and love about Tamiya.
Thoughtful, solid kit engineering results in a kit that builds quickly
and pleasurably.
The level of
detail is very high, and the end result is a great looking model of a very cool
aircraft.
I highly recommend this
kit to anyone who’s interested in adding a stealth fighter to their collection –
just beware, once it’s on your shelf, you might not see it again…
| REFERENCES |
-
Osprey Publications, Combat Aircraft #68, “F-117 Stealth Fighter Units
of Operation Desert Storm”
-
Squadron/Signal Publications, Aircraft in Action #115,
“F-117 Stealth
in Action”
-
Squadron/Signal Publications, Aircraft Walk Around #26,
“F-117A
Nighthawk”
-
Wikipedia, the Online Encyclopedia
March 2013
If you would like your product reviewed fairly and fairly quickly, please contact the editor or see other details in the Note to Contributors.