| HISTORY |
| KIT #: | ? |
| PRICE: |
£35.99 |
| DECALS: | Four options |
| REVIEWER: | Carmel J. Attard |
| NOTES: |
| HISTORY |
The CH-46 Sea
Knight is a USN, USMC carrier borne helicopter having
tandem contrarotating rotors powered by two GE T58 turboshaft engines.
The engines are mounted on each side of the rear rotor pedestal with a
driveshaft to the forward rotor. The engines are coupled so either could power
both rotors in an emergency. The rotors feature three blades and can be folded
for on-ship operations.
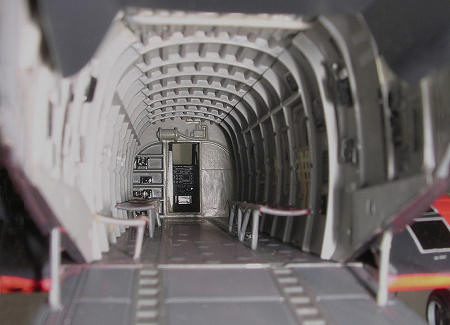
The CH-46 has
a cargo bay with a rear loading ramp that could be removed or left open in
flight for extended cargo or for parachute drops. An internal winch is mounted
in the forward cabin and can be used to pull external cargo on pallets into the
aircraft via the ramp and rollers. A belly sling hook (cargo hook) which is
usually rated at 10,000 lb (4,500 kg). could be attached
 for
carrying external cargo. Although the hook is rated at 10,000 lb (4,500 kg).,
the limited power produced by the engines preclude the lifting of such weight.
It usually has a crew of three, but can accommodate a larger crew depending on
mission specifics. For example, a Search and Rescue variant will usually carry a
crew of five (Pilot, Co-Pilot, Crew Chief, Swimmer, and Medic) to facilitate all
aspects of such a mission. A pintle-mounted 0.50 in (12.7 mm) Browning machine
gun is mounted on each side of the helicopter for self-defense. Service in
southeast Asia resulted in the addition of armor with the guns.
for
carrying external cargo. Although the hook is rated at 10,000 lb (4,500 kg).,
the limited power produced by the engines preclude the lifting of such weight.
It usually has a crew of three, but can accommodate a larger crew depending on
mission specifics. For example, a Search and Rescue variant will usually carry a
crew of five (Pilot, Co-Pilot, Crew Chief, Swimmer, and Medic) to facilitate all
aspects of such a mission. A pintle-mounted 0.50 in (12.7 mm) Browning machine
gun is mounted on each side of the helicopter for self-defense. Service in
southeast Asia resulted in the addition of armor with the guns.
The CH-46 has
fixed tricycle landing gear, with twin wheels on all three units. The gear
configuration causes a nose-up stance to facilitate cargo loading and unloading.
The main gear are fitted in rear sponsons that also contain fuel tanks with a
total capacity of 350 US gallons (1,438 L).
USMC CH-46E.
 Known
colloquially as the "Phrog", and used in all Marine combat and peacetime
environments since its introduction. Still regularly flown by the Marine Corps,
its longevity as a reliable airframe has led to such mantras as "phrogs phorever"
and "never trust a helicopter under 30".
Known
colloquially as the "Phrog", and used in all Marine combat and peacetime
environments since its introduction. Still regularly flown by the Marine Corps,
its longevity as a reliable airframe has led to such mantras as "phrogs phorever"
and "never trust a helicopter under 30".
CH-46E Sea
Knights were used by the USMC during its 2003 invasion if Iraq. CH-46Es
transported personnel, brought supplies to forward arming and refueling points
(FARP), carried ammunition and various tasks. Marine CH-46Es and CH-53Es carried
US Army Rangers and Special Operations troops in a mission to extract captured
Army Private Jessica Lynch from an Iraqi hospital on 1 April 2003.
While the United States Navy retired the airframe on September 24, 2004, replacing it with the MH 60S Nighthawks the Marine Corps plans to maintain its fleet until the MV-22 is fully fielded. In March 2006 Marine Medium Helicopter Squadron 263 (HMM-263) was deactivated and redesignated VMM-263 to serve as the first MV-22 squadron. The replacement process is expected to continue through the other medium helicopter squadrons into 2014.
| THE KIT |
 Academy’s
CH/HH-46D kit consists of accurately moulded parts with a precisely fitted
interior forming the cabin walls. The latter was integrally moulded rib
structure an
Academy’s
CH/HH-46D kit consists of accurately moulded parts with a precisely fitted
interior forming the cabin walls. The latter was integrally moulded rib
structure an d is complete with the equipment fitted at various localities
against the fuselage walls. The instructions come in as an A4 Booklet of 12
pages of detail steps, which are easy to follow. Construction is well
illustrated and detail colouring, decal positioning and suggestions for
alternative parts are clearly marked.. The kit represents a complicated
helicopter of impressive size and much engineering work has gone into it to
ensure a perfect fit so that there is little, if any, need for filler. The kit
has five sprues of grey plastic and one in clear plastic, all neatly packed in
separate plastic bags. Two large decal sheets are similarly packed.
d is complete with the equipment fitted at various localities
against the fuselage walls. The instructions come in as an A4 Booklet of 12
pages of detail steps, which are easy to follow. Construction is well
illustrated and detail colouring, decal positioning and suggestions for
alternative parts are clearly marked.. The kit represents a complicated
helicopter of impressive size and much engineering work has gone into it to
ensure a perfect fit so that there is little, if any, need for filler. The kit
has five sprues of grey plastic and one in clear plastic, all neatly packed in
separate plastic bags. Two large decal sheets are similarly packed.
| CONSTRUCTION |
 Construction
is carried in a number of steps. Step 1 starts with the assembly of the rotor
heads with all the intricate parts they contain. Step 2 to 7 then involve the
cabin interior and a quantity of tiny decal positioning. Unfortunately, the
interior is only partially visible, even when the starboard door and ramp are
left open. Step 8 covers the cockpit, including the positioning of the three
instrument panels. Having had the opportunity to study Sea Knights on several
occasions during visits on Kearsarge, Wasp and
Construction
is carried in a number of steps. Step 1 starts with the assembly of the rotor
heads with all the intricate parts they contain. Step 2 to 7 then involve the
cabin interior and a quantity of tiny decal positioning. Unfortunately, the
interior is only partially visible, even when the starboard door and ramp are
left open. Step 8 covers the cockpit, including the positioning of the three
instrument panels. Having had the opportunity to study Sea Knights on several
occasions during visits on Kearsarge, Wasp and
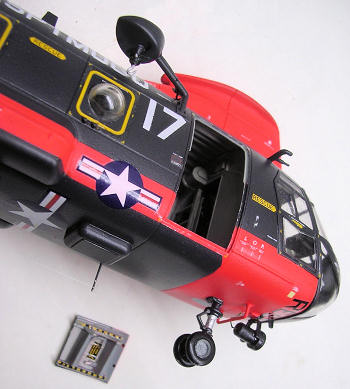
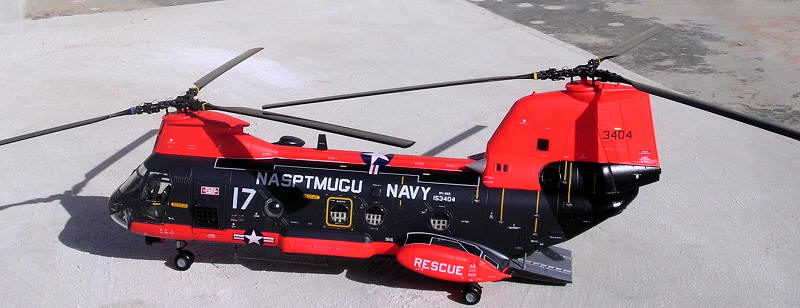
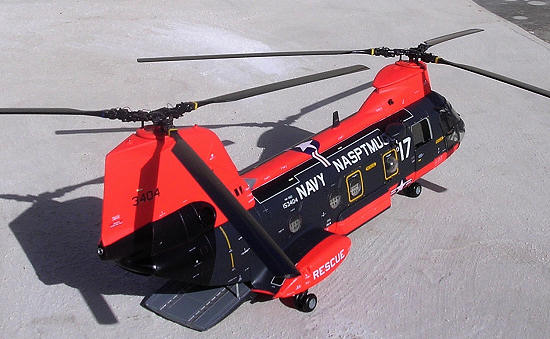
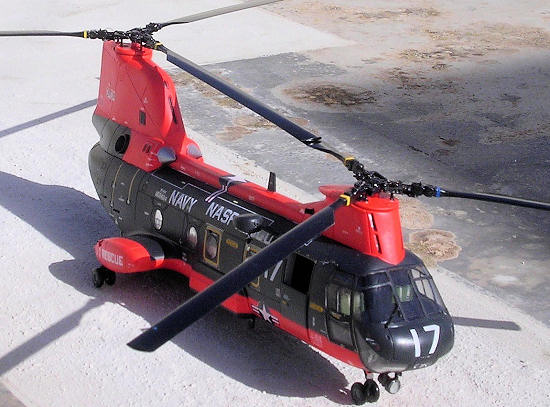
| COLORS & MARKINGS |
 barrels need to be drilled. The guns are mounted on
a base, which allows them to swing in any direction when placed on the model.
There are markings for two colourful HH-46s in an engine grey and bright
red/orange colour scheme. These are shore based at
barrels need to be drilled. The guns are mounted on
a base, which allows them to swing in any direction when placed on the model.
There are markings for two colourful HH-46s in an engine grey and bright
red/orange colour scheme. These are shore based at
| CONCLUSIONS |
| REFERENCES |
Wikipedia.com
Carmel J. Attard
January 2011
If you would like your product reviewed fairly and quickly, please contact me or see other details in the Note to Contributors.