| KIT #: | 4795 |
| PRICE: | $20.00 when new |
| DECALS: | One option |
| REVIEWER: | Spiros Pendedekas |
| NOTES: | Kit represents a pre-production machine |

| HISTORY |
The origins of the F/A-18 can be traced back in summer 1973, where the Secretary of Defense James R. Schlesinger ordered the Navy to evaluate the YF-16 and YF-17 competitors in the Air Force's Lightweight Fighter (LWF) program, in order to pursue a lower-cost alternative to their F-14. Being skeptical about the YF-16’s only one engine and narrow landing gear, the Navy, on 2 May 1975 announced its selection of the YF-17. Of course, the plane had to become carrier capable and for this, the Navy approached the experienced McDonnell Douglas to team with Northrop. The F-18 was born.
Both companies agreed to evenly split component manufacturing, with McDonnell Douglas conducting the final assembly. Northrop would be the prime contractor for the denavalized F-18L land based version which hoped to sell on the export market, while McDonnell Douglas would go for the naval version, which was initially known as McDonnell Douglas Model 267 and eventually named “Hornet” by Secretary of the Navy W. Graham Claytor.
 As it turned out,
apart from the general layout, the navalized F-18 had little in common with the
YF-17. It was bigger, stronger, more aerodynamically refined and incorporated an
innovative quadruple redundant digital Fly-By-Wire system. It would not be too
much of an exaggeration to say that it was a different plane. Though initially
three naval variants were envisaged (the single seaters F-18A and A-18A fighter
and attacker respectively and the dual-seat TF-18A), improvements in avionics
made possible to combine the two former in one aircraft, which was designated
F/A-18A, with the dual seater redesignated F/A-18B.
By all means a “modern” design, the Hornet’s relatively high thrust-to-weight ratio, combined with its advanced aerodynamics and flight controls made the plane highly maneuverable. Its multifunction displays and digital multiplexing avionics buses further enhanced its combat capability, with its not too demanding maintenance and high reliability being the icing on the cake.
Very early in its career the F/A-18 went through some aerodynamic refinements, mainly filling the snag on the leading edge of the stabilators, reducing by roughly 80% the gap between the leading-edge extensions (LEX) and, finally, adding a small vertical fence on top of each LEX to broaden the vortices and direct them away from the vertical stabilizers.
In the meantime, Northrop was developing its land based F-18L as a potential export aircraft. Not needing the strength and other naval requirements, the machine would be lighter and better performing, aiming to compete with the F-16 then being offered to American allies. Things became complicated upon McDonnel Douglas’s promotion of a lightened version of their own F/A-18A as a land based export alternative, with the partnership between the two companies going through a rocky road, including lawsuits and the like. By the time a settlement had been made (which, among others, allowed McDonnell Douglas to market their devavalized F/A-18 by paying $50m to Northrop), Northrop's F-18L project had been terminated.
The Hornet first saw combat action during the 1986 United States bombing of Libya and subsequently participated in the 1991 Gulf War and 2003 Iraq War. In combat, the plane excelled, exhibiting outstanding (for a tactical aircraft) availability, reliability, and maintainability, with its versatility allowing it, for example, to shoot down enemy fighters and subsequently bomb enemy targets with the same aircraft on the same mission!
 During the 90s the
F/A-18E/F Super Hornet was introduced, which was in fact a new, bigger plane,
based on the design concepts of its predecessor. Still flying today (2024), the
Hornet will eventually be replaced by the F-35C and F-35B variants for the Navy
and Marines respectively.
Highly versatile, aerodynamically refined, maneuverable and able to carry a plethora of weapons, the Hornet could perform fighter escort, fleet air defense, suppression of enemy air defenses, air interdiction, close air support and aerial reconnaissance. Though not without its trade-offs, it proved a good, reliable performer, a balanced machine that would become a valuable carrier asset.
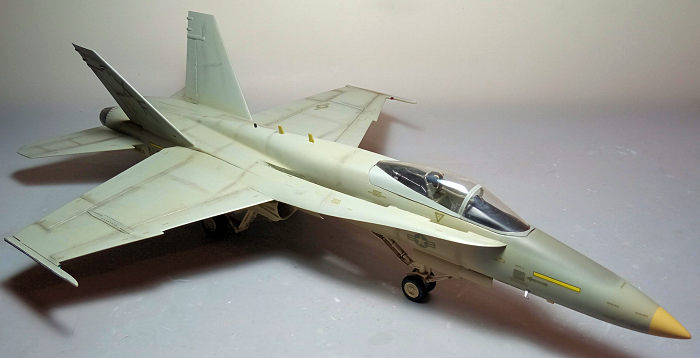
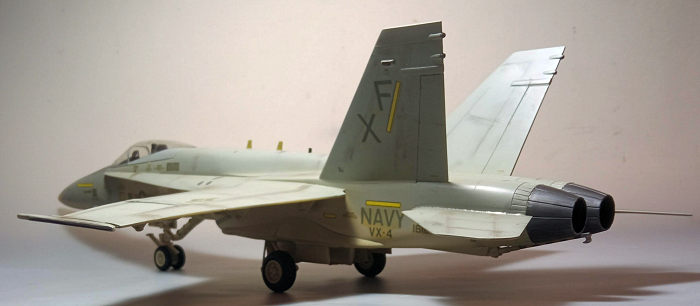
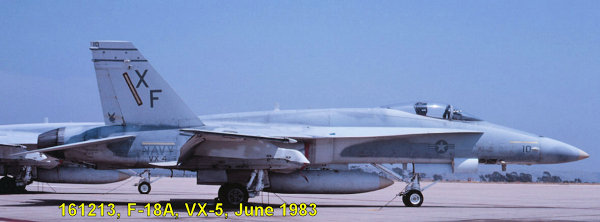
BuNo 161214 was a pre-production example that was used as a test aircraft by the VX-4 “Air Test and Evaluation Squadron Four”. In the early 90s she was transferred to the NASA Dryden Flight Research Center, where she was used as a chase plane, providing valuable monitoring in many significant projects which included planes such as the X-29, X-31, SR-71 and B-52. From 1997 onwards, she is proudly on display at the JetHawks Stadium, Lancaster, California.
| THE KIT |
The first 1/32 F-18 kit was issued by Hasegawa from as early as 1979, with the Revell offering following a year later. By that time the Hornet program was still under evaluation, with not all final aerodynamic refinements yet implemented. This means that both companies took measurements from pre-production machines, which, among others, featured the full gap between the leading-edge extensions (LEX) and lacked the small vertical fence added on top of each LEX later on. This issue somehow plagued these kits, as they could not represent an operational machine and it was not until 2003 that Academy came with an operational 1/32 F/A-18A/C.
Nevertheless, Hasegawa reboxed its kit a couple more times with exactly the same decals, where Revell chose to rebox its own a second (and final) time in 1989, but with a comprehensive decal sheet including full stenciling. This, combined with the very low price, was envisaged as somehow making the kit more desirable. The specific copy was discovered in my then usual/now sadly closed toy/hobby shop in my hometown (Halkis, Greece), with the box partly beaten up and carrying a ridiculously low price: no option but grabbing the big kit, if not out of curiosity.
The kit came in one of
the standard big, oblong Revell top opening boxes, featuring a box art of
BuNo 161214 machine flying below some surreal looking clouds. Upon opening the
box, I was greeted with only (for a 1/32 modern jet) 90 light gray styrene
pieces. Molding is crisp with no flash noted. Panel lines are rais ed and not
that many (something expected from the kit’s 1980 origins). Clearly, this kit
was designed as a compromise between detail, complexity and cost, as, normally,
one would expect to find at least twice the number of parts. Thus, cockpit is
average, featuring a sort of “top” part that contains the instrument panel, side
consoles and rear wall, with its lower part doubling as nose bay top wall and
the one piece seat crying for some extra beefing up.
Landing gear bays tend towards simplicity and intakes are shallow, as are the exhausts, to name a few “oversimplifications”. On the other hand, overall shapes of parts look correct and landing gear legs and linkages are acceptable. The tires are provided in vinyl (something that a number of us might not like too much), exhibiting signs of cracking due to age. The wingtip Sidewinder launchers are molded with the wings, so you practically have to attach the Sidewinders, otherwise some surgery is required to either remove the launchers or refine the toy-ish looking rails. Apart from a pair of wingtip mounted Sidewinders, no other external load or pylon is supplied, something that can patly justify the low number of parts (along with the kit's overall simplicity).
Transparencies are well molded. Instructions are nice and clear, per the usual Revell style, coming in the form of a 6-page b/w leaflet, with the construction spread in 30 concise steps and color callouts provided where applicable.
Only one scheme is provided, of the BuNo 161214 pre production machine, by the time it was undergoing evaluation test with the VX-4 during the late 70s. Color shades are given in Revell codes and in generic form. The decal sheet is superbly printed and contains a full stenciling suite, promising to boost the final model looks. Though Revell decals of the era in general did not age that well, this one seemed to have endured time, exhibiting some yellowness which I hope to partly counteract by taping it inside of a window facing the strong sun.
Instructions want you to first trap the cockpit top and the nose bay between the nose halves. Next you have to attach the main bays from the rear fuselage innards, then attach the top part and glue the subassembly to the front, to complete the fuselage. The tail planes are next assembled and attached, followed by the shallow intakes, the side fuselage load rails, the 2-piece wings, the exhausts and the arresting hook.
The landing gear is next assembled and attached, followed by the wing aerodynamic surfaces actuators, the fins (2-piece each), the wingtip mounted Sidewinders, the nose cone, the canopy and a few small thingies (pitots, antennas and the like), ending a surprisingly uncomplex (for a 1/32 modern jet) build.
| CONSTRUCTION |
Opting for an out of the box build, I started by trapping the cockpit top section and the nose bay between the front fuselage halves. Basic cockpit color, including the seat frame, was Hu140 Gull gray. The instrument panel, side consoles, stick grip, front and rear inner anti-glare areas, the HUD base and head cushion were painted black, with the instruments' raised details dry brushed with silver and some knobs done by "pinning" some red, white and yellow, while the three front circular screens received a drop of clear green each. The seat’s lower cushions were painted olive green, while the seat belts were painted linen with silver buckles. Though not overly detailed, the cockpit could pass under a closed canopy.
 The main wheel wells
were next attached to the lower rear fuselage half, followed by the upper half,
with the subassembly then attached to the front fuselage. The 4-piece air
intakes were then attached, with their innards painted white and their shallow
ends painted black, to add some sense of depth. The side fuselage load rails
were attached at this time, as well.
Time for the wings to be assembled and attached, followed by the tail planes and fins, all 2-piece affairs. The six flaps and aileron actuators were attached, followed by the nose radome (which was attached last, in order to figure out the amount of weight needed - none was necessary). I decided not to install the wingtip sidewinders but keep the launchers, so I filed off the triangular shaped chunk on the sliding side and added two pieces of stretched sprue, to represent some form of railing at each launcher.
This more or less concluded basic assembly, which was way simpler than one would think of a 1/32 modern jet (justifying some shortcuts taken regarding kit detail). Overall fit was surprisingly good, as one would expect from a fresh and relatively modern mold. After some filling and sanding at the usual places (like the wing roots, intakes and fuselage joints), I blanked all open areas and took the big bird to the paint shop!
| COLORS & MARKINGS |
 As an evaluation machine
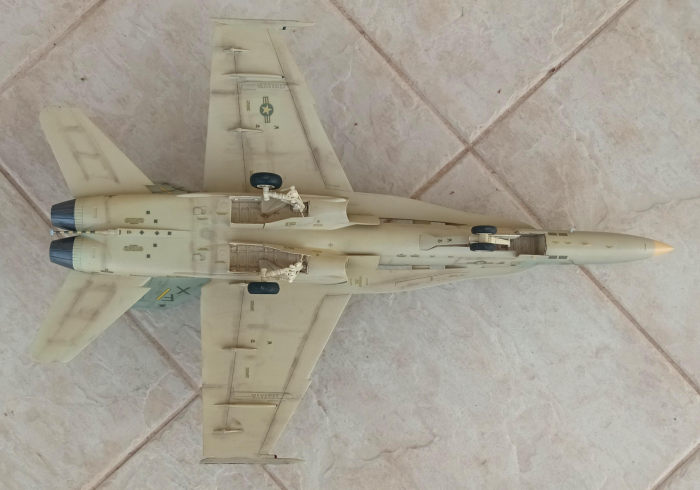
BuNo 161214 featured light gray undersides with somewhat darker gray topsides.
By studying net available pics, I came to the conclusion that shades were
lighter than the subsequent operational ones, so I went for Hu196 undersides,
which dried to a very light gray shade, then freehanded the top gray, for which
I used Hu127 US Ghost Gray. The front anti-glare area was also freehanded with
Hu140 Gull Gray. Finally, the radome tip was painted linen, with a coat of
Future preparing the bird for decals.
The very comprehensive and well printed decal sheet had yellowed with time, so I taped it on a window glass facing the strong sun for around a week, with the yellowness somehow reduced. The decals themselves behaved very well, adhering nicely with no silvering noted, with the plethora of stenciling adding precious life to an otherwise simplistic model. A coat of Future sealed the decals.
| CONSTRUCTION CONTINUES |
 The landing gear legs
were assembled and attached in position, followed by the doors and wheels (the
latter assembled and having had their vinyl tires attached), with the bird
proudly standing on its feet. Upon attaching the vinyl tires, their cracks
became even more apparent, but there was not too much I could do. All landing
gear parts and door and bay innards were painted white and oleos were painted
chrome. The exhausts were also assembled, painted Testors Burned Metal and
attached, followed by the arresting hook.
In photos the bird looked quite clean during its evaluation tests, so weathering applied was not too intense, consisting of a black wash in the landing gear area and a hint of dark brown/black dry pastels all over, with a satin cote giving the model its final hue.
The canopy had its framing hand painted and attached, followed by the various “bits and pieces” (antennas and sensors). Finally, blobs of red and green clear paint were applied to represent the wingtip and fin mounted lights, before calling this early F-18 done!
| CONCLUSIONS |
This is a particular
case of a kit, as it can only represent a pre-production evaluation machine. If
you want an operational 1/32 Hornet you should definitely opt for the 2003
Academy mold. That said, this Revell offering, while not featuring the level of
detail one has to expect from a 1/32 modern jet, is not really a bad kit:
general shape looks correct, molding is crisp, instructions are concise with
construction being surprisingly straightforward, canopy is
clear and decals are nice.
By all means the kit is definitely budget limited, this being clearly evident from the overall level of detail offered, which is more appropriate for 1/48. Though dedicated aftermarket sets do not seem to exist, you may have some luck in using parts sets targeted to the Academy F/A-18 if you so wish.
Not too easy but, still, possible to find nowadays in relatively low prices, the kit can be built quite effortlessly to decently represent a big scale early evaluation Hornet.
Thought you might
find this of interest. Ed

Happy Modeling!
Spiros Pendedekas
30 April 2024
Copyright ModelingMadness.com. All rights reserved. No reproduction in part or in whole without express permission from the editor.
If you would like your product reviewed fairly and fairly quickly, please contact the editor or see other details in the Note to Contributors.