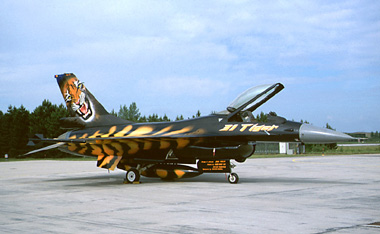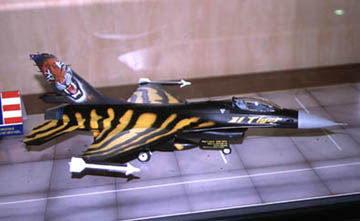

(left) F-16A FA-71 of 31 Squadron, Belgian Air Force, in 1998 Tiger Meet Markings. (right) Built-up Revell model as presented to
the squadron by the manufacturer. Both photos courtesy Gert Weckx of the NATO Tiger Squadrons SIG page.
|
KIT: |
Revell AG 1/48th F-16A "Tigermeet '98" |
|
KIT # |
04543 |
|
PRICE: |
US$18.00 |
|
DECALS: |
31 Squadron, Belgian Air Force, 1998 Tiger Meet markings |
|
REVIEW BY: |
Andrew Abshier, Oklahoma Historical Modelers Society (OHMS) |
|
NOTES: |


(left) F-16A FA-71 of 31 Squadron, Belgian Air Force, in 1998 Tiger Meet Markings. (right) Built-up Revell model as presented to
the squadron by the manufacturer. Both photos courtesy Gert Weckx of the NATO Tiger Squadrons SIG page.
|
HISTORY |
This type needs no introduction to most aviation enthusiasts. The winner of the 1975 fly-off competition against the Northrop YF-17 has gone on to near-ubiquity in the U.S. Air Force, U.S. Navy, and the air forces of 20 other nations. One of those nations, Belgium, was part of the four-nation NATO partnership that were part of NATO's intial order for the type; Belgian and Danish examples were assembled in Belgium by SABCA. F-16s have served in the Belgian Air Force (BAF) since January 1979, and currently equip six squadrons and an OCU wing.
The Association of Tiger Squadrons was formed in 1959 to improve relationships between individual NATO squadrons. The Association has met annually at bases all around the NATO member nations since 1961. Each squadron incorporates the tiger within their squadron crest, and in the 1970s it became the tradition for the host squadron to paint one aircraft in a special "Tiger" paint scheme for each year's meet.
The Belgian Air Force 31 Squadron has participated in the Tiger meets since 1962. In 1998 the Squadron hosted the Tiger meet, and over 8 days one of the most spectacular Tiger paint schemes ever painted was applied to F-16A FA-71 and first presented on June 12, 1998.
|
THE KIT |
The kit inside the box is actually the Italaeri F-16 kit, with some extra parts to represent the Carapace ECM modifications (extended vertical tail root and extra intake fairing) used on Belgian aircraft. Otherwise, the aircraft the kit represents is a Block 10 or later F-16A with the enlarged horizontal stabilizers.
Revell chose to mold this kit in black plastic, which may be fine for those builders who won't paint the parts, but a real pain for those of us who do! It seems axiomatic that the darker the plastic the kit comes in, the lighter the shade required for the interior sections of the kit. Oh well, careful painting in several coats should do the trick.
The surfaces of the kit have a rather inconsistent feel. While much of the kit is smooth, there are some areas of texturing ranging from just discernible to downright pebbly. Sanding should take care of this, but you have to wonder if the mold polishing guy took a 3-martini lunch that day! Panel lines are all engraved.
Cockpit detail is fair. The ACES II seat is basic, and would benefit from some extra details such as seat belts and harnesses. Instrument panel and side console details are adequate, but the sidestick is basic and no throttle is given at all. The new Black Box resin cockpit should fix most of these problems, if one overlooks the fact that the BB cockpit is intended for an F-16C! I'm not sure how much difference there is between the A and C cockpits, so one could just drop in the BB cockpit and not tell anyone!
On the other hand, landing gear strut detail is excellent! All of the hollow portions of the struts and retractor arms are molded as such, and the struts themselves are well done. The wheels appear to be the correct diameter but the hub detail looks incorrect when comparing the kit hubs to photographs. I don't know if there are resin aftermarket wheels for this kit or not, but it looks like this kit will need them. Wheel well detail is basic but nice as are the landing gear doors.
The Carapace mods for the BAF F-16s are well represented. For those not building a Belgian F-16, the shorter fin bases are provided, and the forward ECM fairing is an add-on part, so you won't have any holes to fill.
Two exhausts are provided, one fully open, the other fully closed. Both are Pratt & Whitney nozzles, which are fine for this variant. The open nozzle is molded in two parts: the outer blades, and the inner section that is just visible underneath when the blades are fully open.
There was some question about this kit's accuracy on RMS, and after some study of the kit, there are a few problems. On the upper fuselage, the "break" where the wing trailing edge falls away from the blended wing/fuselage area occurs too far forward on the kit; some building up with Milliput or similar, and sanding, should help this. The cockpit canopy is otherwise well molded, but is not molded in the 210 degree bubble shape. Beyond that, it is hard to assess shape just from looking at the parts on the sprues, but at the end of the building session it looks like the model will resemble an F-16!
Although the aircraft depicted flew with minimum stores--just two Sidewinders and a centerline tank--full stores are provided, including the following: 4 AIM-120 AMRAAMS, 2 AIM-9J/Ps, and 2 AIM-9G/Hs. There are also two wing tanks and an ECM pod that looks like an ALQ-119. Since all but 2 'winders and the centerline tank will be left off the Belgian Tiger if you choose to build it, you'll have plenty of stores for the spares box!
|
DECALS |
Most people will be buying this kit for the markings, so a lengthy discussion of the decals is probably in order.
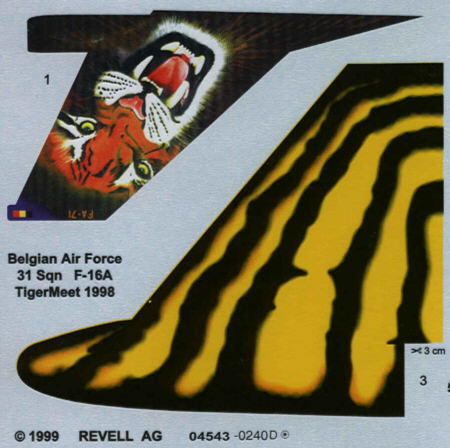
The decals in this kit were designed by Danny Cormans, the same artist that has released a number of stunning decal sheets as DACO Productions. The photo-realism of the tiger on the tail has to be seen to be believed, and all of the tiger stripes on the aircraft have feathered edges! All of the tiger-striped areas are given as decals with all yellow and black parts given, plus margins along the edges to overlap with the black finish on the model. As you might expect, this is a very large decal sheet!

Detail of Revell Tiger Meet decal sheet.
Unfortunately, there are a few catches with this sheet. One area of concern is that the decal is printed on standard Revell AG decal stock. I've had mixed results using smaller Revell AG decals in the past, so I have some concerns about these big decals' ability to conform to panel lines and compound curves. There is also a problem of matching the black on the decal to black paint. Several postings on rec.models.scale have pointed out that the black on the decal is not a pure black, and when applied over a pure black finish, a color shift is apparent.
To address these converns, I wrote a letter to Gert Weckx, the webmaster of the excellent Tiger Squadron SIG Homepage. He replied,
When talking about conforming to panel lines, I can't really tell (its not
visible on the photo [of the model] anyway) - I nevertheless suggest NOT TO PAINT
the ENTIRE AIRCRAFT IN BLACK, I think its preferable to paint
it in a YELLOW shade like printed on the decals, then apply all striping decals,
and then I suggest to paint the other area's in black... WHY...
well in this way you don't have to retouch yellow area's, and its a better background
for the decals (if they shine through on a black background , the model gets darker)
I must also tell you that DACO products from Belgium will release the same
sheet within some months, and that the quality will be suberb in comparison
to those supplied with the kit. - I think that a preview of how that sheet will
look like is already available on the Nato Tigers SIG website. The Revell
decalsheet is drawn by the same man, but they had a strict deadline, so he started
over for some points of the striping etc (for the DACO sheet), resulting in a much better print.
He nevertheless told me that Revell would release the kit again with a
new , improved, print in the future, when their current stock is sold.
For now, these solutions are available to do this scheme:
1. Wait for the DACO version of this scheme to come out, which will have the better details, as Gert pointed out, and should have a more pure black than is on the Revell decal. The catch here is that the DACO sheet will be very costly at US$17.00+!
2. Attempt to match a black paint to the decal black. Matching paint to decals is always difficult--if anyone pulls it off, let us know!
3. If you have a double-action airbrush and are VERY handy with it, airbrush on your own tiger stripes and use only the tail decal. Or, as a compromise, airbrush in only the borders of the tiger stripe decals to help blend them in a bit better.
|
CONCLUSIONS |
Hasegawa's 1/48th scale kit still reigns supreme as the best F-16 kit in 1/48th scale, but this Revell/Italaeri offering looks like a good budget alternative. The problems mentioned, apart from redoing the wing/fuselage contour, are all fixable without that much effort. Plus, if you get the black paint matching problem licked, you get a near DACO-equivalent decal at no extra charge!
|
REFERENCES |
F-16.net: Great site with virtually all you need to know about all variants and operators of the F-16.
NATO Tiger Squadrons: This site features references on all of the NATO tiger squadrons, and also features a page on 31 Squadron, BAF, with pictures of the 1998 scheme. Highly recommended!