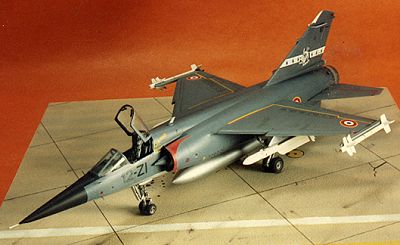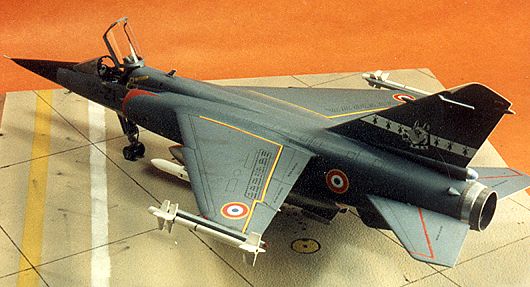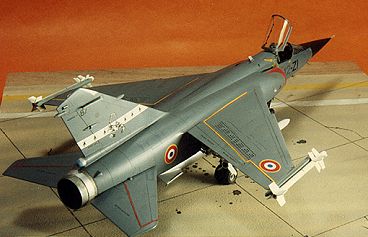
KIT: ESCI 1/48 Dassault-Breguet Mirage F. 1
MEDIUM: Injection molded plastic
PRICE: $8.50 (in 1988)
KIT NUMBER: 4006
DECALS: Five versions: Armee De L’Air (French Air Force) Escadre de Chasse 2/12; Armee De L’Air Escadre de Chasse 3/30; Helleniki Aeroporia (Greek Air Force) 336 Squadron; Ejercito De L’Aire (Spanish Air Force) Ala 14, Esc. 141; and Suid Afrikaanse Lugmag (South African Air Force) 3rd Squadron
OVERALL IMPRESSION: Above Average
DATE OF REVIEW: September 2, 1998
REVIEWED BY: Drew Nix

The Mirage F.1 broke the pattern of delta-winged interceptors designed by Marcel Dassault after World War II. Instead of delta wings, the F.1 has the more conventional swept wings/horizontal tails planform. Popular as an export aircraft, the F.1 soldiers on today in the air forces of many Third World countries. It most recently saw action in the Gulf War, where Iraqi F.1’s were opposed by F.1’s flown by many of the Coalition countries. Talk about getting a positive ID before firing! Nevertheless, several Iraqi F.1’s were destroyed in the course of Desert Storm.
The only 1/48 scale Mirage F.1 to date was released by ESCI in the mid-80’s. Molded in a soft gray plastic with recessed panel lines, the kit captures the sleek lines of the real aircraft. As usual with ESCI kits, the cockpit and wheel well details are basic at best. There is no burner can represented in the exhaust, just a flat piece of plastic. Overall fit of the kit was excellent with very little filler being needed.
Construction begins with the cockpit which, as mentioned, is VERY basic. Inaccurate decals are used to represent the instrument panel and the side consoles. Using the very good Aerofax Minigraph #17 on the Mirage F.1, I detailed the side consoles with stretched sprue, microfine solder, and Grandt Line nuts and bolts (the smaller ones make excellent knobs). Using the kit instrument panel shape as a master, I cut replacement panels from sheet styrene. Using the “sandwich” method, a new instrument panel was constructed and detailed. I scratchbuilt a throttle quadrant, keeping in mind that the French pull back on the throttle to add power. This means that the throttle handle should be mounted forward in the throttle quadrant. The seat shape provided in the kit was replaced by a more detailed one taken from a Monogram Mirage 2000 kit. I had to sand down the Monogram seat’s bottom to get it to sit in the ESCI cockpit at the correct height. By the way, lap belts in Mirages are a sky blue color. Testors makes a good matching color for this in their regular Pla line of paints.
 You’re supposed
to add the nose gear next, but I decided to wait until painting was completed.
Meanwhile, I superdetailed the nose gear itself with stretched sprue, microfine
solder, and a small wound guitar string. Use the Aerofax monograph as a reference
if you decide to detail any part of this kit. I cut out the blank portion
of the exhaust nozzle. After some experimentation, I found that a clear 35mm
film canister was exactly the right size for the burner can. The after part
of the engine was taken from the Monogram Mirage. When put together, this
made a convincing representation of the afterburner section of the Atar engine.
The formation light on the port intake is represented by a recessed circle.
This was drilled out and the appropriate sized M.V. Products railroad engine
headlamp was put in its place.
The main gear wells have little detail. Again using the monograph, I detailed the wells and the main gear itself. I broke off the kit-provided nose probe several times during construction before I finally got wise and drilled a hole in the nose cone to accept a metal probe made from hypodermic tubing. The dual 30mm cannon were also replaced by tubing.
The instrument panel cowling is wrong in the kit. It was replaced by one made from sheet styrene. I loaded up my Mirage with wingtip-mounted Magic infrared AAM’s, MATRA underwing-mounted radar-guided AAM’s, and a drop tank under the fuselage.
After painting the aircraft Intermediate Blue over Aluminum, it was time
to apply the decals. It’s always a crap shoot when dealing with ESCI
decals. They have a tendency to shatter if the kit has been on the shelf
for any length of time. These were fine though and I used the kit decals
to do the colorfully marked French Air Force 2/12 Squadron “12-ZI”,
which has a white bulldog’s head represented on the port tail and a
white scorpion represented on the starboard side. These went down without
a hitch. I modified the Monogram decals for the Mirage 2000 to get the red
warning stripes applied to the front of the intakes. A little touch-up of
red was needed to cover the areas not covered by the decals. After adding
the landing gear, the Mirage was
complete.
This was my first attempt at detailing an aircraft model. I was pleased with the results and can recommend this kit to anyone lucky enough to be able to find one. Since AMT/ERTL bought up the ESCI molds and since very few of the ESCI aircraft have subsequently been released, this kit may be a little hard to locate.