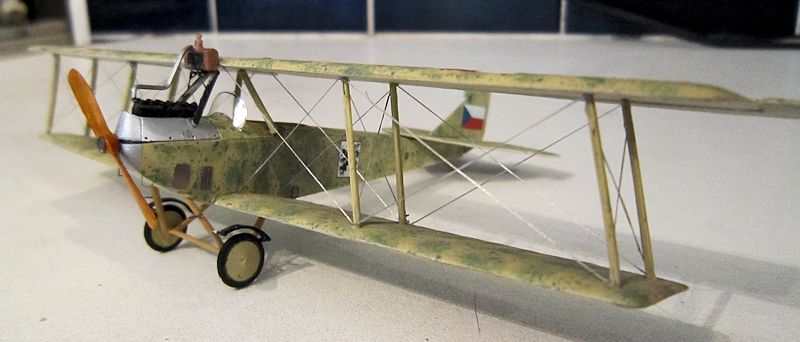
AZ Models Aero Ae-01
| KIT #: | |
| PRICE: | £12 |
| DECALS: | Three options |
| REVIEWER: | Chris Peachment |
| NOTES: |
This is a re-issue of the Legato
kit of the Hansa-Brandenburg B.1. kit with some resin parts for the
differences between the two aircraft and some etched parts including
spoke wheels with rubber tires. |

| HISTORY |
The
Aero Ae 01was a Czechoslovakian military trainer biplane built in 1919, and was
the company's first attempt to modify one of the aircraft designs they had been
manufacturing under licence during WWI, the Hansa-Brandenburg B.1.
And so I looked up that latter aircraft and got this: The
Hansa-Brandenburg B.I.
was an unarmed military trainer and reconnaissance biplane of WWI, flown by the
Austro-Hungarian Air Service. Early models were known internally to the Hansa-Brandenburg
firm as the type
D,
while later models with a more powerful engine were designated
FD.
This aircraft was one of the earliest designs of Ernst Heinkel, who was working
for Hansa-Brandenburg at the time. It was an entirely conventional two-bay
 biplane
with staggered wings of unequal span. The pilot and observer sat in tandem in a
long open cockpit.
It isn't the most handsome of aircraft, with its inward sloping struts,
its radiator slapped on the upper wing and also the strange cockpit which had no
division between the front and rear seats, and must have left the instructor or
observer
in the back very drafty.
And it is interesting to note that it was one of Ernst Heinkel's early
outings as a designer. He is not renowned for aesthetic perfection on his later
aircraft. Not for nothing is the He III known as The Spade, although some of his
high speed efforts have pleasing streamlining.
The aircraft was produced under license by Aero both during the war, and
afterwards (when it became known as the
Aero Ae 01),
and also by Letov, as Š10.
Experience gained with this design would provide Aero
with the basis for a number of derivative civil and military designs throughout
the 1920s.
The design formed the basis for the C.1 and C.II armed reconnaissance types.
| THE KIT |
AZ Models are to be congratulated for covering some of the most obscure
subjects, especially from the inter-war period. It won't have made them a huge
profit, as I can't believe that there are queues around
 the block
for this particular machine. I chose it mainly because I was intrigued by the
'splatter' camouflage, offered as one of three schemes on the box art.
The modeller should note here that
there are some very good pictures on the internet of one machine in a museum in
Prague, but which are labelled Aero Ae-10, rather than 01. I don't know if this
is an error. Or if there was a later model called the 10. If so, it differed
very little from the 01. If an error, I think it might have come about because
the machine in the picture has a code 10 on its side.
The plastic is moulded in grey and is
easy to work. Some of the etch parts are tiny, and it is often easier to
replicate them with plastic rod, especially the mudguards.
| CONSTRUCTION |
The basic construction follows the
usual pattern. AZ have included some extra parts in Polyutherane for those
areas, especially the tailplane, in which the Aero differs from the Hansa
Brandenburg. It is worth noting that polystyrene glue seems to work on them,
though without welding a bond.
I followed my usual practice with biplanes of building and painting
fuselage and wings separately, which was especially necessary here as the cam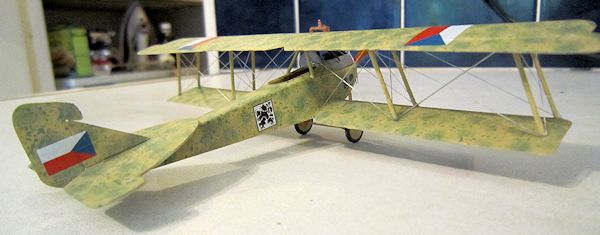 ouflage
is tricky.
The interior is basic, though plenty
enough for what can finally be seen. The cockpit actually fitted when the two
fuselage halves were offered up, which is unusual in a short run kit. The
control columns have a 'steering wheel' on top, and etched wheels are provided.
One of mine pinged off during construction never to be found again.
Once the fuselage seams had been
sanded down and the wings given a few tweaks with some wet and dry, painting can
be started in some trepidation.
I note on the pictures of the museum
aircraft that there are two distinct shades of clear doped linen on top and
bottom, the upper side being of a darker hue. Whether this is true to life, or
an example of later museum painting, I don't know, but I decided to follow it.
| COLORS & MARKINGS |
For the underside I used Light Stone 36400 from the Lifecolor range,
which they also call Deck Tan, if any ship modellers are reading this.
And Vallejo beige which is darker for the upper
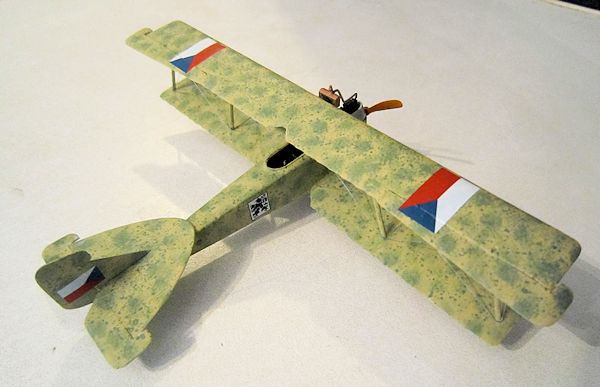
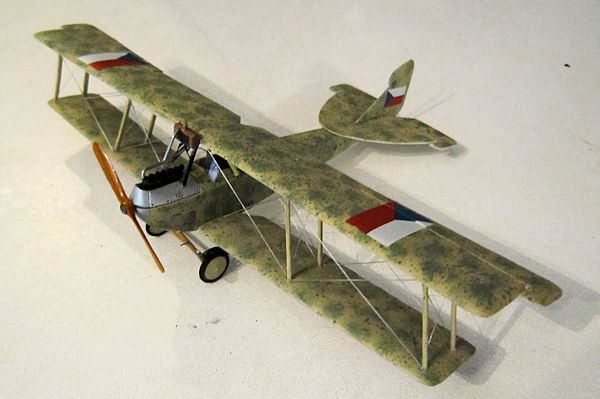
surfaces. I then decided to try the spatter camouflage on a lower wing.
The trick here is to load a medium size flat brash with your green,
which here is Lifecolor RLM 99 Green 34227, a pleasing, muted medium green with
a slight tinge of grey. Something a little more olive might work well. Hold the
brush lightly between finger and thumb of left hand above the area, and flick or
tap 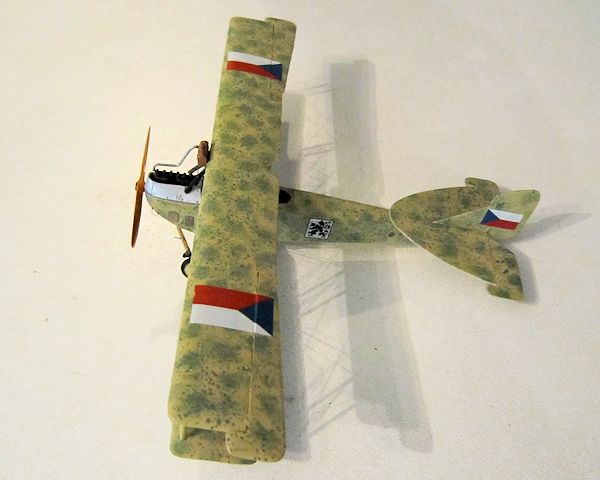 the
metal hasp of the brush with your right forefinger. (Reverse if left-handed.) I
tried various combinations of hands and fingers, but this seemed to work the
best. And try to get the amount of paint right. Too much and you will get ugly
large blotches, too little and it will be invisible. Once you have covered the
wing in light flickings to your satisfaction, then increase the amount of paint
over the areas where you want it to coagulate into solid colour and mottle to
appear. This can finally be touched in, in the centre, with full contact from
the brush, leaving the splatter between the mottling patches. It is a
suck-it-and-see method and I only had to go back and do one wing again, the
first one on which I was experimenting, on which I had overdone it slightly.
the
metal hasp of the brush with your right forefinger. (Reverse if left-handed.) I
tried various combinations of hands and fingers, but this seemed to work the
best. And try to get the amount of paint right. Too much and you will get ugly
large blotches, too little and it will be invisible. Once you have covered the
wing in light flickings to your satisfaction, then increase the amount of paint
over the areas where you want it to coagulate into solid colour and mottle to
appear. This can finally be touched in, in the centre, with full contact from
the brush, leaving the splatter between the mottling patches. It is a
suck-it-and-see method and I only had to go back and do one wing again, the
first one on which I was experimenting, on which I had overdone it slightly.
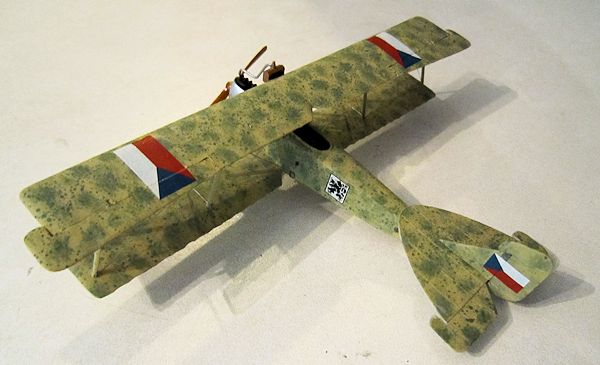
Then go to it on the fuselage.
It is time consuming but the end result is satisfying and you don't
often see this kind of scheme. It is there on the box art, if you are seeking
validation, although I wonder if they have taken their cue from the museum
machine, and that that may have been
done up by some fanciful curator long after the aircraft
was flying. Whatever, it looks unusual.
| FINAL CONSTRUCTION |
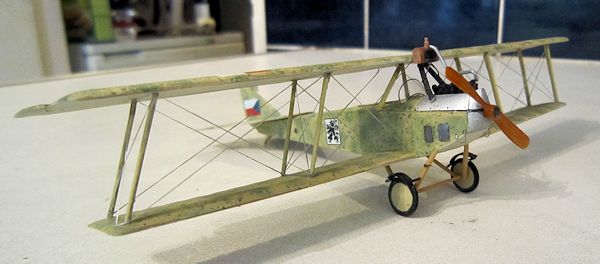
Markings should be fitted here from
the excellent decal sheet, and no problems were encountered. I gave everything a
clear matt coat from a Citadel rattle can of satin, which is actually more matt
than the Vellejo equivalent.
 Once
the wings are all set then a few evenings can be spent on the rigging which is
straightforward in pattern, and I used elastic thread coloured by a silver gel
pen, anchored with drops of superglue gel.
The gel is very handy as it makes placing easier, and
the thread is multi-stranded and so soaks it up nicely and dries quickly.
For finishing details you now have that awkward radiator, which is
mounted on two triangular etched pieces which have to be superglued to the front
cabanes. They ended up glued to my thumbs more often however, and I was tempted
to try and make them from plastic rod, but they were just too small and spindly.
We got there in the end after much cursing. The radiator is brass, toned down
with some matt black dry brushing.
And a matt black centre.
The radiator tube was made from a
paperclip, carefully bent with some needle nose pliers, and superglued in place.
Painted gunmetal.
Problems arrive with the two
mudguards. The etch triangular mounts are too wide and interfere with the
wheels. And the mudguards themselves are thick and difficult to bend to a
semi-circle. This time I scratch built them by bending a thin length of plastic
card to the right radius, and then fixing them in place on two small rods
attached to the u/c legs. Much easier than fiddling around with metal and
superglue. If God had intended us to use etched metal, He wouldn't have called
it plastic modelling.
I tried using the etched spoke wheels at this point, but failed. I
annealed them by holding over a lighter flame
and then tried to create a dish effect, but it just
would not work, and I ended with two hopelessly wavy rims. They went back in the
spares box, and I resorted to the fabric coveted wheels. A shame, because I have
never found a suitable method of doing spoked wheels.
 Etched
sets are always flat and two dimensional, without the roundness of the spokes.
And if anyone can enlighten me on how to dish them I
would be grateful. Because I have an old Pyro Martin-Handasyde kit, finished,
and looking altogether excellent except for the miserable clear plastic spoke
wheels, which ruin the whole thing.
I would write it up for this website, but would be too
ashamed to show you the pictures of those wheels. And I suspect that this is one
kit which you can't cheat on with fabric covered wheels.
Finally, the large windscreen can be cut from the acetate sheet and
prodded into place using Clearfix. And the propeller was painted in mid-stone (Lifecolour
again, but any light to medium brown colour will do. Dark Earth is a bit too
dark.) With a clear orange coat for polish and a little etched boss I had in the
spares box, then
| CONCLUSIONS |
I would recommend it to anyone but a beginner. Especially someone, who
is tiring of all the
Western Allies' aircraft and likes to set out for
distant shores. There are huge areas of Middle European and Russian aviation
only recently coming to light thanks to the fall of the Iron Curtain, now more
than 20 years ago. It is strange to think that there is a whole new generation
coming up who never experienced the Cold War.
| REFERENCES |
http://www.mincbergr.net/index.php?page=aero-ae-10-hb-b-i
http://www.airliners.net/photo/1396279/
http://www.abpic.co.uk/photo/1091272/
http://www.flickr.com/photos/theadventurouseye/5468561910/
http://www.khs.at/prag/prag.htm
http://toulky.vojenstvi.cz/foto_index.php?fid=1571
October 2013
If you would like your product reviewed fairly and fairly quickly, please contact the editor or see other details in the Note to Contributors.