
Classic Airframes 1/48 He-51
| KIT #: | 96-407 |
| PRICE: | $29.95 MSRP, I paid $5 for mine. |
| DECALS: | Two Options |
| REVIEWER: | Lee Fogel |
| NOTES: |
Rigging can be fun! |
| HISTORY |
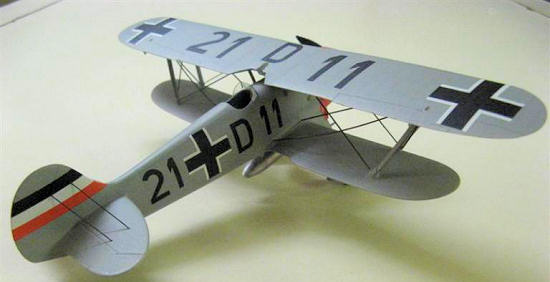
The Heinkel He 51 was the fledgling Luftwaffe’s first mass-produced dedicated fighter aircraft. It served with distinction with the Legion Condor in the early part of the Spanish Civil War but was later outclassed but the I-15 and I-16 fighters it faced. It then served in the light ground attack role and had assumed an advanced trainer role by the beginning of the Second World War. A sturdy and capable aircraft, it has long been a favorite of both Luftwaffe and biplane aficionados.
| THE KIT |
This kit has been issues twice by
Classic Airframes.
This is the first release (circa
1996).
The 2nd
release (circa 2008)
is a completely new kit so this review may not be suited for addressing the
newer release.
I received this kit from a friend who had
 started
it but then lost interest.
The wheel spats and cockpit had been started, the
horizontal stabs added to the fuselage halves and the lower wings glued
together.
The parts are molded in a light gray color and have a slightly
grainy texture (mainly
on the struts and smaller parts).
There are a few small resin pieces mainly used in the
cockpit.
A small PE fret is included and is mostly used for the cockpit and minor
surface details.
The instructions are four pages, printed clearly and do have a
rigging diagram.
The decals have a color profile sheet that offers two options and
are printed very cleanly and look useable.
started
it but then lost interest.
The wheel spats and cockpit had been started, the
horizontal stabs added to the fuselage halves and the lower wings glued
together.
The parts are molded in a light gray color and have a slightly
grainy texture (mainly
on the struts and smaller parts).
There are a few small resin pieces mainly used in the
cockpit.
A small PE fret is included and is mostly used for the cockpit and minor
surface details.
The instructions are four pages, printed clearly and do have a
rigging diagram.
The decals have a color profile sheet that offers two options and
are printed very cleanly and look useable.
| CONSTRUCTION |
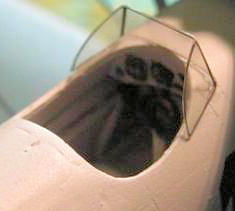
The cockpit had already been
completed and added to one side of the fuselage.
I cleaned up a few things and added Crystal Clear
for the gauge faces.
The fuselage halves were then joined together using
Plastruct liquid cement and the engine intake scoop and PE screen were then
glued into place.
The fit of the fuselage halves and scoop was good
with minimal filler required.
I
 then
glued the completed lower wings to the fuselage.
Fit here is so-so with a good amount of Squadron
White Putty required to smooth the joined areas out.
I also cleaned up the seams from where the lower
wings were glued together.
I then drilled out the rigging holes for the
horizontal stabs, landing gear, lower wings and fuselage.
The wing struts were also cleaned up and drilled at
this time.
I glued the spinner backing plate on and added the two
ventilation holes and four fasteners to the front of the cowling.
then
glued the completed lower wings to the fuselage.
Fit here is so-so with a good amount of Squadron
White Putty required to smooth the joined areas out.
I also cleaned up the seams from where the lower
wings were glued together.
I then drilled out the rigging holes for the
horizontal stabs, landing gear, lower wings and fuselage.
The wing struts were also cleaned up and drilled at
this time.
I glued the spinner backing plate on and added the two
ventilation holes and four fasteners to the front of the cowling.
 anchored
it with another bead of super glue.
This was repeated for the 2nd
wire.
I then turned to the landing gear.
Having already drilled the holes for the rigging in the
landing gear I figured I could slide a piece of brass rod thru the holes to keep
the gear steady and lined up while I applied glue to the attachment wires and
positioned them into place.
This worked out very well with the super glue acting as
both adhesive and filler where the landing gear attached to the fuselage.
Once this assembly was complete I simply removed the
wire from the holes. I
let the model sit overnight to ensure a solid bond and returned to it the
following day.
Another piece of monofilament was cut to length and attached to
the lower port wing with super glue.
This was then threaded through the landing gear struts,
pulled tightly and anchored to the lower starboard wing with (what
else?) super glue.
anchored
it with another bead of super glue.
This was repeated for the 2nd
wire.
I then turned to the landing gear.
Having already drilled the holes for the rigging in the
landing gear I figured I could slide a piece of brass rod thru the holes to keep
the gear steady and lined up while I applied glue to the attachment wires and
positioned them into place.
This worked out very well with the super glue acting as
both adhesive and filler where the landing gear attached to the fuselage.
Once this assembly was complete I simply removed the
wire from the holes. I
let the model sit overnight to ensure a solid bond and returned to it the
following day.
Another piece of monofilament was cut to length and attached to
the lower port wing with super glue.
This was then threaded through the landing gear struts,
pulled tightly and anchored to the lower starboard wing with (what
else?) super glue.
At this point I glued the interplane struts and cabane struts in place. For those that may not be familiar with biplane terminology the interplane struts are the outer wing struts while the cabane struts are located on the fuselage in front of the cockpit. The attachment points on both the wings and the struts are, in a word, lousy. The interplane strut holes in the wing are practically non-existent and they all have very thick flash at the end of each strut were the nub should go into the hole on the wing. Plus, the forward angle of the interplane struts are not molded into the strut meaning that the struts are glued into place 100% vertical instead of at the proper angle. Not paying closer attention to this detail would have dire consequences for me later on. The instructions do illustrate the main struts at an angle as do the pitcures in William Green’s Warplanes of the Third Reich. As a novice biplane builder I should have simply paid better attention to this area and I did not. But it does not excuse the lack of the proper mounting angle and to achieve this will take some measuring, patience and teeth-gnashing on the part of the builder. Limited-run or not this is just poor product planning IMHO. Anyhow, I drilled out the attachment holes on the wings and cleaned up the flash on the struts the best I could.
| FINAL CONSTRUCTION |
Knowing that I was going to have to
mask this off I went ahead and painted the nose, spinner, inner prop blades,
radiator and the upper landing gear struts RLM 23.
Please see my detailed notes on this in the section
below.
 filament
and then the entire model sat for most of the day to allow for a strong bond.
filament
and then the entire model sat for most of the day to allow for a strong bond.
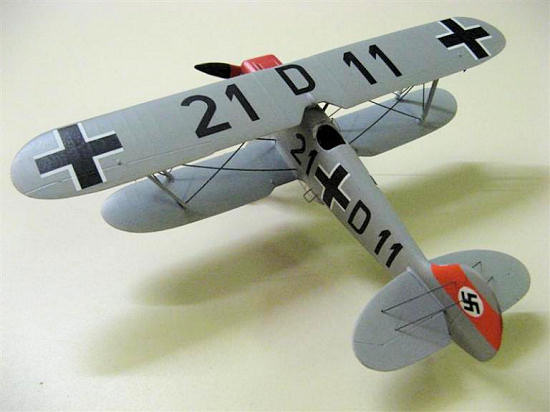
| COLORS & MARKINGS |
The
decals have two options, one a Legion Condor aircraft and the other of 1./JG
132 based in 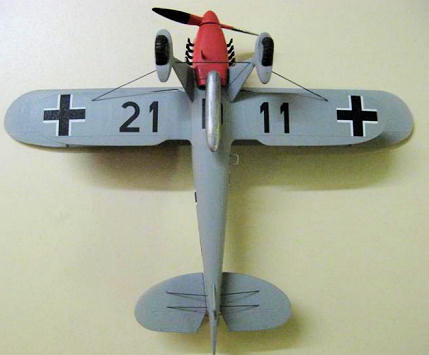 15%
Testors Gloss Orange and 10% MM RLM 21 Semi-Gloss White.
Once mixed this was laid down on the nose, spinner,
inner prop blades, radiator and upper landing gear struts and allowed to dry
overnight.
One thing to note here is that the box top and the decal
profile show two different mask lines for the cowling.
I had already painted the cowling and installed the
upper wing when I caught this.
And I had a hard time finding a picture of this
plane to verify which was correct.
The rest of the aircraft was painted RLM 63 per the
instructions.
Having no RLM 63 in stock (and
my LHS being too far away) I decided to take a peek at
my RLM color chart and see about mixing this.
I noticed that RLM 63 has FS 36375 assigned to it.
So, I took a gander through my stock on hand and
what do you know I had it!
Apparently FS 36375 is Light Ghost Gray in the Model
Master line of paints.
So, after masking off the cowling and radiator scoop
I thinned this out and laid it on with nary an issue.
Once this was done I let the model dry overnight,
removed my masking and then applied Testors Glosscote in preparation for the
decals.
15%
Testors Gloss Orange and 10% MM RLM 21 Semi-Gloss White.
Once mixed this was laid down on the nose, spinner,
inner prop blades, radiator and upper landing gear struts and allowed to dry
overnight.
One thing to note here is that the box top and the decal
profile show two different mask lines for the cowling.
I had already painted the cowling and installed the
upper wing when I caught this.
And I had a hard time finding a picture of this
plane to verify which was correct.
The rest of the aircraft was painted RLM 63 per the
instructions.
Having no RLM 63 in stock (and
my LHS being too far away) I decided to take a peek at
my RLM color chart and see about mixing this.
I noticed that RLM 63 has FS 36375 assigned to it.
So, I took a gander through my stock on hand and
what do you know I had it!
Apparently FS 36375 is Light Ghost Gray in the Model
Master line of paints.
So, after masking off the cowling and radiator scoop
I thinned this out and laid it on with nary an issue.
Once this was done I let the model dry overnight,
removed my masking and then applied Testors Glosscote in preparation for the
decals.
The decals are printed
by Propagteam and are very thin and have good opacity.
Upon very close inspection the Balkenkreuz are
just printed
slightly out of register.
I simply trimmed each edge with my scissors and that was
that.
I then applied them using warm water and Solvaset.
They went on very well and are terrific…some of the best
I have ever used actually.
The carrier film was nonexistent once dried and they are
so thin that they look painted on at first glance.
Everything here went smoothly until I got to the
tail/rudder.
I had already done the rigging for this section and overlooked
that the rigging would interfere with how they were positioned.
Argh!
So, I decided to place them on underneath the
 rigging,
make two cuts to the decal and then slide it into place.
On the starboard side the tri-color decal went on
without too much fuss and only minor touch up on the black section was needed.
The port side however wound up being a real mess as the
decal broke (due to my
ham-fisted prodding) and then started to splinter apart
after repeated maneuvering.
So, this required a lot of touch up with MM Flat White,
MM Flat Black and my custom RLM 23 mix.
It actually turned out pretty good and only under close
scrutiny can you see some of the touch up work.
The decals were allowed to set up over night and then
Testors Dullcote was applied to the entire model.
It was at this stage that I dropped the Heinkel, busting
the starboard side interplane struts, jarring some of the rigging loose and
breaking off one of the wheel spats.
Plus the Dullcote had not set up yet.
So, after a few minutes of sheer disgust I cleaned
everything up, touched up a few spots with RLM 63 and, with super glue,
reattached the rigging and repaired the damaged struts.
rigging,
make two cuts to the decal and then slide it into place.
On the starboard side the tri-color decal went on
without too much fuss and only minor touch up on the black section was needed.
The port side however wound up being a real mess as the
decal broke (due to my
ham-fisted prodding) and then started to splinter apart
after repeated maneuvering.
So, this required a lot of touch up with MM Flat White,
MM Flat Black and my custom RLM 23 mix.
It actually turned out pretty good and only under close
scrutiny can you see some of the touch up work.
The decals were allowed to set up over night and then
Testors Dullcote was applied to the entire model.
It was at this stage that I dropped the Heinkel, busting
the starboard side interplane struts, jarring some of the rigging loose and
breaking off one of the wheel spats.
Plus the Dullcote had not set up yet.
So, after a few minutes of sheer disgust I cleaned
everything up, touched up a few spots with RLM 63 and, with super glue,
reattached the rigging and repaired the damaged struts.
 intake screens dry brushed with Floquil RLM 02.
I painted the exhaust stubs MM Flat Black and then dry
brushed MM Rust and MM Metalizer Burnt Iron on them.
Attaching the exhaust stubs looked to be a real chore.
However I came up with an idea that had me lay down a
piece of wire where the stubs would hang down and tack it into place with
Blu-Tac.
This would allow for me to glue them onto the cowling without the worry
of them drooping out of place and then remove the wire.
Looking at my references I noticed a small tube that
attached between the 4th and 5th
exhaust stubs.
I replicated this with a small piece of wire.
The acetate windscreen is a one-piece affair that you
have to cut out from the acetate sheet and carefully bend to fit.
This takes a few times to bend it to achieve the correct
shape.
I did just that and it looks good.
The windscreen was attached with 5-minute epoxy.
Please note that the framing is printed on the acetate
and requires no painting.
The drop tank was cleaned up and the mounting bar
repaired as this was damaged at some point. I used brass rod and PE framing
scrap to do this.
It was then painted MM Metalizer Aluminum Plate, buffed
and attached to the underside.
intake screens dry brushed with Floquil RLM 02.
I painted the exhaust stubs MM Flat Black and then dry
brushed MM Rust and MM Metalizer Burnt Iron on them.
Attaching the exhaust stubs looked to be a real chore.
However I came up with an idea that had me lay down a
piece of wire where the stubs would hang down and tack it into place with
Blu-Tac.
This would allow for me to glue them onto the cowling without the worry
of them drooping out of place and then remove the wire.
Looking at my references I noticed a small tube that
attached between the 4th and 5th
exhaust stubs.
I replicated this with a small piece of wire.
The acetate windscreen is a one-piece affair that you
have to cut out from the acetate sheet and carefully bend to fit.
This takes a few times to bend it to achieve the correct
shape.
I did just that and it looks good.
The windscreen was attached with 5-minute epoxy.
Please note that the framing is printed on the acetate
and requires no painting.
The drop tank was cleaned up and the mounting bar
repaired as this was damaged at some point. I used brass rod and PE framing
scrap to do this.
It was then painted MM Metalizer Aluminum Plate, buffed
and attached to the underside.
| CONCLUSIONS |
 Good
grief!
After building this kit I can see why so few have appeared on contest
and club meeting tables.
The strut issues are a bit of a struggle even for the
common modeler.
Throw in the needed reinforcement work for the landing gear,
lower wings, horizontal stabs and the so-so fit of the lower wings to the
fuselage and it’s a recipe for frustration.
And I’m not sold on the red in the decals being entirely
correct for RLM 23.
However, if you can get past all of this the fine
surface detail, well detailed cockpit and nice quality decals make for a nifty
looking biplane.
Plus a bit of a sense of accomplishment never hurt anyone and you
will certainly have that once you complete this kit!
Good
grief!
After building this kit I can see why so few have appeared on contest
and club meeting tables.
The strut issues are a bit of a struggle even for the
common modeler.
Throw in the needed reinforcement work for the landing gear,
lower wings, horizontal stabs and the so-so fit of the lower wings to the
fuselage and it’s a recipe for frustration.
And I’m not sold on the red in the decals being entirely
correct for RLM 23.
However, if you can get past all of this the fine
surface detail, well detailed cockpit and nice quality decals make for a nifty
looking biplane.
Plus a bit of a sense of accomplishment never hurt anyone and you
will certainly have that once you complete this kit!
| REFERENCES |
Green, William,
Doubleday, 1970. Catalog card number 88-29673, pp 267-273.
Cohausz,
Peter W., Schiffer Publishing, 2003. ISBN: 0-7643-1873-X, pp 94-96.
The Legion Condor: A History of the Luftwaffe in
the Spanish Civil War 1936-1939,
Ries, Karl and Ring, Hans, Schiffer Publishing, 1992.
ISBN: 0-88740-339-5, pp 16, 64, 94, 96, 138.
Special thanks to the members at MM for their advice and suggestions on rigging!
March 2010
If you would like your product reviewed fairly and quickly, please contact me or see other details in the Note to Contributors.