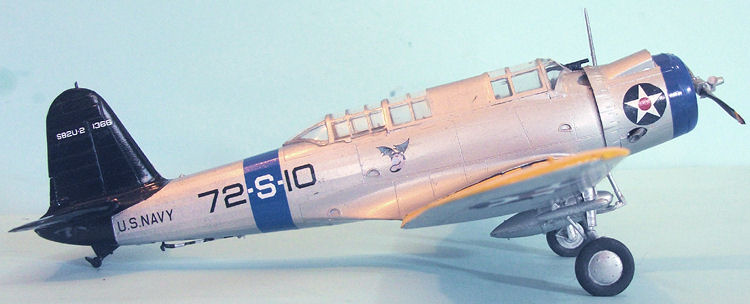
Accurate Miniatures 1/48 SB2U-1 Vindicator
| KIT #: | ? |
| PRICE: | $29.95 SRP when new |
| DECALS: | One option |
| REVIEWER: | Tom Cleaver |
| NOTES: |
Yellow Wings Decals
48-008 “SB2U-2 Vindicator”, 48-009 “Vindicator Section Leaders Colors”,
48005 “US Insignia 1919-42" and 48-018 Pre-War Insignia Pt. 2" sheets
used for this project. |

| HISTORY |
With the rapid development in aeronautical technology in the 1930s, it
was the quite often the case that an airplane that did represent the state of
the art when it appeared in the middle years of that decade was obsolescent if
not obsolete by the time the war came and the airplane faced the uncompromising
crucible of combat.
So it was with the  ts
performance with a useful warload fell sadly short of what was needed.
It possessed barely-adequate lateral control and at normal loaded weight
its maneuverability was sluggish.
The SB2U was Chance-Vought’s answer to a requirement put forward by the
Bureau of Aeronautics in 1934 for a two-seat scout and dive-bomber.
The specification called for a substantial performance advance over
existing aircraft in this category, though it did not call for a monoplane
per se. Rex Beisel’s design
resulted in a contract for a prototype, the XSB2U-1, on
The XSB2U-1 first flew on January 4, 1936. After preliminary contractor’s
tests were completed, it was delivered to the Navy at NAS Anacostia on July 2,
1936. The Navy’s evaluation
suffered a setback when the prototype crashed near Norfolk on August 20, 1936.
Fortunately, testing was sufficiently advanced for the Navy to proceed with
ordering 54 SB2U-1s on October 26.
The SB2U-1 differed from the XSB2U-1 with strengthened cockpit framing,
repositioning of the radio mast, addition of a substantial carburetor intake,
and use of the R-1535-96 Twin Wasp, which provided a useful increase in power to
825 h.p. on takeoff and 750 h.p. at 9,000 feet, raising maximum speed by 20 mph
at all altitudes. Range with a
500-lb bomb in scouting configuration was 699 miles, while use of a 1,000-lb
bomb in the dive-bombing role reduced range to 635 miles.
Vought had originally proposed to use a braking propeller to slow the
dive speed and maintain bombing accuracy, but this failed to work in practice
and was abandoned. Seven-finger
“fences” above and below the outer wing on the main spar were the next solution,
but these produced excessive buffeting.
Eventually, the Navy was persuaded to accept shallower dive angles and
the expedient of extending the landing gear to provide sufficient braking in a
combat dive. The airplane was never really effective as a dive-bomber.
 This was ultimately fortunate for the Navy, inasmuch as it led them to
contract with Northrop for another dive bomber that eventually emerged as the
excellent SBD series. Had the Navy
been forced to use SB2Us in the dive-bombing role during the crucial year of
1942, the history of the Pacific War might have been vastly different.
The 54 SB2U-1s produced in 1937-38 equipped VB-3 and VB-2.
On January 20, 1938, the Navy ordered an additional 58 SB2U-2s - which
differed from the SB2U-1 only in some internal equipment - to equip VB-4 and
later units being organized. The
SB2U-2-equipped VB-4 swapped places with the SB2U-1-equipped VB-3, with the
units taking each other’s designations and ship assignments.
Eventually, as SB2U-2s were issued to units flying the SB2U-1 as
attrition replacements, it was discovered that SB2U-1 outer wings could not be
used on SB2U-2s, since the lower attachment points were just different enough to
not allow a solid lock. The
remaining SB2U-2s were sent to VS-72 when it went aboard the newly-commissioned
USS Wasp in 1940.
During 1941, SB2U-1s and SB2U-2s were used on the Neutrality Patrol,
flying from USS Ranger and USS Wasp. During the spring of 1941,
USS Wasp provided air cover for a U.S. Navy task force searching for the
German heavy cruiser “Admiral Hipper,” then on an Atlantic raiding mission.
Wasp kept her SB2Us until she was sent to the Pacific Fleet in
July 1942.
| THE KIT |
 The SB2U series was the last original design from old Accurate
Miniatures. The reorganized company
issued the kit in 2005; unfortunately, the first pressing had mold sinks on the
fuselage parts ranging from mild to severe, and several modelers have reported
short-shot clear parts. Later
pressings solved these problems, but if you find an Accurate Miniatures kit on
the shelf today, it is impossible to tell if it has the bad parts until it is
opened for inspection. Being
commissioned recently to do an SB2U-3, I thought it might be a good idea to
renew my acquaintance with the kit, since my LHS had an SB2U-1 kit still on the
shelf. Fortunately, this turned out
to be one of the later releases with the good parts.
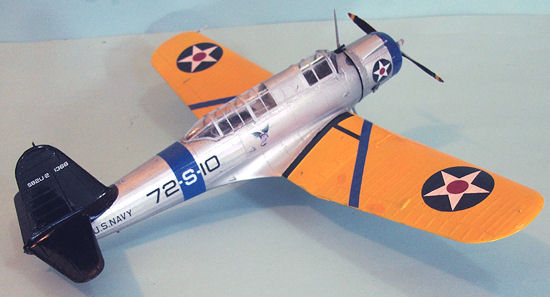
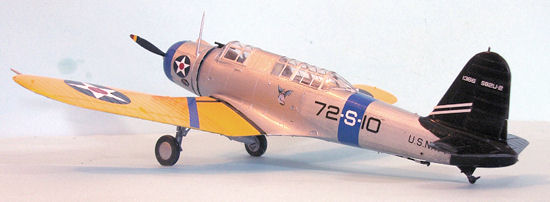
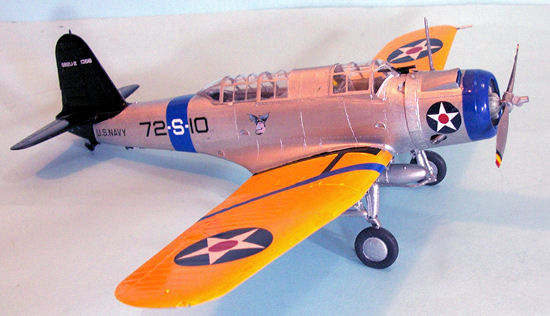
I decided I would use the Yellow Wings sheets released in 2005-06, and do
an SB2U-2 from VS-72 aboard Wasp.
Yellow Wings released sheets that allow a modeler to build any Vindicator used
by any of the four squadrons that operated the SB2U-1 and SB2U-2.
| CONSTRUCTION |
 The big problem with this kit is that it is extremely “fiddly” to
assemble. This was a feature with
all Accurate Miniatures kits other than the SBD Dauntless series and the TBF/TBM
Avenger series; it is only moreso with the SB2U.
After painting the interior parts with Tamiya “Flat Aluminum,” I
assembled them and managed to get them inside the fuselage.
I found that gluing the instrument panel to the front end of the fuselage
by the lower panel part considerably eased trying to fit that to the front
cockpit assembly and get it all inside the fuselage in the proper position.
The lower rear fuselage part is
extremely fiddly, and I found I needed to glue one side to the fuselage
sub-assembly, let it set up, then squeeze the fuselage to get the other side
glued, then hold it in position while it set up.
It is also difficult to assemble the engine and the cowling.
I attached the engine mount to the cooling flaps part, then attached the
cowling sides that had been previously glued together with the exhausts in
position, then inserted the engine, and finally attached the forward cowling.
(I said it was fiddly, right?).
One has to take care in attaching this sub-assembly to the fuselage, to
make sure it is aligned properly: carefully align the rear edge of the cowling
flaps so they are parallel to the first panel line on the fuselage so that the
engine is on straight, and be certain it is aligned straight with the4 fuselage
centerline from above. It is very
easy to get this part cocked too far up or down, or from side to side without
being aware that happened.
The wings were assembled and attached, then the horizontal stabilizers.
Taking a look at the cockpit with had some parts a little bent from
positioning, I decided to use the closed-canopy option.
This is problematic, because they managed to mold that part with window
framing its entire length; one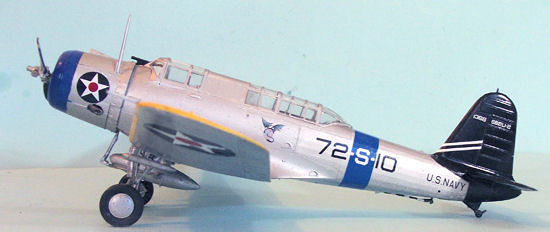 has to sand off the framing from the section between the two cockpits and do so
very carefully to insure the window areas that should be clear remain so.
This part also has terrible fit to the fuselage and needed starting from
the front in sections and held until the glue set up before proceeding to the
next section. I ended up having to
use white glue to fill in the gaps around the gunner’s rear canopy.
With all that, I thought the model was now ready for paint and then found that the masks provided in the kit do not fit the clear areas. Fortunately, the Eduard-style mask(using Kabuki tape) that was in the SB2U-3 kit had sufficient masks for two complete canopies, and these all fit. Otherwise, it would have been the tedious job of taping and cutting my own masks for a lot of window area.
| COLORS & MARKINGS |
The Golden Wings scheme is complicated.
I first painted the upper wings white, then applied the Orange-Yellow.
I then painted the cowling ring with a mixture of Tamiya X-4 “Blue”
lightened with “White” to match the blue shade of the section markings decals.
I then painted the tail with Tamiya “Semi-Gloss Black.”
These areas were then all masked, and the model was
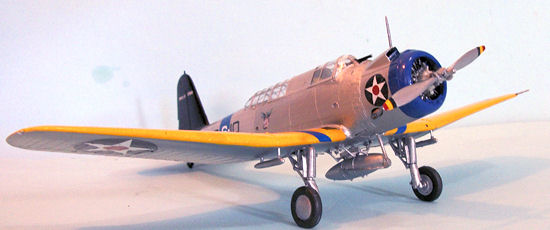 given
an overall coat of Tamiya “Flat Aluminum.”
I then masked off the fabric areas and gave the metal areas a coat of
brush-painted Auto-Air “Aluminum”, which does not leave brush strokes and when
applied this way gives the look of Aluminum lacquer.
I then unmasked the model and gave it an overall coat of Xtracrylix Gloss
clear varnish.
The Yellow Wings decals went down with no problem and look far better
than the kit decals.
When the decals were fully set, I washed off the model and then applied
Xtracrylix Satin Clear overall. I
then unmasked the canopy, and attached the landing gear, drop tanks, practice
bombs and landing gear. Since U.S.
Navy aircraft of this period were maintained in immaculate condition, I did not
apply any weathering to the model.
| CONCLUSIONS |
For anyone who enjoys
carrier aircraft, and especially the carrier aircraft of the “Golden Wings Era,”
this kit is a must-have.
Review Kit courtesy of my wallet. Decals courtesy of Yellow Wings Decals.
If you would like your product reviewed fairly and fairly quickly, please contact the editor or see other details in the Note to Contributors.