| KIT #: | 92048 |
| PRICE: | £16 in the UK or Approx $32 |
| DECALS: | Four options |
| REVIEWER: | Chris Peachment |
| NOTES: | Short run kit with resin and photo etch |

| HISTORY |
The Curtiss Hawk II was essentially a F11C-2 Goshawk modified for
export. It was fitted with a Wright R-1820F-3 Cyclone of 710hp, carried the same
armament as the production F11C-2, and was exported in quantity to Turkey, the
first customer, which took delivery of 19 in August, 1932. Colombia placed an
order at the end of October 1932, receiving an initial batch of four twin
floatplane Hawk IIs, the first of a total of 26 float fighters delivered by the
end of July 1934. These were used in the Colombia-Peru war of 1932-1933. Nine
Hawk IIs were supplied to Bolivia, of which three had interchangeable wheel or
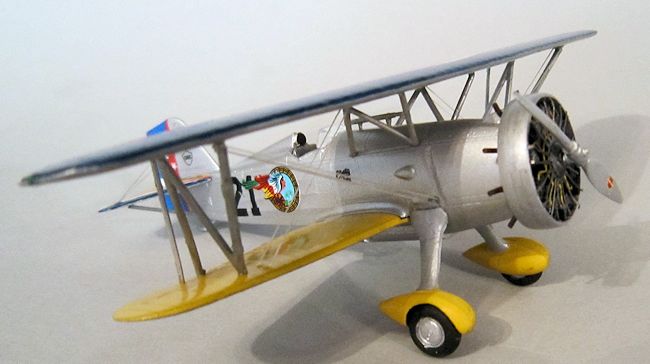
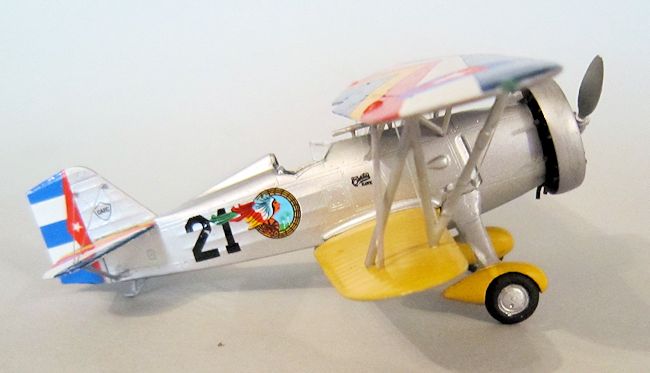
float undercarriages. Four were delivered to Chile, 52 to China, four to Cuba of
which mine is an example, two
 to Germany,
one to Norway and 12 to Thailand.
The sole surviving Curtis Hawk Export, which was piloted by WWI German
ace Ernest Udet in the 1936 Olympics, can be seen in Cracow museum.
My particular model was piloted by Len Povey, a self taught pilot, who
was one of the first enlisted pilots in the US Army Air Force in 1922. He was
instrumental in the building of Cuba's Air Force, and took this aircraft to the
1936 Air Show in Miami, where he invented the famous aerobatic manoeuvre,The
Cuban Eight, by accident.
While performing for the trophy, he decided to do a triple Avalanche,
which is three snap rolls at the top of a loop. At the top of the loop. Len saw
that he had too high an entry speed for the snap, so he rode over the top.
Coming down the other side, he did a half-roll and pulled up into another loop,
again half-rolling on the down side before pulling out.
The new manoeuvre was a hit with the crowd, and when Povey was asked by
the
press what he had done, he replied without thought that it was
a “Cuban eight”. The manoeuvre exists to this day and is
performed by aerobatic teams around the world.
| THE KIT |
 No information supplied
| CONSTRUCTION |
Construction began as usual with the interior, which has more than
enough detail for a small open cockpit. Too often in the past with short run
kits, the floor never fits, and has to be reduced by a process of
try-it-and-see. But this one to my surprise fitted first time.
The interior and seat was painted aluminium, with some dark grey detailing and a wash to add depth. Once the seats were dried, the two fuselage halves were cemented and the seams were sanded smooth. No filler was needed.
| COLORS & MARKINGS |
For obvious reasons, the wings and tailplanes were kept separate
and painted at this stage. Both wings got an undercoat of matt Humbrol white,
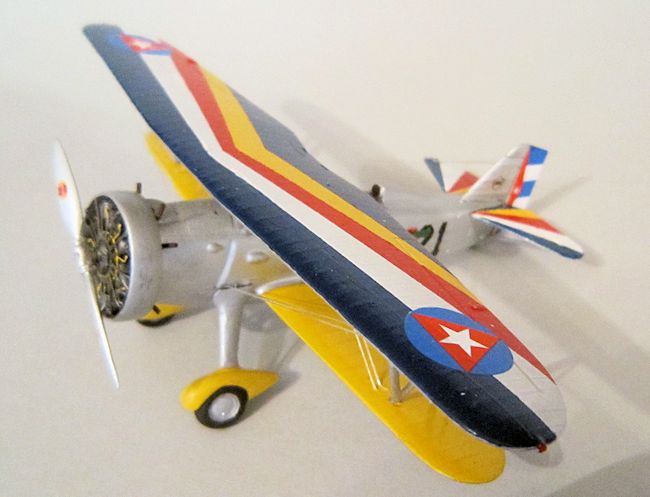
and then Humbrol Yellow from a rattle can. The complex striping on the upper
wing requires a lot of masking, an d so it is best to let the yellow cure for a
few days, because even low-tack tape like Tamiya's can still mark a gloss
finish.
Masking the upper wing is very tricky because according to the box art,
and whatever photos I have, the lines of each colour are not quite parallel, but
make an arrow shape towards the front. Nor are the different colours of the same
width. It is easier to look at the box art than to describe here, but one good
way to do it is to print off some photocopies and make masks, from which you can
make pencil marks on the yellow surface. Try to keep everything symmetrical, and
counting the ribs can help here. Once the masking tape is in place, burnish the
edges well with some sort of burnishing tool. I am not quite sure what it is
called but I use an old implement which women used to use to push back the
cuticles of their fingers.
I found it years ago, and it must have belonged to my
mother. The rounded spoon-shaped end is good for making sure that masking tape
won't allow bleeds.
It will take a while to do all the different colours,
but when you finally you remove the tape, you will be dazzled by a radiant
sunburst.
The rest of the aircraft can be painted aluminium, and the Cuban
roundels and rudder markings are best fixed at this stage. I bedded them all
down with some microset, though not too much as this can scar aluminium paint.
After that an overall coat of semi-gloss varnish will blend everything together.
| FINAL CONSTRUCTION |
The undercarriage comes with the streamlining in two parts, so let them
dry and sand down the prominent seams, before giving the fairings a coat of
yellow.

The final construction is just a question of joining up all the
sub-assemblies. The top wing joined the struts with no problem at all, and I
wish I could say that about every biplane. And the rigging is a simple
X-pattern, though note that this aircraft uses double wires. I used my usual
method of elastic thread, coloured with a silver gel pen, and glued in placed
with superglue applied with a sharpened toothpick.
If you are daunted by rigging, then this aircraft would be a good a
place to start because it is so simple. Once rigged, the two aileron actuator
rods can be snapped in place with some glue on the ends. The tiny windscreen was
last be fixed in place using Humbrol's excellent Clearfix.
| CONCLUSIONS |
RS now have a very wide range of aircraft which aren't covered by
mainstream manufacturers, including this little gem from the golden era. It is a
fine kit, and a good tribute to Len Povey one of America's great aviation
pioneers.
| REFERENCES |
http://www.aviastar.org/air/usa/curtiss_hawk2.php
http://www.wings-aviation.ch/11-RTAF/200-Aircraft/Curtiss-HawkII/Fighter.htm
April 2014
If you would like your product reviewed fairly and fairly quickly, please contact the editor or see other details in the Note to Contributors.