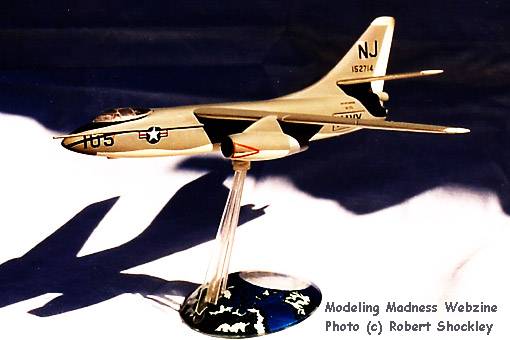
Revell 1/68? A-3 Skywarrior by Robert Shockley

Not long ago, my favorite local hobby shop had a moving sale, and I managed to pick up five 1/72 A/C kits for under $20.00 (I hope he moves again soon!). I decided to get a "theme group" of kits, mainly because it made it SO much easier picking out which kits to get, but also because I thought I'd assemble a collection of aircraft representative of a classic Navy strike unit (bombers, fighters, recon, electronic warfare, tanker etc.). I selected 4 Viet Nam era jets, plus a Korean war-era jet (a Banshee) for a change of pace if I needed it. The Nam jets selected were a RA-5C Vigilante, an A-7 Corsair II, a F-8 Crusader, and an A-3 Skywarrior, which is the subject of this review.
This is a Revell kit (sorry, I don't have the kit#), that was more than likely first issued in the mid to late 50's, judging by the box art and the quality of the model itself, which leaves a lot to be desired. It was pretty much flash-free, but the plastic is very thick, which was probably a good thing, considering all the putty/sanding work I had to do on it! Options included are folding wings and tail (the A-3's tail had to be folded down to get the plane in the hangar deck). I decided not to use those options because the fit was bad to the point that when they were in the "flight" position, huge gaps showed up that really killed the models appearance. You also have the choice of using either a stand, or the wheels. I decided to use the stand, mainly because I knew I'd be spending considerable time on the fuselage, and didn't want to scratch-build a nose gear wheel-well, but also partially because I got all-nostalgic over the stand (it's the clear partial globe kind that was in lots of older kits).
The cockpit is BARE. 3 figures are included, 2 back-to-back, and a co-pilot, each of which mounts into either side of the fuselage before the 2 halves are put together. No other detail is provided. Since you can really see inside this thing, even down thru the nose gear opening (another reason why I went with the stand), I had to fix her up a little, so I scrapped an old 1/32 scale F-14 Tomcat, and used the cockpit instrument clusters to make up an interior for the A-3. It might sound like it wouldn't match, but it actually looks really good. Sheet styrene was used to build up the instrument consoles, with the F-14 stuff making up the faces. I also added a floor, as the 2 sets of crew don't meet together in the middle, leaving a gap that is visible.
Once finished w/ the cockpit, it's time to put the fuselage together, which is an easy enough job, AS LONG AS YOU DON'T FORGET TO INSTALL THE CANNONS IN THE TAIL FIRST!!! Putty was used to fill some seam gaps on the belly, and then it was time to install the wing. MAJOR problems here... #1- the outer-wing is much thicker than the inboard side, and #2- the wing fits into a notch in the upper fuselage but is about 3/16ths of an inch too high. I took care of problem #1 BEFORE the wing was installed, which was a good thing, considering how much pressure I had to use to sand them down equal. When installing the wing, you can go ahead and remove the locator tabs, as they hinder the wing from sitting flush. Again, I had to really bear down on this thing to get the wing level w/ the rest of the kit. Of course, any panel lines in these areas were wiped out, and had to be fixed later.
The upper portion of the tail is also thicker than the lower portion, which required more filling, filing and sanding. The engine nacelles also used locator pins for installment, but they prevent the nacelles from lying flush on the wing surface, so cut 'em off. Minor putty work was needed on the nacelles, and the underside seam of the wing/fuselage joint (hint: much easier if you take care of that seam BEFORE you install the nacelles). The main gear doors don't match the openings and needed filling, filing and sanding. Another tricky area is the refueling probe. The probe has a small piece that is supposed to strengthen the part by connecting the probe to the fuselage, but it looked awful so I cut it off. It now looks correct, and is more than strong enough.
I airbrushed the kit a standard Navy light-grey over white, followed with a couple coats of dullcote, and applied a mix of kit and aftermarket decals. The only problem I had with the decals was getting the engine-exhaust warning decals for the engine nacelles to set flat. A couple coats of Micro-Set took care of that. The clear globe-stand has a "map" of the Artic, with raised outlines on the underside, which makes for a nice smooth exterior appearance. Both airbrush and regular brushes were used to paint the ocean (Blue Metal Flake), earth (Gloss Beret Green) and snow (Gloss White).
Believe it or not, I enjoyed making this model even though a ton of work is required to produce a quality Skywarrior. It was a versatile aircraft of the fleet for many years and no collection of modern Navy aircraft is complete without one. Thanks again to Scott for putting up such an excellent modeling site and allowing others to participate.
Copyright ModelingMadness.com. All rights reserved.