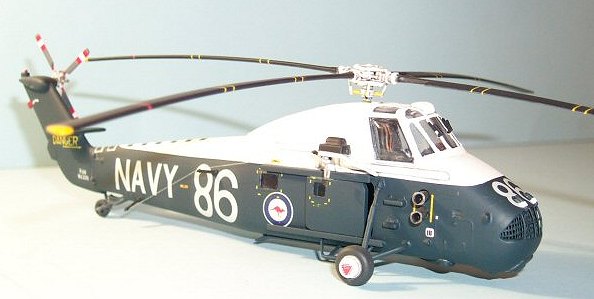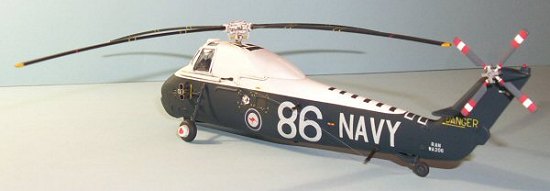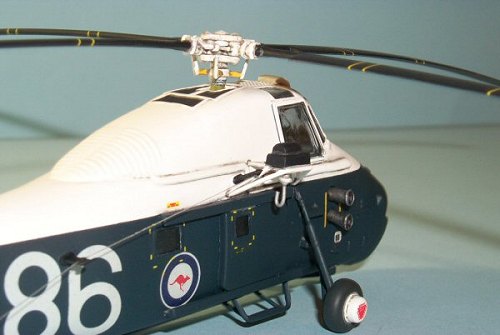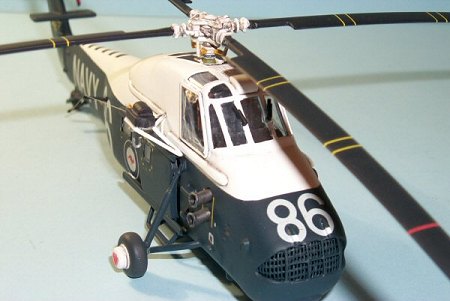
Matchbox 1/72 Wessex HU.5/HAS 31A
| KIT #: | ? |
| PRICE: | $4.00 at a swap meet |
| DECALS: | Two options |
| REVIEWER: | Michael Johnson |
| NOTES: |

| HISTORY |
The Westland Wessex is essentially a licence-built Sikorsky S-58 fitted with one (or two) turboshaft engines in place of the original piston power plant, and converted to anti-submarine, utility and assault variants.
The Mk.31, a variation on the RN HAS.3, was ordered by the Royal Australian Navy for operations from the carrier HMAS Melbourne. Twenty-seven were delivered in the twelve months from November 1962. Some served in a training role at the Nowra shore base, and others with HS 817 Sqn. on the Melbourne. In 1969 the 23 surviving Wessex’s were upgraded to Mk.31B standard, identifiable by the bulged gear housing behind the main rotor.
 The Wessex
was phased out of anti-submarine duties from 1975 by the Sea King, and 725
Sqn. was disbanded. The Wessex’s joined 723 Sqn. for miscellaneous duties
including Army support. The Wessex’s underwent a revival in 1984 when they
replaced the Navy's Grumman Trackers, often operating from ships such as
HMAS Stalwart and HMAS Tobruk, as well as from Nowra.
Westland Wessex Mk.31
|
TYPE:Anti
submarine and utility helicopter.
COUNTRY OF ORIGIN: Britain ENGINE: One Napier/Rolls Royce Gazelle 162 turboshaft of 1600 shp DIMENSIONS: Rotor diam.: 56 ft 0 in / 17.07 m. Fuselage length: 48 ft 4.5 in / 14.74 m Height: 16 ft 2 in / 4.93 m. WEIGHTS: Empty: 8,900 lb / 4,037 kg Max. loaded: 14,000 lb / 6,350 kg |
CAPACITY:
Normally 4.
PERFORMANCE: Max. speed: 110 kts / 204 kph Max. cruise: 105 kts / 195 kph Max. climb: 1,540 ft/ 469 m. per min Service ceiling: 14,100 ft / 4,298 m. Normal range: 262 n.mls / 483 km. ARMAMENT: (ASW) Two externally mounted torpedoes.
|
R.A.N.
SERVICE: 1963-1991
with HT 725 (training) at Nowra, and HS 817 Squadron (HMAS Melbourne); from
1975, when replacement Sea Kings arrived, Wessex’s transferred to 723 Sqn.
Preamble
Another of my end of project-on to the next, stash perusals yielded this old gem, purchased for the princely sum of $4 from a fellow club member, who was happy to pass it on to me as he knew I would build it!
| THE KIT |
 This is
the most recent boxing of the Matchbox Wessex, issued by Revell Germany
during the early to mid nineties. The decals seem to be better than other
Matchbox re-releases by Revell Germany decals that are often thick,
indistinct and reluctant to settle down on anything but a flat surface,
even with decal treatments!
So what is in the box? There are three sprues within the typical box, all moulded in light grey and a clear sprue for the canopy and windows. The canopy is rather thickly moulded but has nicely defined framing. The RAN HAS.31 option consists of a new nose and exhaust stubs.
Two decal options are provided, along with an instruction sheet with painting instructions for two helicopters, one RN and the other RAN.
The kit is typical of Matchbox, but with very fine raised panel lines other than the more usual trench like panel lines. Dry fitting indicated that the kit went together very well, with the most glaring inaccuracies centred on the cockpit and minor shape issues. Well I was not after a contest winner here at all, so I could safely ignore all the shortcomings built into the kit or otherwise.
| CONSTRUCTION |
Assembly started with the cockpit. Matchbox supply two seats, a centre console, foot pedals, joysticks and an instrument panel. The seats are certainly too tall but I did not want to accurise this kit, preferring to just add some Tamiya masking tape harnesses. While the seats were drying I scratch built a collective lever and cemented that in the correct position. I used various shades of Vallejo acrylics to paint all the cockpit components.
The instructions called for the removal of the RN type nose so that the RAN style nose could be added. This was done with a scalpel, lightly scoring along the moulded guides on each fuselage half until the nose came away. A quick wipe over with wet n dry tidied up the cut.
 The main
cabin was devoid of any sort of detail whatsoever, so the installed floor
and cockpit sides were quickly painted Vallejo Basalt Grey and the cabin
windows added. Once the paint was dry I added the floor and cockpit tub to
one fuselage half and then used masking tape to hold both fuselage halves
together, thus ensuring each assembly was square and true while the cement
cured.
The remainder of assembly proceeded smoothly and rather quickly, with only small amounts of filler in most areas required to smooth out ill fitting joints. I found the rotor gear housing covers very troublesome with significant filler required to smooth over the seam line and restore the surface contours. To add to this, cleanup was complicated by the need to protect raised surface detail.
Once this was done I cleaned up, polished and masked the canopy. The masked canopy was offered up to the fuselage and cemented into place with clear parts cement, reinforced with a careful application of liquid cement; this filled any gaps between the fuselage and the canopy. A quick application of white glue, with excess wiped away with a wet mk1 finger, smoothed out any remaining gaps. The cockpit side windows were added at this stage as well and did not fit very well at all, requiring some work to get a somewhat decent fit.
Once masking was completed, I attached the main gear legs to the fuselage. Matchbox supplies each assembly in two parts. This proved troublesome and much manipulation was needed to achieve correct sit and to ensure the assemblies were symmetrical. I am still not exactly happy with the final placement; it appears that the main gear sits “low” in relation to the fuselage.
| COLORS & MARKINGS |
 Now that
construction was finished I could settle down to masking fun and painting.
I started with the white area, using a mixture of Tamiya white primer and
Citadel skull white to achieve a nice even white finish. This was left to
cure for a week while I continued with other sub components. I then used
Tamiya masking tape to mask the demarcation line between the oxford blue
and white. Cut into thin strips, Tamiya masking tape is excellent for
masking around bends and corners.
I then used a spray can of Model Master Sea Blue, this giving a good shade approximation of the Oxford Blue used on the Wessex. The spray went on thick and did not seem to cure very well at all, so I sanded back the flaws as well as I could and over painted the area with Aeromaster USN Sea Blue. Certainly not the exact blue I was looking for as it is a little too green in shade but looked good enough based on some colour pics I have of the Wessex. Removing the masking revealed some minor runs which were dealt with fine wet n dry used wet and some touch up painting with white paint. The winch frame was then added with the winch mechanism box cover painted Vallejo flat black.
The completed airframe was put aside to cure prior to application of Johnsons “Super Stride” with a wide flat brush kept especially for this purpose. Now the Wessex was ready for decaling.
The
decals performed like champions, adhering very well even after several
adjustments in position. I was a little alarmed at the milky coloured decal
adhesive, but this dried perfectly clear. Indeed the only issue with the
decals was the nose number, which needed some cuts with the scalpel and
repeated applications of decal solutio n
to help conform over the surface. A subsequent touch-up with white paint
was required to fill up the resulting gaps in the decal.
I then turned my attention to the main and tail rotor assemblies which needed careful painting and assembly, followed by weathering with a sludge wash.
All finished assemblies were washed with warm water to remove any decal glue residue and then airbrushed with Pollyscale flat clear to seal everything in and impart a uniform finish. As per my previous Matchbox F9F-5 Panther, the flat clear really gives a good in-scale gloss finish without making the finished model look toylike. Checking out reference photo’s confirmed this as in service pictures indicated a well worn gloss finish fading to a more eggshell or very low sheen finish. Only the examples preserved in museums had a factory fresh glossy finish.
| FINAL CONSTRUCTION |
The exterior aerial wires were then added using smoke coloured invisible thread and the rotor assemblies added. My Wessex was now finished.
I then noticed that the warning danger arrows were pointing the wrong way, oh well, a good example of not checking references more thoroughly whilst applying markings!
| CONCLUSIONS |
 Frog and
Matchbox were the only game in town for those modellers wanting to add a
Wessex kit to their collection, until Italeri released a superb offering
with full interior detail. (Revell’s kit is a re-boxed Italeri kit and the
old Frog kit has been re-released recently by Eastern Express). I am
unaware of any 1:48 scale kits currently available for the Wessex, though
there was a 1:48 Revell kit some years ago.
This little Matchbox Wessex however, inaccuracies aside, builds up very well indeed and would make an ideal first kit foray into the diverse world of helicopter modelling.
I have ordered the Italeri Wessex as I am most taken by the canary yellow rescue version!
Good fun and it looks great!
| REFERENCES |
September 2004
If you would like your product reviewed fairly and fairly quickly, please contact the editor or see other details in the Note to Contributors.