Hobbycraft 1/48 CF-105 Arrow
|
KIT # |
1568 |
|
PRICE: |
$24.98 |
|
DECALS: |
One aircraft |
|
REVIEW : |
|
|
NOTES: |
Recent boxing with good decals! |
|
HISTORY |

If there ever what could be considered a cult aircraft, at least for Canadians, it would be the Avro Arrow. Unlike many of the “Luft 46” paper projects such as the Focke Wulf Ta183 that excite modelers and inspire “what if-- would have, could have” speculations from war historians and aviation buffs, the Avro Arrow actually existed. Merely by doing so it somehow penetrated the psyche of people only peripherally interested in aviation at all. Over forty years after its demise many still speculate on how Canada’s technological and military future might have be shaped had the Arrow project reached fruition.
The CF-105 Arrow arose in April 1953 out of the RCAF’s perceived need for a supersonic aircraft that would be able to intercept Russian bombers before they reached North American cities. The idea was that with speed and an advanced weapons system it would be possible to intercept and shoot them down while still in the high arctic, far away from any population base. The original specifications were considered highly ambitious, but Avro Canada, having built the reasonably successful CF-100 Canuck felt that they were up to the task.
As ambitious projects are wont to do costs quickly spiraled upwards. By 1957, when the first Arrow flew, the Canadian Government had spent close to 100 million dollars more than double what was originally allocated. In terms of modern day aircraft development and purchase projects (take the 200 billion US Joint Strike Fighter Project for example) these initial costs may not seem that high. However for that time and for a smaller government such as Canada’s this amount was considered outrageous. It was also quickly been considered that the actual threat of Soviet bombers was seen as somewhat nebulous with the advent of Intercontinental ballistic Missiles, thus the project was abruptly on cancelled on Feb 20,1959. Ironically, later the Government would purchase F-101 Voodoos from the US to serve Canada’s air defense needs at a much higher cost than the production Arrows would have been.
 All in all, five Arrow
prototypes were built and flown successfully, albeit with interim engines for
testing. A sixth, with the intended production Orenda “Iroquois” engines was
completed but never flown before cancellation. Where the idea of the Arrow cult
comes into play is in that upon cancellation, all six of these aircraft were
completely destroyed along all of the jigs and plans. This destruction is
something that most Canadians cannot comprehend.
Ultimately the Arrow was seen as the epitome of what Canadian technology was capable of. Although Canada continues to produce successful aerospace projects that are recognized internationally (DeHavilland Beaver, Otter and Dash 8, Canadair Regional Jet for a few examples) It is the CF-105 that continues to fuel the imagination. It is also recognized that as a result, many of Canada’s best and brightest technological minds now elect to travel south to do their best work. Such is the legacy of the Arrow in Canada.
To those outside of Canada the CF-105 should also prove of interest if only because of the beauty of the design. It’s contemporaries were aircraft like the Convair F-106 Delta Dart, The English Electric Lightning, and The Dassault Mirage III--all attractive aircraft, but to my eyes at least, these were not as elegant as the Arrow. The Arrow’s cranked shoulder wing configuration was futuristic and evokes the “next generation” fighters such as the F-15 Eagle and Su-27 Flanker.
|
THE KIT |
The kit comes in a large box and very nearly fills it up. It is moulded in white plastic with recessed panel lines that are unfortunately more Matchbox style than Hasegawa. I decided they would look better with a coat or two of paint. It appears that this kid is virtually identical to the 1/72 version I built a few years ago.
I suspect it is a pantographed up version resulting in the
wide lines and softness of detail.
The canopy is very thick and clunky looking but clear. The wheels look terrible—nothing at all like the real ones with very soft detail. The front wheels have the added strike against them of having divots in the tire that will be hard to repair. The worst aspect of the landing gear the wheels are the huge “lugnuts” that are supplied to attach them to the legs. They are about 8 inches scale across and six inches wide. Another unfortunate feature is very large ejector pin dimples on the landing gear doors that will need to be filled.
The parts breakdown is very basic and simple for such a large kit. For example, the fuselage is simply a bottom and a top half. The entire airframe consists of about fifteen parts. (The fit of these parts is another story!)
There is also an option to add a long range fuel tank. Holes are provided in the fuselage for this item. Also supplied is a battery of missiles that unfortunately look nothing like the Sparrows that the Arrow was supposed to carry, more like miniature Phoenixes. The instructions suggest that these missiles should be carried outside the fuselage while in reality they were carried inside the internal weapons pack. They are poor items in any event so I am not sure what one would do with them.
The high point of the kit is probably the decal sheet. It is clearly printed with good colors and in register. It gives you the option to include any of the five prototypes, but unfortunately not RF206, the only Orenda engined version. It would seem a simple matter to have included an extra “6”, but Hobbycraft didn’t. With regards to the decals I would advise anyone interested in building this kit to make sure and seek out the recent issue with the black box ends. If you have the earlier “grey box” issue and are stuck with the hopeless original decals, there was an excellent sheet issued by Arrow Graphics that is still around.
|
CONSTRUCTION |
 I wound up deciding that this was going to be a pure “Out of the Box” project,
but it wasn’t for lack of trying. I asked and hunted around, but it seemed that
no-one had offered any extras for this kit, so that was it!
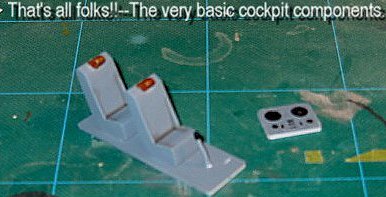
The cockpit is a very simple
affair—a plate with two seats that look more like my fathers lazy boy recliner
than any ejection seat I ever saw. I suppose I could have found some ejection
seats that would have looked better but just left things as is. The instrument
panel was simplistic and out of proportion with two huge dials that would scale
up to the size of hubcaps. It fit into the nose half at a weird 45 degree angle
that made no sense at all. All I could think of was that I was glad the canopy
was so thick and the windows were so small so that you could not see inside.
Before gluing the halves together I glued some weight in so that it would not be
a tail sitter.
The fuselage uppers and lowers I personally had problems with, but I feel that needn’t be the case. These are just a very long seams. I rushed my cementing and as a result I ended up using a lot of filler and doing a lot of sanding. A little care here would go a long way. Next I moved onto the wings and tail surfaces which all fit together nicely with no problems.
I now had subassemblies to block together and did so with little fuss. A little filler is needed under the nose part. A poorly fitting part is part E38 which protrudes out the back too far. The tail cone will not fit properly unless about 1/16” is sanded off the front. Once this is done the front needs to be shimmed up to be level with the wings. (As is my “lazy man” style I built it up with putty.)
A major complaint for me is with the intakes. First, there is a shape problem with the intakes themselves—they are rectangular when they should be more elegantly oval. Second, there is no trunking into the fuselage so that looking from the front you can see that they blank out about ¾” back. Lastly is the fit, which is terrible. I spent so much time trying to get this part to look right and must have filled and sanded five or six times.
As mentioned earlier the landing gear is a low point. There are no wheelwells to speak of. Just flat area with holes for the landing gear legs to sit into. It is as though the kit is designed to be modeled “in flight” rather than on the ground and the landing gear is an afterthought. The legs and wheels are over simplified and inaccurate. Nonetheless I built it all “out of the box” according to plan. At some point I think I may take the gear off and hang the model from the ceiling.
|
PAINT & DECALS |
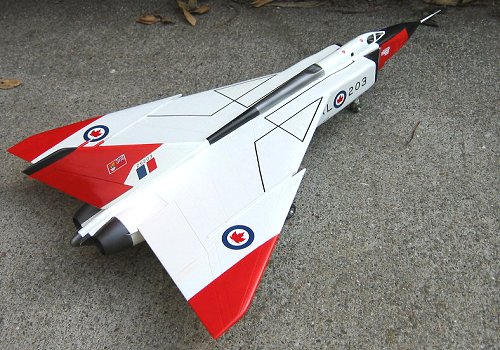
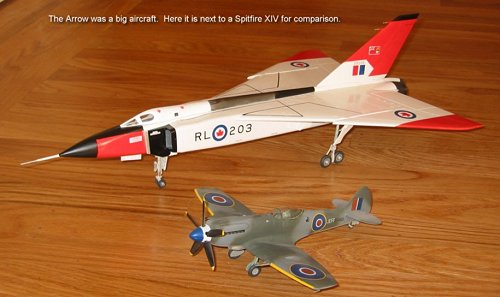
I had decided early on that I wanted to model the third Arrow, RL203. This is the aircraft that had all of the markings specific to the type and included the Red Ensign, Canada’s early flag on the tail fin. (Note: One thing that some may notice is that my model has the “short” exhaust cones as used on RL201 and 202, RL203 had longer and less tapered exhaust cones…)
 Painting was more difficult
than I thought. I find painting gloss white to be very difficult. In this case I
used ModelMaster Acryl “Gloss White” after an initial coat of white primer and
after three coats it looked great. The Red for the dayglo areas was an issue of
much debate. I spent a long time analyzing the photos in my reference book and
making sample after sample asking my wife for second opinion after second
opinion. I started with Model Master Acryl “Italian Red” and mixed it down with
yellow and white. After about a week of test chips I think I nailed it. I used
“Aircraft Interior Black” for the nose, intakes and anti-glare panels and
various Modelmaster metalizers for the spine and burners. Ordinarily I like
the SnJ stuff for large metallic areas but I only had aluminum handy and burnt
metal was the order of the day. I thought I would give the MM products a try.
Sure enough, their reputation for fragility is well founded. After my
manhandling I had to do a fair touchup later on. Over all I thought it looked
OK.
The Decal sheet lived up to initial appearances and was excellent. I stated with the wing walk markings. They broke a few times but that’s probably to be expected. Everything else went on great. The trickiest part was the tri-layer red ensign which kept floating apart on me.
A little touch I added was the strip of aluminum at the leading edge of the intake. This is made out of Bare Metal Foil
|
CONCLUSIONS |
I have somewhat mixed feelings on this kit. On the one hand it is an Avro Arrow and basically there are no other injected kits out there. Ultimately, the finished project looks pretty decent (it is big!), it is an easy project and I definitely had fun doing it. On the other hand I found myself wishing for more accuracy and detail. Part of the problem is that my references made me relize the detail deficiencies of the kit.
I realize that the Arrow is a cult plane and we are is not likely to get an all new kit--This is unless a company like Hobbycraft decides to do something special for the 50th anniversary of the Arrow in 2009. Upon building it I found myself wishing for a resin upgrade set for the landing gear, wheel wells, cockpit, and tailcone. (Belcher Bits, where are you?!) I think the kit itself is worthy so here is hoping.
As it sits I think that the kit is more than suitable for “wheels up” display and any modelers who want a quick fun project. Those who want to make the definitive CF-105 model and have references at the ready likely would find themselves wanting more.
In the end I would recommend this kit simply because that’s all there is.
|
REFERENCES |
 My main reference source
for this model is the book “Avro Arrow” from Boston Mills Press. This book has
lots of great color photos in it and contains basically anything one would need
to know. Highly recommended. Another source of information I would suggest, if
only for entertainment, is the CBC movie “The Arrow”, starring Dan Aykroyd that
came out a few years back. Like many movies it plays hard and loose with the
facts in the name of drama. For example it suggests some great conspiracy theory
that led to the cancellation and proposes that there is still an aircraft
squirreled away in a secret location. among other things, but it is still a lot
of fun. It has some genuine archival footage that is breath taking and tells the
saga reasonably well.
Finally, the net is littered with Arrow information. Do a Google search and you will find an amazing number of sites dedicated to all things Arrow…
Copyright ModelingMadness.com
If you would like your product reviewed fairly and fairly quickly, please contact the editor or see other details in the Note to Contributors.