
Monogram/Fox 3 studios 1/48 F-100F Super Sabre
| KIT #: | 5471 |
| PRICE: | $15.00 for the kit, $30 for the conversion |
| DECALS: | See review |
| REVIEWER: | Ben Brown |
| NOTES: | Resin conversion and drop tanks with Aeroclub seats |

| HISTORY |
Originating from a design study to upgrade the F-86 Sabre, the F-100 Super Sabre was the first operational fighter to be able to exceed Mach 1 in level flight. Like all early jet fighters, the Super Sabre was not an easy airplane to fly, and its accident rate was appalling. In 1954, North American Aviation started a self-funded program to build a two-seat trainer to try to reduce the F-100 accident rate. The Air Force loaned F-100C 54-1966 to NAA for modification. A 2 foot 11 inch plug was added forward of the wing to make room for a second cockpit. As a trainer, this airplane was not fitted with any weapons systems. Also, since the TF-100 was modified from an F-100C, it did not have trailing edge flaps like the F-100D and production F-100F. It did, however, have the larger vertical stabilizer found on the later versions. The plane first flew in August, 1956, but crashed the following April. The F-100F, which first flew in 1957, retained the F-100D's fighter-bomber role, but only carried the two inboard 20mm cannon. 339 F-100Fs were built.
In addition to serving as a trainer
for the single seat F-100s, the F-100F played an important, but under-recognized
role in pioneering the Wild Weasel and Fast FAC (Forward Air Controller)
concepts. The F-100 Fast FAC program was highly successful in patrolling the
Route Pack 1 area of North Vietnam and southern Laos, developing tactics still
used by jet FAC pilots today.

The Fast FAC concept originated when Air Force decided to use two-seat jets in order to increase the survivability of its FACs over North Vietnam. The slow, propeller-driven Cessna O-1 Birddogs and O-2 Skymasters were encountering more and more hostile ground fire, making their already dangerous job even more hazardous. The F-4C was the preferred choice, but the F-100F was more readily available and, according to one Misty pilot, “cheaper and more expendable.” In June of 1967, Major George "Bud" Day was given command of the F-100F Fast FAC detachment, code named "Commando Sabre," but more widely known by its radio call sign "Misty" (Mrs. Day's favorite song). Flying out of Phu Cat AB, and later Tuy Hoa AB, the unit used standard F-100Fs, often borrowing "HE" tail coded jets from the 416th TFS. Pilots alternated flying or working as "Guy In Back." The GIB carried maps, a tape recorder, a 35mm camera, and extra film, and among his many tasks, had to shoot photos of potential targets while his pilot jinked all over the sky to avoid ground fire. In addition to the internal 20mm guns, Misty FACs carried LAU-59 7-shot rocket pods armed with 2.75 inch white phosphorus rockets on the outboard wing stations, and two 335-gallon drop tanks. To quote another Misty pilot, "Two pods of Willy Pete , 2 guns, and two not-so-bright aviators."
Typical missions included search and rescue, hunting for truck parks, and spotting hidden anti-aircraft and artillery sites. Flights lasted between 4 1/2 and 6 hours, with the Mistys refueling from KC-135s as many as six times. They stayed above 400 knots, jinking every 5-7 seconds, and rarely descended below 4500 feet. To do so greatly increased the chances of being shot down. The Mistys often worked with Sandy A-1 Skyraider and HH-3 Jolly Green Giant helicopters to spot downed pilots.
In all, 155 pilots served in the
Misty program. Two went on to become Air Force Chiefs of Staff (Tony McPeak and
Ronald Fogelman), and Dick Rutan later flew the Voyager around the world,
non-stop. Between August 1967 and May 1970, Misty pilots flew over 21,000 hours
of combat time, thirty-four pilots were shot down (two pilots twice!) and seven
pilots were killed, the highest loss rate for any F-100 unit. Four pilots,
including Major Day, were captured by the North Vietnamese. Major Day was later
 awarded the Medal of Honor for his actions during captivity. Because the Misty
mission was so hazardous, the tour requirements were reduced to four months,
about 60 missions. Twelve Misty pilots flew 100 or more missions.
The Misty F-100Fs were eventually replaced by F-4Ds, which used Stormy as their call sign. The F-4C was faster, but according to one source, had poor visibility and a short loiter time compared to the F-100F.
For further reading on the Misty FAC program, I highly recommend Misty, by Gen. Don Sheppard: http://www.mistyvietnam.com/index.html . He has also recently completed a second book with author Rick Newman called: Bury Us Upside Down: The Misty Pilots and the Secret Battle for the Ho Chi Minh Trail, which is to be published at the end of February, 2006.
The Skyraider Association has a recording made by a Misty crew as they coordinated setting rescue operations in motion for the downed crew of F-4D 66-7671 ROMAN 02: http://skyraider.org/skyassn/sartapes/roman2/roman2.htm
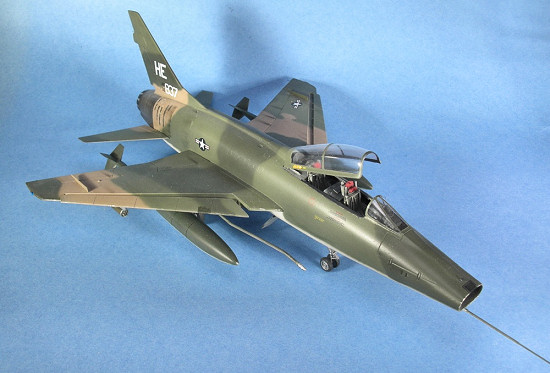
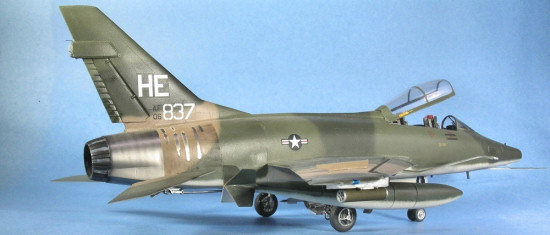
F-100F-10-NA 56-3837 left the factory on April 10, 1957. She served in the US, Japan, Viet Nam as a Misty jet, and finally finished her career with the Indiana ANG in 1979. After being rejected for the QF-100 target drone program, 837 ended up at Davis Monthan AFB. She was found in 1997 by one of her former crew chiefs, who had named her The Ghost when he "owned" her during the early 1960s at Cannon AFB. Larry's quest to save The Ghost from the scrap dealer eventually resulted in 837 being restored to her former glory as a Misty jet and placed on display in the USAF Museum in Dayton, Ohio in 2003.
| THE KIT |
Even after
20+ years, Monogram's is still the best F-100 available in any scale. It is
accurate in shape and dimensions, and provides a good level of detail for a very
reasonable price. The kit has been re-released several times, in a variety of
markings. I personally like the "High Tech" version of the kit, since it comes
with a small photo-etched fret with wing fences, canopy latches, and a mirror.
The older versions of the kit are molded in a softer plastic than the two most
recent releases, which makes them easier to chop up into an F-100A or C. The
molds seem to have been reworked slightly for the latest release, because some
of the detail seems more crisp, but there is quite a bit of flash on most of the
parts. All versions of this kit include early and late-style refueling probes,
open speed brake, and a well-detailed cockpit. The instrument panel represents
a late F-100D with the radar  warning receiver displays on top of the instrument
panel glare shield. Monogram doesn't provide the RWR antennae for the tail and
under the intake, but these are easily made from scrap plastic, if necessary.
The only really major flaw in the kit is the pre-1965 275-gallon drop tanks are
1/4 inch too short.
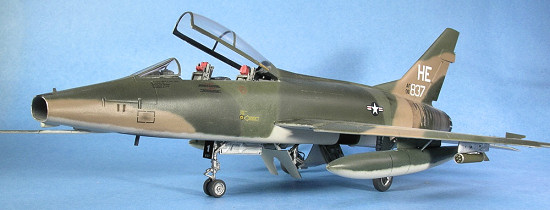
Of the four F-100F conversions that have been released over the years, the Fox 3 Studios conversion is my favorite of the bunch. Fox 3's set includes a complete new resin fuselage, broken down into an upper and lower half, new cockpit tub, rear instrument panel, rear control stick, front seat with folded headrest, and an accurate vacuformed canopy. The canopy comes formed over its resin master. This makes it much easier to cut out, and if you have an accident, you have the master on hand to make a new canopy. The new cockpit tub is nicely-detailed, but I had to replace some knobs and switches with sprue because they were not molded completely. There are no pour blocks to be removed from any of the parts and the only cleanup required is to trim a little flash from some of the parts. Fox 3 also sells ALPS-printed decals for an F-100F flown by Chuck Yeager when he commanded the 1st Fighter Day Squadron and the 335th FDS jet pictured here. I built this one several years ago when Fox 3 first released this conversion and I just couldn’t resist the temptation to show it off!
The only complaints I have about the set is there is no glare shield/ windscreen included for the rear cockpit and the new front ejection seat has the parachute pack molded in (just like the Monogram seat, which is used for the rear cockpit). The parachute usually wasn't left in the aircraft.
 My original plan was to use the
nice-looking resin seats from Legend Productions. Unfortunately, Legend
apparently took their measurements from Black Box's too-short F-100D seat and so
they were nearly 4mm too short between the seat cushion and the headrest. When
they were placed in the cockpit, the headrests barely protruded above the
cockpit sill. The seats can be fixed, but would be difficult since the seat
belts would be destroyed when a splice is added to the seat back. After
teaching my children a few interesting new words, I went with Plan B and used
some white metal seats from Aeroclub. While not as well-detailed as resin
seats, they are more correct in their dimensions. Just remember to split the
headrest for the forward seat horizontally and fold the top back. The photo
shows, left to right, the kit, Legend Productions, Black Box, and Aeroclub
seats. I’ve been told by an F-100 pilot that the arm rests were almost always
out, as depicted on the Monogram seat.
| CONSTRUCTION |
Since the conversion parts are direct replacements for the corresponding Monogram parts, the conversion can be built in the same order as the F-100D. Before starting, I sanded the raised detail off of the wings and tail, then rescribed them. The Fox 3 fuselage halves are smooth, without any panel lines, so I used a needle in a pin vise to scribe these.
I dressed up the resin cockpit tub with some throttles, landing gear levers, and drag chute handles. I had to remove a little resin from under the drag chute handle molded into the upper fuselage half so the front instrument panel would fit. Once this was done, the cockpit tub popped right into place.
 The single-piece wing in
Monogram's F-100D is the cause of the poor fit of the kit's fuselage halves.
The problem is that the gap in the upper wing section (part 52) is too narrow.
This squeezes the upper fuselage half in and causes major gaps in front of and
behind the wings when you add the lower fuselage half. The Fox 3 upper fuselage
half has a slight depression where the upper wing panel mates to it, preventing
the wing from causing problems.
The resin fuselage halves have several internal braces molded in, resulting in a very strong fuselage. The forward one must be removed so the intake duct can be installed. A section of the duct must be removed so it will not interfere with the cockpit tub. I also removed the brace at the rear of the fuselage so I could add an afterburner interior. Since the Monogram afterburner part doesn't have any depth, I used a motor tool to grind out the interior. I added an afterburner can and engine turbine wheel salvaged from a scrapped Monogram F-102 kit, then detailed the nozzle interior with strips of styrene. Legend Productions has since released a very nice resin and photo-etched aft fuselage (#4810 and also includes a “seamless” intake) that replaces the Monogram nozzle part. I’d consider this set a must-have item when building a Monogram F-100.
The resin fuselage halves fit
right together, needing only a little filler at the joint. It is not necessary
to add any weight to the nose. Between the extra fuselage length forward of the
main gear, the metal seats, and the long resin drop tanks, there is no danger of
this model ever being a tail-sitter. I used styrene sheet to build a new glare
shield, with its pop-up windscreen, for the rear cockpit. I didn't notice until
it was too late that the rear instrument panel sits too low in the cockpit.
Fixing this would have required
 thinning the inside of the fuselage and
modifying the panel. Faced with the prospect of popping open fuselage halves
that had been superglued together, I decided the rear instrument panel looked
just fine as-is. I'll get it right on my next one!
The conversion uses the stabilators from the kit, so I marked the positions of the stabilators and drilled holes for mounting pins. Adding the stabs during final assembly makes it easier to clean up the seams and paint the aft fuselage.
Due to the increasing anti-aircraft missile threat in Vietnam, many F-100s were fitted with a radar warning receiver system. Antennae for the system were placed in a teardrop-shaped fairing under the nose, just forward of the pitot tube, and on the aft end of the fuel tank vent fairing on the tail. I used a resin antenna fairing that comes with Missing Link's F-100 drop tank extensions (which enable you convert the kit's 275-gallon tanks into 335s that are 1/4 inch too short). The one on the tail was made from a chunk of scrap styrene. The RWR azimuth display was mounted on top of the front instrument panel's glare shield on the left side. On the Monogram kit, it's the small cylinder just above the drag chute handle. Later, after the model was painted and almost finished, I read a comment by a Misty pilot who stated the F-100s operating "In Country" (South Viet Nam) were fitted with RHAWS equipment, but those the Mistys flew into heavily defended North Viet Nam, were not. I managed to find several photos of Misty jets with the antenna fairings, and since I couldn’t find any of 837 during the war that show whether or not it had them, the antennae stayed on my model.
Before painting the model, I added photo-etched wing fences to the tops of the wings. I scribed deep grooves in the wings to accept the fences and give the super glue a little more surface area to "bite."
| COLORS & MARKINGS |
Misty
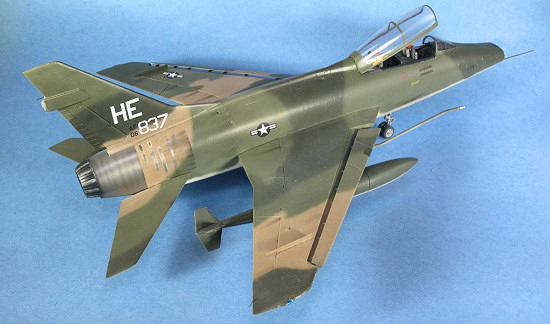
F-100Fs were finished in the standard F-100 Southeast Asia camouflage scheme.
Heat from the F-100's afterburner very quickly caused the camouflage paint on
the aft fuselage to discolor, then peel off, leaving strips of titanium
exposed. Over time, 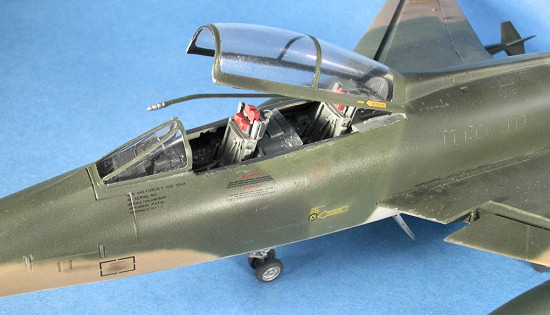 most of the paint on the aft fuselage would burn away. In
the April 2003 issue of FineScale Modeler, Pat Hawkey describes an excellent way
to duplicate the burned paint. Following Pat's method, I first painted the
metal surface on the rear fuselage using a mixture of Alclad II colors. I then
covered vertical bands of the metal areas with liquid mask before painting the
main camouflage colors using Xtracolor paints. Once the camouflage colors were
dry, I masked the wheel wells and painted them Model Master Medium Green.
Having poked my head up inside the wheel wells of several unrestored F-100s, I
feel like this color looks like a good match for the Interior Green North
American used in these areas.
F-100s in Southeast Asia camouflage carried very little in the way of markings or stencils. National insignia and ejection seat triangles were from Experts Choice F-100D sheet, with tail codes and serial numbers from an old Repliscale tail code sheet. The yellow stencils came from the scrap box. I cut a piece of white decal for the chess piece silhouette on the nose gear door, somehow managing to keep it from looking like an amoeba.
After the decals had dried, I sprayed a couple of coats of Polly S Clear Flat to give the model a nice flat finish, then peeled away the liquid mask, revealing the metallic paint underneath. Next, I airbrushed some thinned Tamiya Smoke on areas of the aft fuselage to simulate paint that was burned but hadn't flaked off yet. I initially grossly overdid it (Note to self: Do NOT touch the airbrush after drinking beer with your friends!), but a little Windex on a Q-Tip removed the offending Tamiya paint without damaging the Xtracolor or Alclad paint.
I didn't do a lot of weathering, since I'm still learning that skill and didn't want to over-do it on this model. I used a silver artist's pencil to simulate worn paint, and experimented with pastels to put a little gunpowder residue around the gun muzzles, hydraulic stains aft of the main landing gear doors, and general grime on the entire airframe. I was tempted to drill a bullet hole in the right stabilator, shown in the photo of 837 on the Misty web site, but just couldn't work up the courage.
| FINAL CONSTRUCTION |
 I
made a new pitot tube using telescoping brass tubing, a new barrier hook from
styrene, and static wicks for the tail and wing tips using short lengths of
wire. By 1965, F-100s were carrying 335-gallon drop tanks, which were the old
275s modified by welding a 28 inch plug in front of the pylon leading edge.
With the exception of the tanks included in the old War Eagle vacuform F-100F
conversion, Fox 3 Studios makes the only aftermarket 335s that are the correct
length. The tanks are molded without their integral pylons, so you must use the
ones from the kit tanks. If you really want to get picky, the leading edges of
the drop tank pylons should curve inboard, like the airfoil of a wing. As I’ve
previously mentioned, Missing Link's drop tank conversions are too short, as are
the 335s sold by Legend Productions. A Tamiya Skyraider kit provided the
LAU-57 rocket pods, which I mounted on the outboard pylons. I haven't found any
photos of Misty F-100Fs carrying inboard pylons, so I left these off of my
model. F-100 pylons were painted silver, even on camouflaged jets.
| CONCLUSIONS |
An excellent conversion for one of my favorite kits! Because there is no major cutting and only some relatively simple scratchbuilding involved, this is a very good "first conversion" for anyone with a little model building experience. If you can use Super Glue without gluing too many important body parts together, you can build this conversion.
I was very disappointed with Legend’s resin ejection seats. These would have been a great addition to any F-100 model, if only they weren't so darn short!
Kit and accessories courtesy of my wallet. I have no financial connection with Fox 3 Studios. I just happen to like their products.
| REFERENCES |
North American F-100 Super Sabre, Peter Davies and David Menard
North American F-100 Super Sabre, David Anderton
F-100 Super Sabre In Action, David Menard and Larry Davis
Detail & Scale Vol. 33, F-100 Super Sabre, Bert Kinzey
Replica In Scale Vol. 3, No. 2, 1975
Michael Benolkin's F-100.org: http://www.f-100.org/hun.shtml
Henk Scharringa’s F-100 Serial Number Database: http://www.supersabre.org/
History of F-100F 56-3837: http://www.geocities.com/f100f_56_3837/index.html
F-100D/F Flight Manual
Bill Spidle photos
Ben Brown photos
Aftermarket Sources:
Legend Productions
March 2006
Copyright ModelingMadness.com. All rights reserved. No reproduction in part or in whole without express permission.
If you would like your product reviewed fairly and fairly quickly, please contact the editor or see other details in the Note to Contributors.