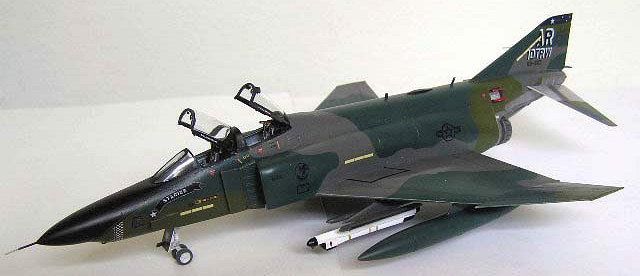
Hasegawa 1/72 RF-4C Phantom II
| KIT #: | 00791 |
| PRICE: | $27.50 at great models |
| DECALS: | Five 10 TRW aircraft |
| REVIEWER: | Fernando Rolandelli |
| NOTES: | Nice kit. |
| HISTORY |
The RF-4C (Model 98DF) was the unarmed photographic reconnaissance version of the USAF's F-4C. The armament and radar of the fighter version was removed and replaced with equipment specialized for photographic reconnaissance.
The
RF-4C had three camera stations in the nose. The Forward camera station
(situated just behind the radar) could carry a single forward oblique or
vertical KS-87 camera. Behind that, in the number 2 or "Low Altitude" station, a
KA-56 low-altitude camera 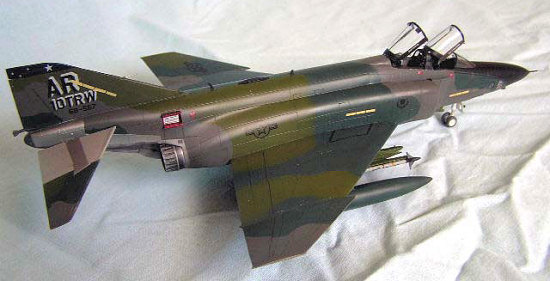 could be carried, although this could be replaced by a
trio of vertical, left, and right oblique KS-87 cameras. Alternatively, a left
or right oblique KS-87 could be carried in this station. A vertical KA-1 could
be carried in the low-altitude station instead of the KS-87, or a KS-72 could
replace a KS-87 in the 30-degree oblique position. The third station (the "High
Altitude" station) was just ahead of the cockpit under the nose, and normally
carried a single KA-55A or KA-91 high-altitude panoramic camera in a stabilized
mount. Alternatively, two split vertical KS-87 cameras could be carried there,
or KC-1 or T-11 mapping cameras could be installed. The High Altitude station
could also house an AN/AVD-2 laser reconnaissance set, but this was later
withdrawn from use.
could be carried, although this could be replaced by a
trio of vertical, left, and right oblique KS-87 cameras. Alternatively, a left
or right oblique KS-87 could be carried in this station. A vertical KA-1 could
be carried in the low-altitude station instead of the KS-87, or a KS-72 could
replace a KS-87 in the 30-degree oblique position. The third station (the "High
Altitude" station) was just ahead of the cockpit under the nose, and normally
carried a single KA-55A or KA-91 high-altitude panoramic camera in a stabilized
mount. Alternatively, two split vertical KS-87 cameras could be carried there,
or KC-1 or T-11 mapping cameras could be installed. The High Altitude station
could also house an AN/AVD-2 laser reconnaissance set, but this was later
withdrawn from use.
An AN/AAD-5 or AN/AAS-18 infrared detection set was installed just aft of the nose wheel bay. The RF-4C is also fitted with a Goodyear AN/APQ-102 side-looking mapping radar, with antennae on either side of the lower nose just aft of the optical reconnaissance bay
Initially, the RF-4C carried no weapons, but in later years, RF-4Cs were armed with AIM-9 Sidewinder missiles carried on the inner underwing pylon for self-defense. Provision was also made for carrying an electronic countermeasures pod on the inboard pylon underneath the starboard wing.
| THE KIT |
How comes that a modeler whose main interest is 1/48 fighters from the WWII Pacific-CBI theatre builds a RF-4C from USAFE based in England? Well, mostly by chance or mistake.
Inside
the box of a Hasegawa F-111D/F bought second hand unexpectedly came a Xtradecals
sheet (X010-72) which contained decals for, besides the Lybian raiders, an Euro
I camouflaged RF-4C. Then, in a big order of PE sets, an Eduard set (SS265)
appeared in the same fashion. Well, even me can tell a sign when he sees one,
and I ordered a Hasegawa kit. I had some
 experience from my younger years
building Fujimi’s and Esci’s Phantom kits (not to speak of the Revell –the
ancient Revell- one), and regarded the former highly. Hasegawa’s follows the
general layout of both (as does the equally modern and praised Revell Germany
kit, which by the way costs less than half), but it is a bit better: it has more
and better surface details, good seats in an otherwise bare interior, a
cunningly designed arrangement for the splitter plates that allows you to
install them after painting, and a noticeably slimmer nose and upper fuselage
(comparable to the Revell’s, so I think the proportions are correct). Its main
con is the separated outer wing panels, whose join is very weak and a pain to
obtain the correct dihedral, and the total lack or armament (hardly a problem in
a RF-4C) However, I wanted to hang some stores from my Phantom, so I summoned an
Airwaves AN/ALQ-119 (a resin piece intended I think for the Jaguar) and a AIM-9L
Sidewinder, from the Hasegawa no. 5 Weapons Set. Being aware that the ejection
seat is the single item that most enhances a modern cockpit; I got a couple of
Quickboost QB 72-011 chairs. To dress up the canopies, I purchased an Airwaves
set AW2023.
experience from my younger years
building Fujimi’s and Esci’s Phantom kits (not to speak of the Revell –the
ancient Revell- one), and regarded the former highly. Hasegawa’s follows the
general layout of both (as does the equally modern and praised Revell Germany
kit, which by the way costs less than half), but it is a bit better: it has more
and better surface details, good seats in an otherwise bare interior, a
cunningly designed arrangement for the splitter plates that allows you to
install them after painting, and a noticeably slimmer nose and upper fuselage
(comparable to the Revell’s, so I think the proportions are correct). Its main
con is the separated outer wing panels, whose join is very weak and a pain to
obtain the correct dihedral, and the total lack or armament (hardly a problem in
a RF-4C) However, I wanted to hang some stores from my Phantom, so I summoned an
Airwaves AN/ALQ-119 (a resin piece intended I think for the Jaguar) and a AIM-9L
Sidewinder, from the Hasegawa no. 5 Weapons Set. Being aware that the ejection
seat is the single item that most enhances a modern cockpit; I got a couple of
Quickboost QB 72-011 chairs. To dress up the canopies, I purchased an Airwaves
set AW2023.
| CONSTRUCTION |
The
cockpit tub got dressed up quickly and wonderfully with the Eduard set, but
nothing is provided in the way of sidewalls. I
 mimicked some structural detail
and much after (actually after closing the fuselage halves) I decided they still
looked bare and added some boxes following some assorted Phantom pictures (none
of them though of a RF-4C!) I closed the unsightly gap left by the mountings for
the intakes with some Plasticard which does not look tidy at all, but works. The
areas behind the seats’ headrests, a maze of cables and fittings, were dressed
up with bits of plastic and wire. The rear seat was raised a bit with chunks of
plastic; while this had the wanted effect, the side consoles were left much too
low. The HUD I thought it was too wide, so I sliced it off in the middle.
mimicked some structural detail
and much after (actually after closing the fuselage halves) I decided they still
looked bare and added some boxes following some assorted Phantom pictures (none
of them though of a RF-4C!) I closed the unsightly gap left by the mountings for
the intakes with some Plasticard which does not look tidy at all, but works. The
areas behind the seats’ headrests, a maze of cables and fittings, were dressed
up with bits of plastic and wire. The rear seat was raised a bit with chunks of
plastic; while this had the wanted effect, the side consoles were left much too
low. The HUD I thought it was too wide, so I sliced it off in the middle.
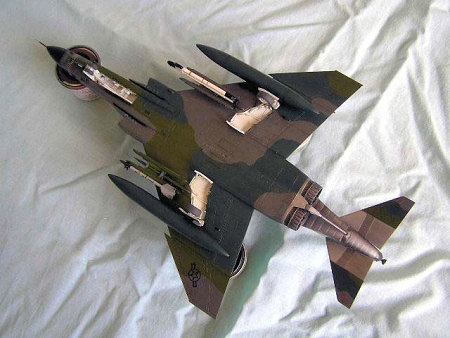
 The rest
of the fuselage building was uneventful; there were steps all around the intakes
and forward/rear fuselage joints, and the undernose pan, but nothing out of the
ordinary. I dropped any crazy idea of doing something about the intake trunks. A
small piece of plastic pushing from the inside of the lower fuselage helped
align the central wing. The outer wing panels were very carefully glued and
puttied and sanded trying (unsuccessfully) not to obliterate the folding wing
detail in the process. The top of the fin (a separated piece to provide for the
different antennae arrangements) is also very fragile, as are the pitot tubes
(man, a lot of fragility in the kit of a modern aircraft!) The nose pitot needs
to be carefully faired if you want to avoid the “pushed in plastic rod” look,
but I should have fitted it after painting and decaling and weathering and all,
the Black nose would have allowed me to apply putty, to sand and to paint it as
a separate unit.
The rest
of the fuselage building was uneventful; there were steps all around the intakes
and forward/rear fuselage joints, and the undernose pan, but nothing out of the
ordinary. I dropped any crazy idea of doing something about the intake trunks. A
small piece of plastic pushing from the inside of the lower fuselage helped
align the central wing. The outer wing panels were very carefully glued and
puttied and sanded trying (unsuccessfully) not to obliterate the folding wing
detail in the process. The top of the fin (a separated piece to provide for the
different antennae arrangements) is also very fragile, as are the pitot tubes
(man, a lot of fragility in the kit of a modern aircraft!) The nose pitot needs
to be carefully faired if you want to avoid the “pushed in plastic rod” look,
but I should have fitted it after painting and decaling and weathering and all,
the Black nose would have allowed me to apply putty, to sand and to paint it as
a separate unit.
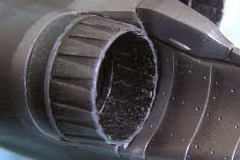 From the
start I decided I would do something about the afterburner cans, other than
buying the extremely expensive Aires replacement. I cut truncated triangles of
Tamiya tape and fixed them to the insides mimicking the inside surface of the
petals. After painting, though still rough, they give a better look than the
bare kit’s items. The Sidewinder rails were also given a strip of stretched
sprue and some pieces as detailing. The resin ECM pod was cleaned and a strip of
plastic added on top; the Sidewinder itself is a superb little piece, I just
drilled the exhaust and added a bit of putty to the two separated forward fins,
and added small squares of Gunmetal-painted Tamiya tape to the back ones.
From the
start I decided I would do something about the afterburner cans, other than
buying the extremely expensive Aires replacement. I cut truncated triangles of
Tamiya tape and fixed them to the insides mimicking the inside surface of the
petals. After painting, though still rough, they give a better look than the
bare kit’s items. The Sidewinder rails were also given a strip of stretched
sprue and some pieces as detailing. The resin ECM pod was cleaned and a strip of
plastic added on top; the Sidewinder itself is a superb little piece, I just
drilled the exhaust and added a bit of putty to the two separated forward fins,
and added small squares of Gunmetal-painted Tamiya tape to the back ones.
| COLORS AND MARKINGS |
Painting
A
machine in Euro I camouflage is a dark thing. I used Xtracolor FS 36081 as a
primer; on that I sprayed WEMM’s 34092 and 34102 (actually, from the Regia
Aeronautica range!), all in my customary motley fashion, with the hardest of
liquid masks (it looks good in
 this small scale). The NMF parts were painted in
various Alclad shades. The anti-glare panel was painted by means of a mask
patterned after the decal strip which would be its boundary. The fin top was
painted a very dark Humbrol Blue. Tamiya Clear Blue was used for the windscreen,
brushing it on the insides. Everything was given several coats of Xtracrylixs
gloss varnish and the model went for decaling.
this small scale). The NMF parts were painted in
various Alclad shades. The anti-glare panel was painted by means of a mask
patterned after the decal strip which would be its boundary. The fin top was
painted a very dark Humbrol Blue. Tamiya Clear Blue was used for the windscreen,
brushing it on the insides. Everything was given several coats of Xtracrylixs
gloss varnish and the model went for decaling.
Weathering was mostly done by means of an oil wash and some airbrushing on the panel lines and randomly with the usual Brown/Black concoction. The White wheel wells were given a very light coat of Tamiya Clear Yellow to give them a dirty old look.
The ALQ pod was painted White; I understand that A-10As in Euro I carried a Dark Green painted one, but I wanted some contrast; the small triangle marking was made of painted Tamiya tape. The Yellow bands were hand painted, as were the Brown and Yellow ones in the Sidewinder, which was painted 36375 with a Tyre Black nose.
Decals
Well,
this fairly old Xtradecal sheet contained that kind of milky glue-type decals.
They were very user-u nfriendly, folding down on themselves at the first
opportunity; I managed to recover most to an acceptable degree. Once dried in
place, however, they have a wonderful “painted-on look”. There were no specific
directions regarding the nose band; it had no number on the sheet, and just a
shade of it was shown in the instructions; I placed it as best as I could guess.
Halfway I realized I had no stencils or walkways; the Xtradecal sheet obviously
relies on the kit’s, but mine, depicting a 16440/17875 painted machine had a
completely different pattern of the latter (I quickly seized the opportunity of
foregoing with the former) I remember there was once a Superscale sheet with
walkways, but it is not available any more; in the end I resorted to painting
the wing walks, and nothing else. I had dropped the idea of decaling the
Sidewinder, but thought it over, brushed some gloss varnish on the already glued
in place item and applied the decals, which literally cover it up.
nfriendly, folding down on themselves at the first
opportunity; I managed to recover most to an acceptable degree. Once dried in
place, however, they have a wonderful “painted-on look”. There were no specific
directions regarding the nose band; it had no number on the sheet, and just a
shade of it was shown in the instructions; I placed it as best as I could guess.
Halfway I realized I had no stencils or walkways; the Xtradecal sheet obviously
relies on the kit’s, but mine, depicting a 16440/17875 painted machine had a
completely different pattern of the latter (I quickly seized the opportunity of
foregoing with the former) I remember there was once a Superscale sheet with
walkways, but it is not available any more; in the end I resorted to painting
the wing walks, and nothing else. I had dropped the idea of decaling the
Sidewinder, but thought it over, brushed some gloss varnish on the already glued
in place item and applied the decals, which literally cover it up.
| FINAL BITS |
 Man,
they took weeks to gather on the model! It sat painted and decaled and seemingly
finished for weeks while I glued an interminable queue of small parts and
sundries. Among these were the Airwaves PE parts for the canopies and rails,
which I got when the model was almost ready, and the splitter plates, which went
in like a dream. And my model has almost no ordinance. That’s what modern
aircraft modeling seems to be about…
Man,
they took weeks to gather on the model! It sat painted and decaled and seemingly
finished for weeks while I glued an interminable queue of small parts and
sundries. Among these were the Airwaves PE parts for the canopies and rails,
which I got when the model was almost ready, and the splitter plates, which went
in like a dream. And my model has almost no ordinance. That’s what modern
aircraft modeling seems to be about…
| CONCLUSIONS |
Well, I was not a Phantom Phanatic, so I my Phantom Philes were pitifully small, and even smaller my experience with modern jets (I know, those words, applied to a Phantom, clearly reveal my age), but I enjoyed the build a lot, and certainly was left wanting for more: my intention was to build this almost as a cast-off, but now I can Phoresee quite a number of them.
| REFERENCES |
- “Modelling the F-4 Phantom II”, Geoff Coughlin and Neil Ashby, Osprey Modelling, Osprey Publishing.
- Several websites (“Google is your friend”) including J. Baugher’s (wonderful historical and technical stuff)
October 2007
If you would like your product reviewed fairly and fairly quickly, please contact the editor or see other details in the Note to Contributors.