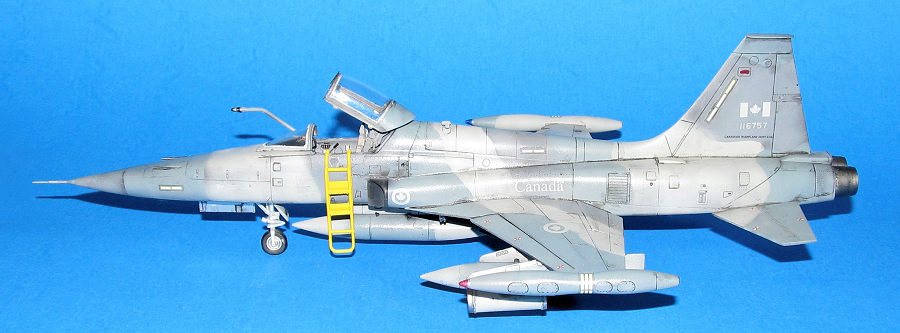
Kinetic 1/48 CF-5A
| KIT #: | 48020 |
| PRICE: | $65.00 |
| DECALS: | Fifteen options |
| REVIEWER: | Dan Lee |
| NOTES: | Eduard exterior PE and Master Gun Barrels. |

| HISTORY |
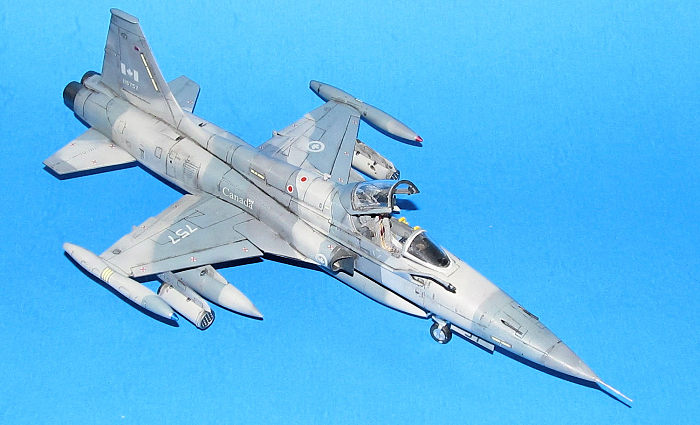 The CF-5A
(the official Canadian Forces designation is CF-116) was a light strike
fighter that didn't really fit anywhere in the Canadian Armed Forces except
in terms of cost. It spent most of its time in the Canadian Forces equipping
two squadrons that was the air element of the rapid reaction force to be
sent to Norway in case of World War 3.
Also provided tactical reconnaissance, dissimilar dogfight training as well as lead in training for more advanced fighters. Although most F-5s could be equipped with Sidewinders, the CF-5 usually carried rocket pods, fuel tanks, photo recon cameras, bombs and its internal 20mm cannons in operation service. It served from 1968 to 1995 when most airframes were retired and/or sold to other nations.
| THE KIT |
| CONSTRUCTION |
Like most airplane models it all started with the cockpit. I removed most of the interior and exterior surface details and added PE from the Kinetic Photo Etch (PE) cockpit set AND the Eduard external PE set when I bought all of them way back in 2015.
The interior detail didn't
take long to do (only two weeks!) as this was the first kit where I used my new
bend and fold PE tool. It's actually worth the cost as I no longer had
mis-shapened and odd angled bends in my PE pieces. No major issues with the
cockpit parts, but I was more selective using the external set because many of
the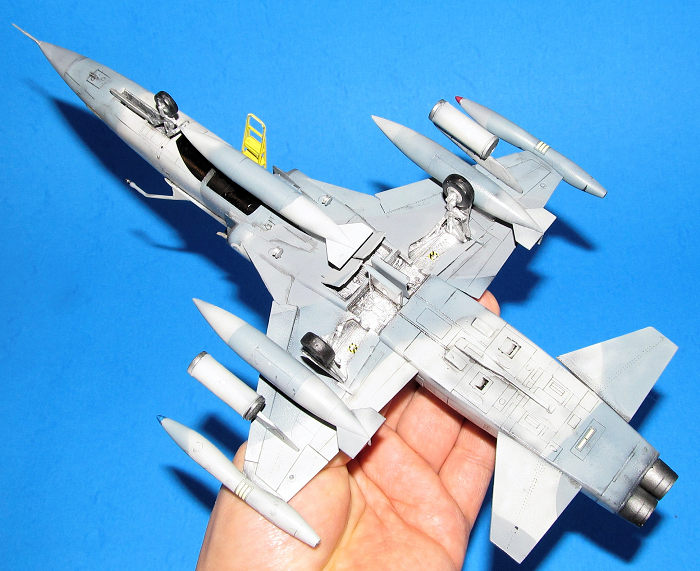 parts
require a lot more work/effort than I was willing to do like the air brakes (I
mostly used the kit parts because I didn't want the headaches.) Most of the
external PE I used were for the slime lights, landing gear wheel wells and air
brake wells interior details.
Meanwhile I glued together the external stores and fuel tanks. Once the glue was cured for a week (or six as this build took a while) I sanded the seams smooth.
The intakes were glued together, but I only sanded at the entrance of the intakes where it could be barely seen. The forward intakes were glued and sanded.
I had read DaBoss' review of this kit and was prepared for all sorts of seam work. When I attached one major assembly like the wings, I sanded whatever seams showed up. The hardest external seams were the intake pieces as they had a step between the fuselage and the intakes pieces. It took a fair amount of sanding during the assembly and priming stages to remove it. The seams I couldn't get rid with sanding were filled with Vallejo plastic putty (the excess removed with damp Q-tips) done over several sessions. The worst seam I had to fix was the instrument panel console which had a 2mm gap that required shims and careful sanding to avoid destroying the detail.
I left off most of the tiny details including the pitot tube as I have a habit of breaking them while handling the model during painting.
| COLORS & MARKINGS |
 I first
primed the model using several coats of black Stynylrez primer. It was then when
I found a number of seams that needed rework. After all the additional seam work
(filling the seam, sanding down the area, polishing the area, reapplying the
primer) was done to my satisfaction I started spraying the base colors. The
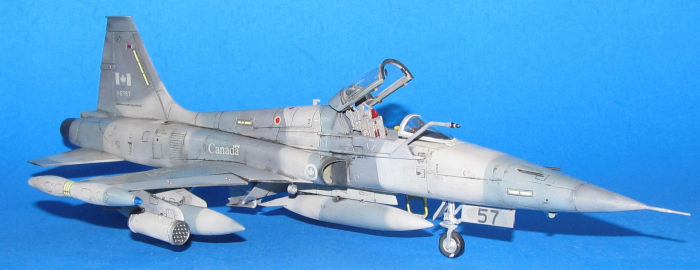
Canadian Ghost pattern uses colors similar to the following FS595 colors
FS36237, FS36375 and FS36251. I used Xtracrylix paints for those shades. The
color demarcation lines are pretty clear with this scheme, but when it is
weathered it looks like it has varying shades of light greyish blue (I've seen
the CF-5A at the Canadian Warplane Museum in Hamilton Ontario, but I don't have
the skills to make the paint look that faded.)
As per the standard process I sprayed thin coats of the lightest color first. I then added precut masks I made using low tack tape to cover areas of the 1st color and repeated the same spraying process of applying thin coats of the 2nd color. Next I made masks for the areas of the 2nd color and added them to the model. Repeated the same process for the 3rd color. I ended up doing some touchups as I had overspray or made a mistake with the mask.
The intakes have a black area at the entrance. I originally masked off these sections, but ended up having to spray them black again as the tape didn't hold well and I got overspray.
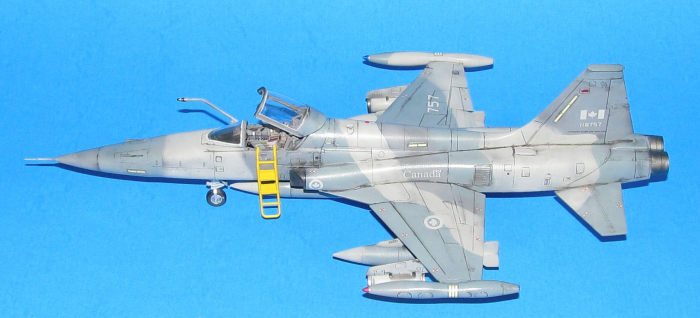 The canopy
of the CF-5 (as well as all other F-5s) has a prominent canopy seal. Instead of
using decals, I made my own masks as the CF-5 canopy is pretty simple shape wise
unlike many other modern jet canopies which make masking multiple layers a royal
pain in the butt. I ended up spraying on the seal without error, but it wasn't
easy. Finally I sprayed on Vallejo gloss coat to provide a smooth surface for
the decals.
I used the kit decals for the plane from the Canadian Warplane Museum. There were a number of decals to add, but nothing like an F-4 or any “modern” jet when it comes to the number of stencils. The Kinetic decals went on without much silvering using MicroSol.
I decided to use Tamiya Panel Line Accent as the main wash. I slathered it on and then when it was sort of dry I used mineral spirits to remove most of it and show off most of the panel lines. It's pretty grungy for an operational jet (based on the photos) but way too dirty for the museum plane. The final coat was Vallejo Acrylic Flat. I sprayed on two light coats and I was done with the painting (and the model too as it was the actual final step.)
| FINAL CONSTRUCTION |
I continued with my habit of doing the ejection seat after painting (but before spraying on the final coat.) I do this because I've had a number of PE seatbelts detach themselves from the seat during the handling of the model while painting/assembly. I painted the plastic bits and added the PE parts. The ejection seat is more complicated than the cockpit with all the small PE bits that strained my eyesight. Once done, I plopped the seat into the cockpit. The stick and throttle parts were painted and glued in place.
Next the already painted and decaled landing gear/doors were added. I had added the PE parts where useful (I didn't use the PE oleos.) The wheels required masking where I used my new circle cutter for the first time. It did a good job making the masks from low take painter's tape.
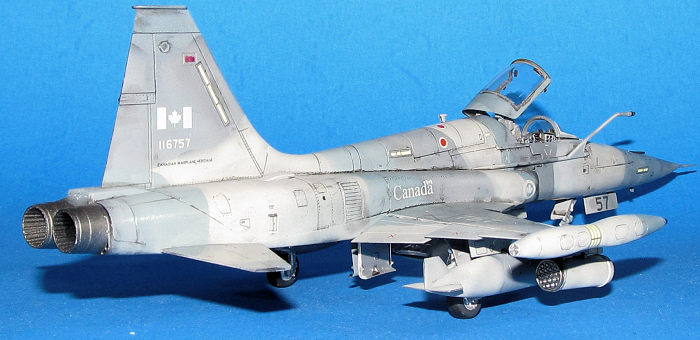 I used Master
Models brass cannon barrels for the 20mm Browning cannons. I ended up having to
drill out the mounting holes and secure the painted brass parts with a dab of CA
glue.
The already painted fuel tanks and rocket pods were added using CA glue. They were painted based on photos of CF-5 fuel tanks and rocket pods. The prominent wingtip fuel tank lights were painted white first then Vallejo clear blue and red while the trim around the lights were painted silver (all with a fine tipped brush.) The only booboo Kinetic made was making the wingtip fuel tanks oriented at a perfect horizontal rather than angle down about 10 degrees (I had a hard time correcting this with my Classic Airframes build so I passed.)
I added the PE gunsight with the Kinetic clear plastic piece (which is missing from the Classic Airframes kit.) I added the nose pitot tube and then realized that the gap was too noticeable so I filled it in with Vallejo plastic putty (removing the excess with damp Q-Tips) and repainting that area of the nose.
Finally I added the windscreen (which proved to be more fiddly than I expected), crew ladder and canopy assembly complete with canopy mechanism and I was done.
| CONCLUSIONS |
I've always liked the look of the F-5 series having built a CF-5 based on the Matchbox kit many many years ago as a kid. For some reason I've had issues building them as an adult as the only completed model of the F-5 family I'm proud of building was the F-5E derivative F-20 Tigershark. I finished the Classic Airframes version of the kit after several years but I wasn't happy with how things turned out (the ailerons are too forward because I screwed up the placement.) Outside of making it too grungy, I'm happy with this build.
The Kinetic kit makes for a nice kit, but only if you're an experienced modeller as it is quite fiddly and requires a lot of sanding/filling to make it look nice.
16 May 2023
Back to the Previews Index Page
Back to the Previews Index Page