
Italeri 1/48 F-5A
| KIT #: | 802 |
| PRICE: | 10 Euros |
| DECALS: | Three options |
| REVIEWER: | Spiros Pendedekas |
| NOTES: | Reboxed Hawk kit |

| HISTORY |
Small and highly
aerodynamic, focusing on performance and a low cost of maintenance, smaller and
simpler than its contemporaries, it is not surprising that the F-5 is quite a
few times referred as “the F-16 f its time”.
 Designed for a day air superiority role, the aircraft proved to be a capable
ground-attack platform and was furthermore developed into a dedicated
reconnaissance version, the RF-5 Tigereye. It also served as a starting point
for a series of design studies which resulted in the F/A-18 Hornet.
A huge export success, the F-5 is still serving with many Air Forces (as of
2021), exhibiting a long and very interesting operational history. A total of
2246 have been built.
Hellenic Air Force (HAF), started receiving the F-5A in 1965. In the same year,
the 341st Day Interception Squadron (MAH) was declared operational, followed by
the 343 MAH. Fifty-five aircraft were initially received, with 17 RF-5As
received in 1970. In 1975 ten were purchased from Iran and later another ten
from Jordan. With nine more granted by Norway In 1986 and another ten (NF-5A /
B) finally in 1991 by the Netherlands, it is no surprise that HAF F-5s sported a
variety of camos, ranging from “NMF”, to SEA, Asia Minor, Aegean Blue, “Dutch”
gray/blue, “Norwegian” gray and Aegean Ghost!
Offering their services for 36 years, including their later use as “introductory
planes” for F-16 and Mirage 2000 pilots, HAF “Freedom fighters” clocked a
whopping 364,647 flight hours, while 23 memorable pilots lost their lives flying
with them. The type was withdrawn from HAF in 2001.
| THE KIT |
Introduced by Hawk in
1966, with the molds acquired by Testors in 1973 and regularly reissued till
1998 (by also the “cousin” Italeri), this is your definitive old school, basic
kit, meaning acceptable general shape and minimal detailing whatsoever. My copy
was the 1998 (and final, so far) Italeri release.
 The kit comes in a flimsy side opening box, with an attractive USAF bird boxart.
Inside the box there are four light gray sprues of thick, soft plastic that
contain all the parts. There is quite a bit of flash evident. Of interest is
that the main wing is provided as one piece, to be attached under the fuselage.
No cockpit is there, just a flat instrument panel and a toy-ish seat, onto which
a lifeless pilot is to be affixed. At least, a nice decal takes care of the
instrument panel. No wheel wells are provided whatsoever, with the rest of the
parts looking, the most part, simple and toy-ish. Some ordnance is supplied,
but, sadly, neither the almost always carried centerline drop tank, nor the so
characteristic tip tanks.
Transparencies are thick, but clear and separately packed. Instructions are very
well written for what looks to be a simple construction. Three decal options are
provided, a USAF, a Norwegian and a Spanish bird, all in aluminum finish. Decals
are superbly printed by Zanchetti Buccinasco and contain a bit of “extra”
stenciling.
| CONSTRUCTION |
I started by joining the two fuselage halves, with the one piece nose landing
gear, the instrument panel and the seat support trapped between them. Some
weight at the front had beforehand been secured with modeling clay (instructions
call for 20 grams, but, since the NLG seemed strong, I added more, just to be on
the safe side…) ., by attaching a flat styrene piece onto the top of the NLG I
created a cockpit floor. Then, I attached two leftover side consoles at the
sides of the fuselage and similarly leftover control stick and rudder pedals. A
rear bulkhead was added from styrene sheet. Basic cockpit color was gull gray,
with black consoles and stick grip. The consoles were dry brushed with silver
and had some “switches” added by tiny blobs of red, yellow and white paint. A
red “fire” knob was also painted onto the stick grip. Finally, the very nice
instrument decal was applied onto the gull gray panel.
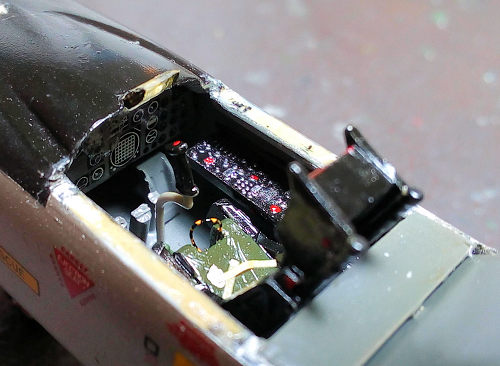 During the early 70s, F-5s received Martin Baker seats, so I happily tossed away
the ungainly looking kit seat. I used a leftover Mirage F-1 Martin Baker seat
that looked convincing, painted it black (dry brushed with silver), with green
cushions and red headrest. An ejection handle was formed from thin stretched
sprue, painted yellow and green and attached in position. The seat was then
placed into the cockpit, which also received a leftover clear gunsight that had
its surrounding framing painted black. Black was also used for the dashboard
top. After all those add-ons the cockpit, though on the fictitious side, looked
somehow busy, possibly passable under a closed canopy.
I proceeded with construction by adding the main wing, the pair of 2-piece air
intakes, the horizontal stabilizers and the two air scoops bilaterally of the
fin base. The latter were carefully hollowed with my micro drills, in order to
look more realistic. Intake innards were painted silver, with matt black end
plates, to enhance the illusion of depth.
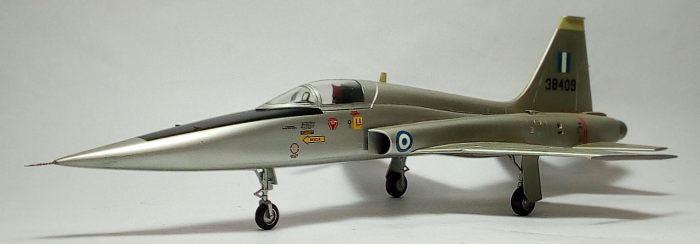 Due to the lack of any detail whatsoever, I took the decision of attaching all
three auxiliary gear doors and the air brake in “closed” position. Though it’s
true that a resting F-5 usually has its slats, all doors and air brake hanging
down or extended, my chosen posture might have some faint chances of actual
existence, possibly at the first couple of minutes after engine shutdown, before
the airbrake falls by gravity and the technicians open the gear doors. Anyways,
general fit was not bad, needing some attention around the intakes and
wing-to-fuselage joint, with the soft plastic making sanding an easy task.
I attached the tip sidewinder rails, but, intending to depict an otherwise clean
bird, as if it had just finished its test flight, following its Periodic Depot
Maintenance, I did not attach the wing mounted pylons . I thus filled the
corresponding underwing cuts with styrene rod and putty. The toy-ish MLG legs
and struts were attached in position, as well as all gear doors, having been
beforehand sanded down to a more scale thinness. The exposed MLG bay
lifeless-looking flat area received some “ribbing” with stretched sprue pieces,
looking consequently more alive. Upon sanding the whole model with 1000 and then
2000 grit, I blocked the cockpit opening with masking tape and headed to the
paint shop!
| COLORS & MARKINGS |
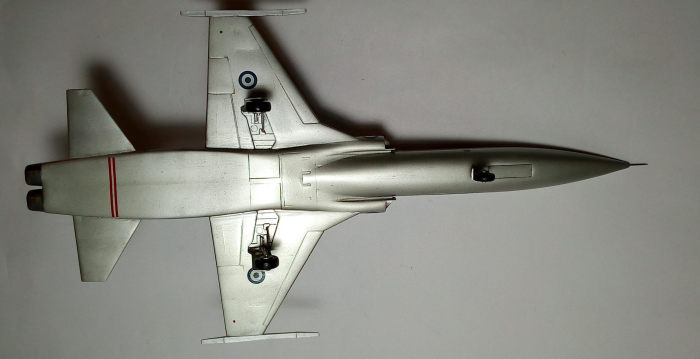 After a coat of Hu103
Cream to the fin top and a coat of matt black to the front anti glare area, I
masked them off and went on to joyfully apply Hu11 Silver everywhere else! The
wheel rims, as well as the canopy framing, received the same silver. With the
result deemed “acceptable”, I removed the masks and proceeded to decaling.
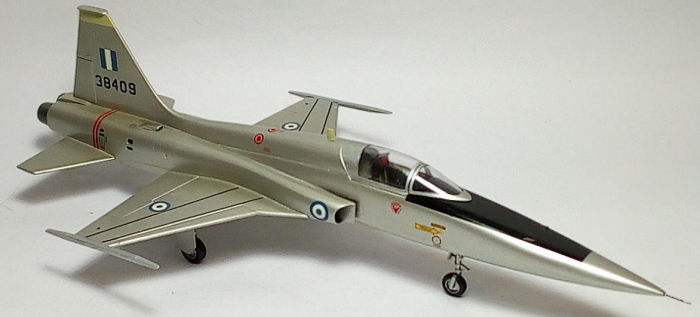
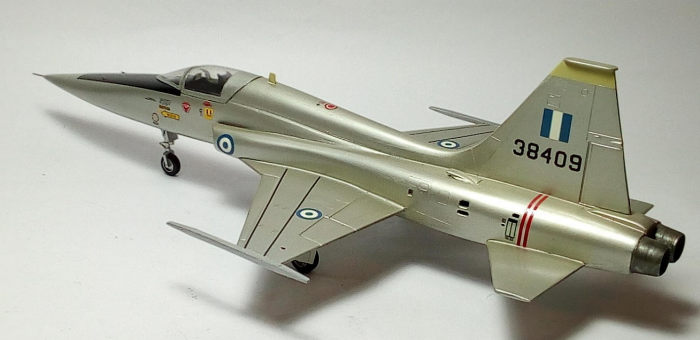
I wanted to depict the s/n 38409 bird in the early 70s. For the HAF insignia I
used a generic “Afterburner by Kalfakis” sheet (Cartograf printed, excellent
allover, sadly no longer available…). For the stenciling and warning/walk lines,
I used the kit decals, which also behaved excellently. Codes were from leftover
decals. A coat of Future sealed everything.
| FINAL CONSTRUCTION |
The double exhausts
were drilled out and had two pieces of right width straws attached to their
innards, in order to look deep and realistic. They were painted Testors Burned
Metal, had their outsides buffed and were attached in position. The rear wheels
were also attached, as well as a "cream" painted top shoulder fillet antenna.
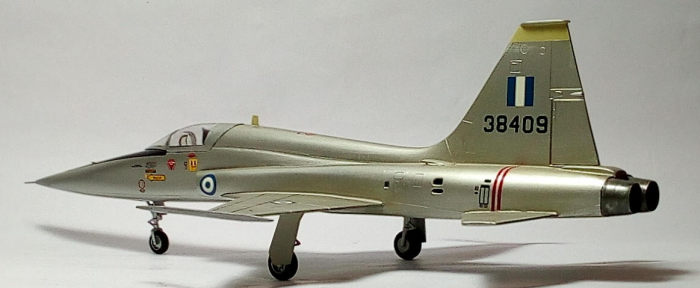 The bland top nose gun recessions were drilled out. I used needle pieces,
painted burned metal, in order to represent the two nose guns, which were
secured in their holes with cyanoacrylate glue. A needle piece was also used to
represent the front pitot. Per reference pics it had its red stripes carefully
painted with a 10/0 brush. Since the plane had just finished its Depot
Maintenance, meaning fresh “aluminum” paint, no weathering was performed
whatsoever. A satin towards gloss finish gave the plane its final shine.
I affixed the canopy in place, fairing the gaps with white glue, then
represented the navigation lights with tiny blobs of red and green clear paint
and called this elegant bird done!
| CONCLUSIONS |
If you want a “modern”, mainstream, kit of the F-5A, look no further than the Kinetic kit. It is not a toss together kit (Scotts excellent build and review here), but the end result is an accurate, impressive F-5A. Classic Airframes did an equally excellent (and, possibly, more accurate) multimedia (a lot of resin!) F-5A back in 2006, but they went out of business and those kits are almost impossible to find today (as of 2022).
The ancient Hawk/Testors
F-5A, even with the latest (1998) nice Italeri decals, is nothing more than a
toy-ish representation of the real plane. Key areas like cockpit, landing gear
and exhausts are overly simplified with almost nonexistent detailing. It is not
a difficult build, though, and the general shape looks like an F-5A. Even a
novice modeler can put it together and practice “natural metal” painting, with
the final result adequate enough to be displayed on a shelf.
The addition of leftover/scratch built stuff, as was my case, breathed some
interest to this otherwise toy-like model and I have seen masterpieces out of
this kit (check Roger Jackson’s fantastic F-5C).
As of 2021, this kit is out of production for a good 20 years (I doubt it will
ever be reissued) and equally difficult to find.
Since modeling not only is the pleasure of building the "latest and greatest", but also the equal satisfaction of putting together old and less than perfect kits, if you have one of these old F-5s, it might not be a bad idea to give it a go, possibly improving a couple of areas. It is definitely buildable and, I can assure you, you will experience modeling joy, also by the fact that the finished model will be sitting proudly on your shelf, instead of residing in your Shelf of Doom forever.
Happy modeling!
Spiros Pendedekas
10 January 2022
Copyright ModelingMadness.com. All rights reserved. No reproduction in part or in whole without express permission.
If you would like your product reviewed fairly and fairly quickly, please contact the editor or see other details in the Note to Contributors.