Eduard 1/48 Albatros D.V (Profipak)
|
KIT # |
8110 |
|
PRICE: |
$29.95 |
|
DECALS: |
Four Aircraft |
|
REVIEWER: |
|
|
NOTES: |
|
HISTORY |
While the Albatros D.V bids fair to win just about any contest for "Best-Looking Fighter of World War I," in fact this is the only way the last fighter product of the Albatros Werke Gmbh could take a first place. Technically, it was the least-successful of the line.
 Albatros came into the fighter
game in 1916 with its D.I and D.II biplanes, which were
head-and-shoulders above their competition and set the standard for a
modern fighter that has stood for 86 years: fast, agile, heavily-armed
and able to outperform the competition. Unfortunately for the Albatros
fighters, one of their more successful opponents was the Nieuport 17, a
lightly-loaded, highly-maneuverable sesquiplane. Not all the laws of
aerodynamics were fully known at the time, and the German authorities
came to believe there was something inherent in the Nieuport design that
made it successful, that something being the sesquiplane design. German
manufacturers were ordered to develop sesquiplanes, Albatros among them.
Albatros came into the fighter
game in 1916 with its D.I and D.II biplanes, which were
head-and-shoulders above their competition and set the standard for a
modern fighter that has stood for 86 years: fast, agile, heavily-armed
and able to outperform the competition. Unfortunately for the Albatros
fighters, one of their more successful opponents was the Nieuport 17, a
lightly-loaded, highly-maneuverable sesquiplane. Not all the laws of
aerodynamics were fully known at the time, and the German authorities
came to believe there was something inherent in the Nieuport design that
made it successful, that something being the sesquiplane design. German
manufacturers were ordered to develop sesquiplanes, Albatros among them.
The result was the Albatros D.III, which changed the strong biplane design for a sesquiplane, with the single spar in the lower wing. The Albatros design was different from the Nieuport - heavy where the Nieuport was light, and the sesquiplane was really not strong enough to perform under these kinds of loads. The Albatros D.III was a very good performer and became the standard German fighter by the Spring of 1917. However, it was not as maneuverable as its Nieuport and Sopwith competition.
 The Albatros D.V was introduced
that summer, a design that was very weight-conscious, and far lighter
than the previous D.III. Unfortunately, it was structurally too light.
The lower wing soon revealed its lack of strength when they began
separating from the rest of the airframe in combat! This was the result
of an unknown aerodynamic force - flutter - that overwhelmed the light
attachment points of the lower wing under combat g-forces. Pilots began
handling the airplane gingerly, and a fighter that has to be flown
gingerly is not a winner. Albatros undertook to beef up the airframe,
but all this did was add unnecessary weight without providing the
requisite strength, and the Albatros D.V - though it served in large
numbers and was still a significant fighter as late as the summer of 1918
- always fought with one hand behind its back. The killer of 1916 and
1917 was the prey by 1918.
The Albatros D.V was introduced
that summer, a design that was very weight-conscious, and far lighter
than the previous D.III. Unfortunately, it was structurally too light.
The lower wing soon revealed its lack of strength when they began
separating from the rest of the airframe in combat! This was the result
of an unknown aerodynamic force - flutter - that overwhelmed the light
attachment points of the lower wing under combat g-forces. Pilots began
handling the airplane gingerly, and a fighter that has to be flown
gingerly is not a winner. Albatros undertook to beef up the airframe,
but all this did was add unnecessary weight without providing the
requisite strength, and the Albatros D.V - though it served in large
numbers and was still a significant fighter as late as the summer of 1918
- always fought with one hand behind its back. The killer of 1916 and
1917 was the prey by 1918.
All this is as may be, the Albatros D.V is one of the most aesthetically-pleasing designs to ever fly, and the colors its pilots flew it in make it a natural for modelers today.
|
THE KIT |
Eduard first introduced the Albatros D.V back in 1994, in the days of the "limited-run" kit. The kit made up into a beautiful model, but it required work to smooth the plastic parts and get rid of the flash, and all the detail parts were done in the still-new photo-etch. While the basic kit was released in several versions with different markings, it has been out of production now since 1999.
 This is the first "re-make" of
an Eduard kit to the new standards introduced with the Sopwith Triplane
in 1998. Eduard no longer makes "limited run kits." Their products are
up to the quality level of any other mainstream producer, and ahead of
many. The new Albatros has a corrected landing gear, and has all basic
airframe parts - like the previously-photoetch cabane struts - in
injection-molded plastic. This is fully up to the quality level of any
recent Eduard kit, such as the Pfalz D.III series, the Roland C.II or the
Nieuport series.
This is the first "re-make" of
an Eduard kit to the new standards introduced with the Sopwith Triplane
in 1998. Eduard no longer makes "limited run kits." Their products are
up to the quality level of any other mainstream producer, and ahead of
many. The new Albatros has a corrected landing gear, and has all basic
airframe parts - like the previously-photoetch cabane struts - in
injection-molded plastic. This is fully up to the quality level of any
recent Eduard kit, such as the Pfalz D.III series, the Roland C.II or the
Nieuport series.
As a "Profipack" release, this particular kit does include photo-etch details such as seat belts, machine gun jackets, and small interior details, as well as four different sets of markings, along with Eduard "Express Masks" to make painting the model easier.
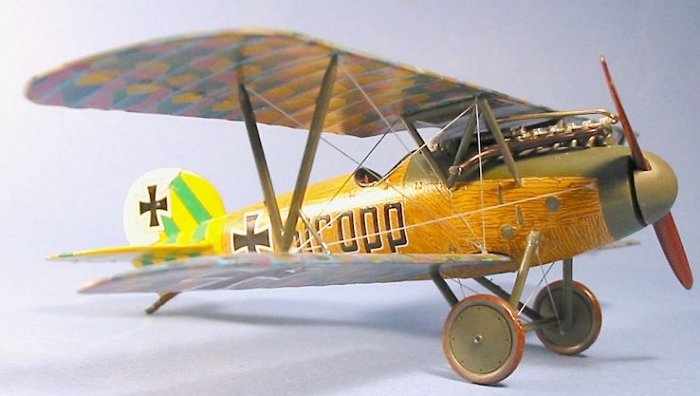
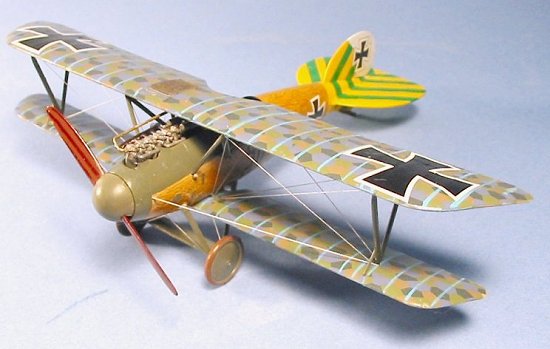
The four versions include the garish D.V flown by Herman Goering's buddy Bruno Loerzer that is on the box cover, the well-known "Stropp" - which sits today in the National Air and Space Museum - as well as a D.V. with black fuselage and lozenge wings flown by Ltn. Kissenberth of Jasta 23b, and Ltn. Georg von Hantelman's D.V from Jasta 15. All of these are good-looking schemes that will make up into a striking model.
|
CONSTRUCTION |
As with most models, construction starts with the cockpit. However, in this case it's a bit different. I Futured all the interior and the various parts on the sprue, then when dry I began applying wood decal to each. When this was completely set up, I then "varnished the wood" with Gunze-Sangyo "Clear Yellow" to get the "yellow varnish look" associated with the Albatros fighters. While all that was drying, I assembled the engine, then assembled the cockpit and engine compartments with all the nice little parts one gets in a "Profipack" kit that results in a good-looking cockpit, and glued the fuselage halves together.
|
CAMOUFLAGE & MARKINGS |
Once I had the fuselage center
seam disposed of with Mr. Surfacer, I assembled the tail surfaces,
painted them yellow, and masked them off. It was time to add the wood
finish to the exterior. After Futuring the fuselage, I cut out various
bits from typing paper to fit the various panels of the fuselage. The
purpose of this was to recreate the way the A lbatros fuselage was really
built as strong and as light as it was: the separate plywood panels were
always attached to the frame so that the individual panels all had the
grain going in different directions; the result was a fuselage that was
light, yet practically impervious to buckling under flight loads. This
was a tedious process of cutting and applying the various bits of wood
decal, and the result is not that noticeable unless viewed up close, but
I like that it's accurate. When that was all set up, the fuselage was
"varnished" with the Gunze-Sangyo "Clear Yellow."
lbatros fuselage was really
built as strong and as light as it was: the separate plywood panels were
always attached to the frame so that the individual panels all had the
grain going in different directions; the result was a fuselage that was
light, yet practically impervious to buckling under flight loads. This
was a tedious process of cutting and applying the various bits of wood
decal, and the result is not that noticeable unless viewed up close, but
I like that it's accurate. When that was all set up, the fuselage was
"varnished" with the Gunze-Sangyo "Clear Yellow."
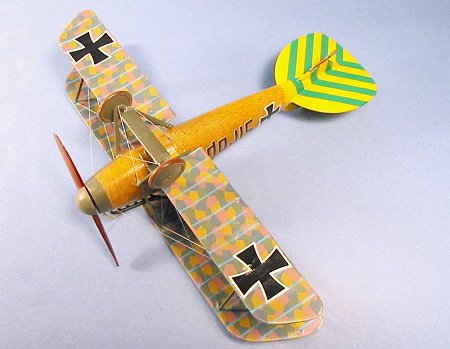
Next were the wings, which were to be all lozenge. The kit-supplied lozenge decals looked like no lozenge I had ever seen before, color-wise, so I used the new Eagle Strike upper and lower lozenge sheets, which have the best color of any decals I have yet run across. I started by doing the lower surface, then Futuring it when dry, and proceeding to the upper surfaces; in both cases, the ailerons on the upper wings were decaled separately, with the pattern going span-wise instead of chord-wise. When all this was Futured again and safe to handle, it was time to do the one thing that no World War I modeler looks forward to: the ribbing tape.
While Eagle Strike supplies very
good rib tape decal, the process of applying it and the chances of
screwing it up are greater than any other part of the decaling process on
a kit like this. The week before, I had been shopping at the local
Michael's Crafts Store, and had run across the perfect solution to this:
a paint pen. I had purchased one that was in the
 right shade of blue,
and now was the time to try it. I taped the wing onto the old wooden
shelf I used as a lap-bench for detail work, pulled out my strait-edge,
and proceeded. Pressing lightly but firmly, I had the upper surfaces of
both wings done in about 10 minutes. I let that paint dry, Futured the
wing to protect it, and repeated the process on the lower surfaces. The
entire operation took about an hour, as opposed to the several hours over
several days decaling the @#$%$#@!! rib tapes would have normally taken.
right shade of blue,
and now was the time to try it. I taped the wing onto the old wooden
shelf I used as a lap-bench for detail work, pulled out my strait-edge,
and proceeded. Pressing lightly but firmly, I had the upper surfaces of
both wings done in about 10 minutes. I let that paint dry, Futured the
wing to protect it, and repeated the process on the lower surfaces. The
entire operation took about an hour, as opposed to the several hours over
several days decaling the @#$%$#@!! rib tapes would have normally taken.
I then painted the landing gear and the various wing struts with RLM02, which I think is the descendant of the "grey-green" used on the Albatros and other German aircraft of the First World War.
Decals:
Now that the model's finish was complete, it was time for the decals. The Eduard decals went down with no trouble, other than a bit of "fiddling" with the green tail stripes, which resulted in a couple of them (fortunately, on the bottom of he horizontal stabilizers) being replaced with other green stripe decal that was fortunately close enough in shade to "pass."
|
FINAL CONSTRUCTION |
The plastic cabane struts and
gear struts fit much better than I recall the photoetch versions doing on
the earlier release Albatros D.V. I attached the upper wing, then
a ttached the interplane struts with Cyanoacrylate glue.
The Albatros has a simple rigging system, and this was accomplished with .010 steel wire.
|
CONCLUSIONS |
This kit is quite simple to build. For those of you who are put off by all the decal work to make "Stropp," Two of the other markings possibilities include painted fuselages with wings in the painted camouflage of light blue lower surfaces and a mauve-and-green pattern on the upper surfaces. Overall, the kit is much easier to build than its limited-run predecessor, and with the simple rigging would be a good "first choice" for anyone wanting to try their hand at a World War I Model.
June 2003
Thanks to Eduard for the Review Kit.
If you would like your product reviewed fairly and quickly, please contact me or see other details in the Note to Contributors.