|
KIT: |
Special Hobby 1/48 Spad VII C.1 |
|
KIT # |
? |
|
PRICE: |
$29.95 |
|
DECALS: |
Three Aircraft |
|
REVIEWER: |
|
|
NOTES: |
Short run with resin parts |

|
HISTORY |
The SPAD VII C.1 was the first French fighter powered by an in-line engine. Heavier than the lightly-loaded, rotary-powered Nieuport series, it depended on speed and maneuverability in the vertical plane rather than the close-in high-g maneuvering of the rotary-powered fighters.
The Spad VII first
appeared in the Spring of 1916, powered by a 150 h.p. Hispano-Suiza V-8, and
armed with a single Vickers machine gun utilizing an interrupter gear designed
by Louis Bechereau, who designed the engine. Difficulties were encountered in
supplying useful radiators that could maintain engine temperatures, and only
some 140 were produced by the end of the year. The Spad VII finally began to
appear in appreciable numbers in 1917, when it was powered by an
 upgraded 180 h.p. Hispano-Suiza,
which made it one of the fastest scouts on the Western Front and a very worthy
opponent of the contemporary Albatros D.III. In addition to the 30 French
Escadrilles that were eventually equipped with the fighter, the Royal Flying
Corps also obtained several hundred which equipped some ten squadrons. The
aircraft was also built under license in Russia by Duks, with approximately 100
eventually seeing service on the eastern front. In Italy, Aeronautica Macchi
undertook license production in early 1917 and the SPAD VII was one of the major
types operated by the Italian air force until the end of the war; Francesco
Baracca favored it over the later SPAD XIII for its superior handling, and
scored the majority of his 29 victories while using the type.
Even after the appearance of the more powerful and more heavily-armed SPAD XIII, the SPAD VII remained in production until late 1917, and was still in squadron service as late as the German Spring Offensive of 1918, though it was completely gone from the Western Front by that summer.
Post-war, the SPAD VII equipped several air forces, including Belgium, Holland, Czechoslovakia, Italy, Japan and Finland.
|
THE KIT |
I think the SPAD series of fighters are either my favorite World War I airplanes, or tied in a dead heat with the Albatros series. This likely goes back to the fact that when I was very young, my father was friends with an older man in our neighborhood who had actually flown Spads in World War I, and I loved looking at his photographs. I also built the old Hawk (now Testors) Spad model, of which I was too young at the time to know it was "too difficult" for me to do.
 There have only been
two other kits of the SPAD VII available, one being a resin kit from JMGT in
France that is still available and makes up into a very nice-looking model if
you are careful not to snap the very thin and very brittle wings (I speak from
experience), and one done several years ago by Blue Max which is long out of
production and a real "find" if you can run across it.
This SPAD VII by the Czech firm Special Hobby comes on two sprues of grey plastic, with a resin cockpit and a decal sheet that allows the modeler to create SPAD VIIs flown by Georges Guynemer and Maxime Lenoir of the French Air Force, and one flown by Capitano fulco Ruffo di Calabria of the Italian Air Force. The red in the insignias seems a bit dark to me.
The injection-molded parts of this kit are very well-done, with a muted and more accurate fabric effect overall, with the wings and tail all commendably thin. The resin cockpit is nicely-detailed with some photo-etch for additional details and the seatbelts.
|
CONSTRUCTION |
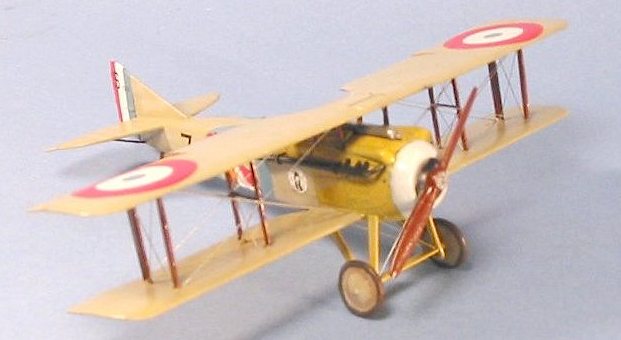
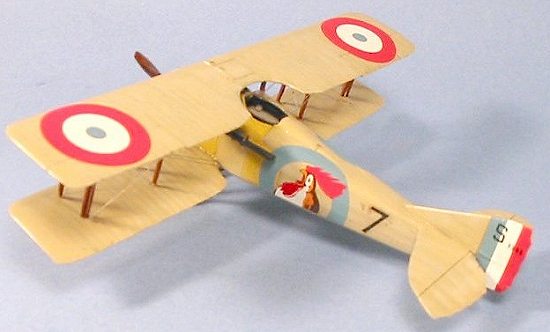
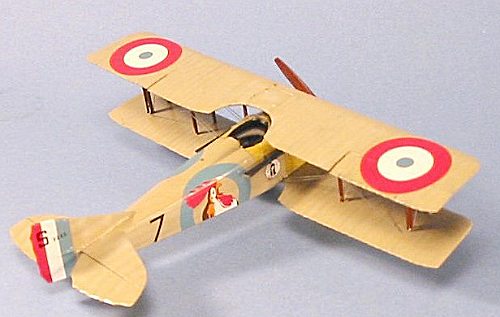
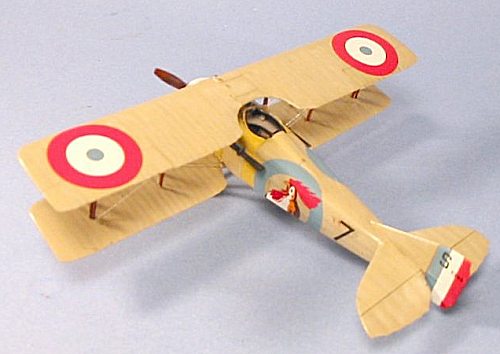
Overall, this was one of the easiest-to-construct World War I airplane models it has been my pleasure to run across.
 I started by cutting all the control surfaces loose and then posing them more
dynamically, something I do with almost all WW1 models. While these were setting
up, I turned to the cockpit.
The resin cockpit is nicely detailed. I painted the various parts in different shades of brown to represent the different kinds of wood used in the construction, and to provide a more colorful cockpit. Assembly of the parts was straightforward and no difficulties were discovered.
While this was setting up, I assembled the fuselage halves and attached the lower wing. This way, I would just slide the cockpit into position, then attach the cowling and radiator parts. The fuselage fit well, and I only needed to use the #11 X-acto blade to scrape down the join line so it looked like a rib. After I slid the cockpit into position and glued it in place, I attached the cowling parts. With pre-fitting and a bit of trimming, these parts fit perfectly and required no putty or Mr. Surfacer. I then attached the horizontal stabilizer and rudder.
|
PAINT & DECALS |
Painting:
 After pre-shading the
model on panel lines and rib lines in the fuselage and wings, I painted the
metal parts with Gunze-Sanyo "Cream Yellow" which is close to the "Ecru" color
the French used on non-fabric surfaces of their airplanes at this time. When
dry, this area was masked off with drafting tape, and the fabric areas were
painted with Gunze-Sangyo "Sail Color." In each case, the area was post-shaded
by adding a bit of white to the color and going over the panels of the cowling,
and the areas between ribs in the fabric sections. When dry, the model was
Futured and I attached the landing gear.
Decals:
I used the decals from the Aeromaster sheet for the Spad VII flown by Sgt. Jacques Rocque, with the very colorful rooster insignia. The decals snuggled down under a coat of Micro-Sol with no problem.
|
FINAL ASSEMBLY |
 I attached the cabane
struts to the fuselage, and used this to measure the interplane struts. Sure
enough (this is a kit my MPM after all), they were long. I cut 1/16" off the
outer ones; for the inner ones, I cut off 1/32" from either end, to keep their
"two part" shape so the "H" with the interstrut brace would be right. The upper
wing went on with no trouble once the struts were in position.
Rigging for the Spad VII is not has hard as the real "bird cages" like a D.H.2 or F.E.2b, but more difficult than an Albatros fighter. The airplane is actually a single-bay biplane, with the "H" strut being a series of smaller struts which are there to brace the interplane flying wires. I used .010 stainless steel wire for the rigging, which was accomplished in about 90 minutes of work. (All of us with rigging phobia can send our kits to Tom to have this onerous task done as he seems to have it down pat!)
|
CONCLUSIONS |
This is a well-designed, well-produced kit of an interesting and historically-significant airplane. The design of the kit is so good that it can even be recommended to a modeler who has yet to try a World War I model. I am sure there will be more than one of these sitting in the Spad section of my World War I shelves. Highly recommended as good value for money spent.
Kit supplied courtesy of my wallet.
If you would like your product reviewed fairly and quickly by a site that has well over 150,000 visitors a month, please contact me or see other details in the Note to Contributors.
Back to the Reviews Index Page