Wingnut Wings 1/32 Albatros D.V
|
KIT #: |
032009 |
|
PRICE: |
$59.00 SRP |
|
DECALS: |
Five options |
|
REVIEWER: |
Tom Cleaver |
|
NOTES: |
Pheon
Decals 32012 “Albatros D.V and D.Va, Vol. 2" and 32020 “Albatros 5-Color
Lozenge Decals” used |

While the Albatros D.V bids fair to win just about any contest for "Best‑Looking
Fighter of World War I," in fact this is the only way the last fighter product
of the Albatros Werke Gmbh could take a first place.
Technically, it was the least‑successful of the line.
Albatros came
into the fighter game in 1916 with its D.I and D.II biplanes, which were
head‑and‑shoulders above their competition and set the standard for a modern
fighter that has stood for 95 years:
fast, agile, heavily‑armed and able to outperform the competition.
Unfortunately for the Albatros fighters, one of their more successful
opponents was the Nieuport 17, a lightly‑loaded, highly‑maneuverable sesquiplane.
Not all the laws of aerodynamics were fully known at the time, and the
German authorities came to believe there was something inherent in the Nieuport
design that made it successful, that something
 being the
sesquiplane design. German
manufacturers were ordered to develop sesquiplanes, Albatros among them.
The result
was the Albatros D.III,
which changed the strong biplane design for a sesquiplane, with the single spar
in the lower wing. The Albatros
design was different from the Nieuport ‑ heavy where the Nieuport was light, and
the sesquiplane was really not strong enough to perform under these kinds of
loads. The Albatros D.III
was a very good performer and became the standard German fighter by the Spring
of 1917. However, it was not as
maneuverable as its Nieuport and Sopwith competition.
 The Albatros D.V was introduced that summer of 1917.
The design was very weight‑conscious, and far lighter than the previous
D.III.
Unfortunately, it was structurally too light.
The lower wing soon revealed its lack of strength when they began
separating from the rest of the airframe in combat!
This was the result of an unknown aerodynamic force ‑ flutter ‑ that
overwhelmed the light attachment points of the lower wing under combat g‑forces.
Pilots began handling the airplane gingerly, and a fighter that has to be
flown gingerly is not a winner.
Albatros undertook to beef up the airframe, but all this did was add unnecessary
weight without providing the requisite strength, given that the real underlying
problem was undiscovered at the time. The Albatros D.V and the beefed-up D.Va,
though they served in large numbers and were still a significant part of the
German fighter force as late as the summer of 1918, always fought with one hand
behind its back. The killer of 1916
and 1917 became the prey of 1918.
Despite
all this, the Albatros D.V is one of the most aesthetically‑pleasing designs to
ever fly, and the colors its pilots flew it in make it a natural for modelers
today.
This Albatros D.V was one of the first five kits released by Wingnut
Wings in late 2009. It is the first
kit of this airplane in this scale that I am aware of, and is the best Albatros
model in any scale.
Though the kit is labeled a D.V, it includes the braced interplane struts
that are the one major visual difference between the
 two
sub-types, so a modeler can build either version from this kit or from the D.Va
kit that was released simultaneously.
The kit is specifically a D.V as regards the decals, which provide
markings for five good-looking airplanes, including an overall silver Albatros
flown by Ernst Udet, as well as Otto Kissenberth’s “Edelweiss” Albatros with
overall black fuselage. The boxart
airplane is Fritz Rumey’s black-and-white “candy-striper” from Jasta 5.
The kit provides a fully-detailed and very complete interior, including a
full cockpit and engine compartment, two different types of wing radiator, two
different types of propeller, and a choice of solid-plastic Spandau machine guns
or plastic weapons that use a photo-etch cooling jacket.
I elected to use Pheon Decals recent “Albatros D.V and D.Va, vol.2" decal
sheet for the individual markings, and the brand-new “Albatros D.V 5-color
Lozenge” sheet, which is nothing short of revolutionary for World War I
modeling. These decals were
researched with the help of Harry Green and Richard Andrews, two noted experts
in the field, and I think they just may be the most accurate lozenge decals out
there in terms of proper colors.
As with any Wingnut Wings kit, the modeler is well-advised to use the
truly excellent instruction book and follow it religiously.
The result will always be an excellent model.
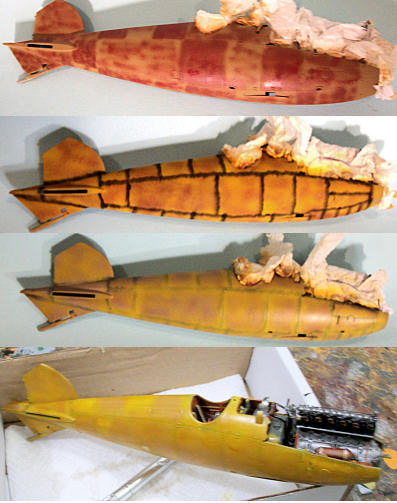
 I started by pre-painting as much as I could, following the color
call-outs in the instructions. I
had decided to try a new way of representing the natural varnished wood
fuselage, and this began in the cockpit painting.
I applied an overall coat of Tamiya “Buff,” which was then followed by
Tamiya “Desert Yellow” and “Flat Yellow” sprayed to represent different panels
of the fuselage. This was followed
by a very thin coat of Tamiya “Buff” over all that allowed the darker colors to
show through. I then applied a coat
of Tamiya “Clear Yellow.” The
result looks like the way the Albatros was built with different panels of
plywood.
The interior structure was painted “Ash,” a honey-yellow-brown I mixed
up.
All other parts were painted per the kit instructions.
Not knowing what power plant had been used by the Albatros I intended to
do, I decided to build the 180 h.p. Mercedes IIIa engine, since I had used the
D.III
engine on my other Albatros models.
Assembly presents no difficulty once everything is painted, and the
positive-click design insures everything goes in the right place.
Following the assembly of the fuselage, I proceeded to paint the outer
fuselage. I followed the same
procedure as I had on the interior, other than I used a final coat of thinned
“Flat Yellow” overall before applying the “Clear Yellow” varnish.
The metal parts were all painted with Xtracrylix “RLM 02"
Let’s just say from the outset that Pheon Decals is busy
filling the hole left by the departure of Americal Gryphon when it comes
to World War I decals. They’re
offered in all three major scales, and I haven’t run across one yet that isn’t
wonderful.
With the fuselage done, I applied a coat of Xtracrylix Clear Gloss on the
wings, horizontal stabilizers and control surfaces.
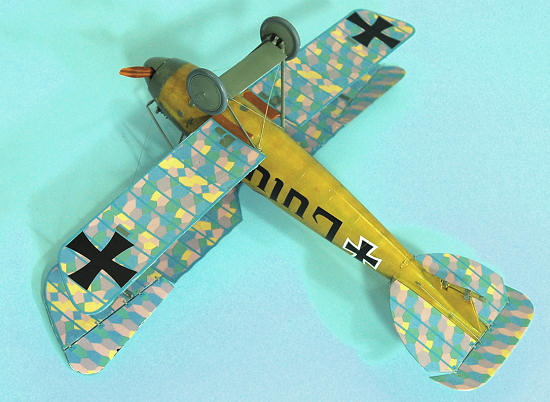
I then applied the Pheon Albatros D.V 5-Color Lozenge (32020).
What makes this set of decals revolutionary is that the lozenge is
printed in parts that fit directly to the various surfaces, without having to be
cut to fit with scissors from a strip of lozenge.
Each decal also includes the rib tapes, and the sheet provides either the
blue rib tape or the pink rib tape opt ions.
I cannot recommend these high enough.
Rather than spend an hour on the upper surfaces, cutting, trimming,
applying, letting them dry, then doing the lower surfaces similarly, then
applying rib tapes individually, for a total time spent of perhaps 4-5 hours
with the constant possibility of a decal piece setting up wrong and ruining the
whole operation, these decals took a total of 20 minutes to apply to all
surfaces, with no possibility of a mistake.
Do follow the instructions provided, to make sure the decals set up
properly. This is the best thing to
happen to World War I modeling since Eduard started releasing 1/48 kits 20 years
ago.
Pheon will next release a second sheet of this wonderful stuff,
specifically for the Pfalz D.III
and D.IIIa in a few months. There will undoubtedly
be a sheet done for the coming Wingnut Fokker D.VII.
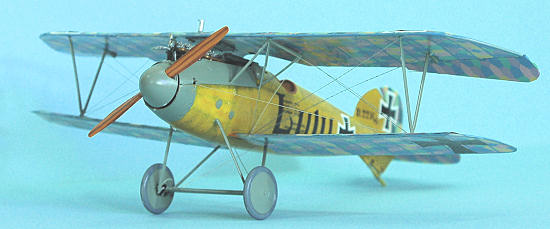
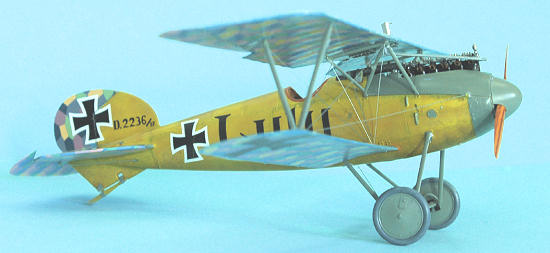
Once the lozenge had set up, I used the kit decals for the national
insignia and the stenciling. The
Pheon “Albatros D.V. Vol. 2" sheet provided the “Lulu” marking and serial number
for the Albatros D.V flown by Vizefeldwebel Ludwig Webber of Jasta 3.
Webber is little-known pilot, but I chose these markings because the
airplane was “factory stock” with lozenge on all the flying surfaces, which thus
allowed me to fully demonstrate the
Pheon lozenge decals.
When everything was done, I washed the parts to get rid of decal solvent,
then gave the sub assemblies an overall coat of Xtracrylix Satin varnish.
I attached the engine cowlings, then attached the horizontal stabilizers
and the lower wings. I then
assembled and attached the landing gear.
I attached the control surfaces to the upper wing, horizontal stabilizer
and vertical fin in “dynamic” positions (that mirrored the position of the
cockpit controls). I attached the
cabane struts and interplane struts, then attached the upper wing.
I attached the radiator lines then the prop and assembly was complete.
I rigged the model with .008
wire.
 As others have demonstrated with their Albatros projects, the kit is
another big winner from Wingnut Wings.
Definitely the best Albatros D.V in any scale, and the easiest to
assemble. The Pheon lozenge makes
this model look better than any other German airplane with lozenge I have ever
done, and I cannot recommend its use highly enough.
The model is a good one for a modeler entering World War I modeling,
being both easy to assemble and rig.
If you follow the instructions it is a guaranteed winner.
In addition to the two sheets of markings from Pheon, Wingnut has
released at least four “aftermarket” sheets of very interesting markings for the
kit. I’m pretty sure I will be
getting another one. It looks
perfect sitting next to the Roden Albatros D.I, D.II and D.III
kits.
Highly recommended.
Tom Cleaver
August 2011
Review kit
courtesy of
Wingnut Wings. Pheon decals
courtesy of Pheon Decals. Order
yours at the links.
If you would like your product reviewed fairly and quickly, please
contact
me or see other details in the
Note to
Contributors.
Back to the Main Page
Back to the Review
Index Page


 being the
sesquiplane design. German
manufacturers were ordered to develop sesquiplanes, Albatros among them.
 The Albatros D.V was introduced that summer of 1917.
The design was very weight‑conscious, and far lighter than the previous
D.
 two
sub-types, so a modeler can build either version from this kit or from the D.Va
kit that was released simultaneously.
The kit is specifically a D.V as regards the decals, which provide
markings for five good-looking airplanes, including an overall silver Albatros
flown by Ernst Udet, as well as Otto Kissenberth’s “Edelweiss” Albatros with
overall black fuselage. The boxart
airplane is Fritz Rumey’s black-and-white “candy-striper” from Jasta 5.
 ions.
I cannot recommend these high enough.
