
Frog 1/72 Tempest V
| KIT #: | F-189 |
| PRICE: | $Freebie |
| DECALS: | Two options |
| REVIEWER: | Scott Van Aken |
| NOTES: | Kit came in a bag with no instructions |

| HISTORY |
Even before the first flight of the prototype Tempest V a production order
for 400 Tempests was placed by the Air Ministry. The order was split, with the
initial batch of 100 being Tempest V "Series Is", powered by the 2,235 hp
(1,491 kW), Napier Sabre IIA series engine with the chin radiator, while the
rest would be the Tempest I with the Napier Sabre IV and leading-edge radiators.
As it transpired the difficulties with the Sabre IV meant that this version
never reached production and the order was switched to 300 Tempest V "Series
2"s. The first production Tempest V,
JN729 was first flown by test pilot
Bill Humble on 21 June 1943. Several of the early production aircraft underwent
extensive service trials at Boscombe Down
 including clearances to be fitted with
external stores, including 500 lb (227 kg) and 1,000 lb (454 kg) bombs and 3 in
(76.2 mm) RP-3 rockets, although few Tempest Vs used such ordnance operationally
during World War II.
Examination of captured Fw 190s brought about improvements in the windscreen/ side windows; by careful design and positioning of the frame structure blind spots were reduced to an absolute minimum. The three-piece windscreen had a bullet-resistant centre panel made up of two layers, the outer 1.5 in (38 mm) thick and the inner 0.25 in (6.5 mm).
During production of the first batch of 100 Tempest V "Series Is",
distinguished by their serial number prefix
JNxxx, several improvements
were progressively introduced and were used from the outset on all succeeding
Tempest V "Series 2s", with serial number prefixes EJ, NV and SN. The rear
fuselage fuselage/empennage joint originally featured 20 external reinforcing
"fishplates", similar to those fitted to the Typhoon, but it was not long before
the rear fuselage was strengthened and, with the fishplates no longer being
needed, the rear fuselage became detachable. The first series of Tempest Vs used
a built-up rear spar pick-up/bulkhead assembly (just behind the cockpit) which
was adapted from the Typhoon. Small blisters on the upper rear wing root fairing
covered the securing bolts. This was later changed to a new forged, lightweight
assembly which connected to new spar booms: the upper wing root blisters were
replaced by small "teardrop" fairings under the wings. The new spar structure
also allowed the wings to carry up to 2,000 lb (907 kg) of external stores. Also
developed specifically for the Tempest by Hawker was a streamlined 45 gal
(205 l) "drop tank" and carrier fairing; the redesigned wing incorporated the
plumbing for these tanks, one to each wing. The ailerons were fitted with
spring-loaded tabs which lightened the aerodynamic loads, making them easier for
the pilot to use and dramatically improving the roll rate above 250 mph
(402 km/h). Starting with EJxxx series Tempest Vs the improved Sabre IIB and IIC
were used, both of which were capable of producing over 2,400 hp (1,789 kW) on
emergency boost for
 short periods of time. All versions of the Sabre drove
four-bladed, 14 ft (4.267 m) diameter de Havilland Hydromatic or Rotol
propellers.
The first 100 Tempest Vs used long-barrelled 20 mm (.79 in) Hispano Mk.IIs the barrels of which projected ahead of the wing leading edges and were covered by short fairings, while later production Tempest Vs switched to the short-barrelled Hispano Mk.Vs the muzzles of which were flush with the leading edges. Finally, while early Tempest Vs used Typhoon style 34 by 11 inch (83.4 by 28 cm) five-spoke wheels, the majority used smaller 30 by 9 inch (76.2 by 22.9 cm) four-spoke wheels.
As in all mass-produced aircraft, there may have been some overlap of these features as new components became available. In mid to late 1944 other features were introduced to both the Typhoon and Tempest: A Rebecca transponder unit was fitted, with the associated aerial appearing under the portside centre section. A small, elongated oval static port appeared on the rear starboard fuselage, just above the red centre spot. This was apparently used to more accurately measure the aircraft's altitude.
Unusually, in spite of the Tempest V being the RAF's best low to medium altitude fighter, it was not equipped with the new Mk IIC gyroscopic gunsight, an asset which was fitted in RAF Spitfires and Mustangs from mid-1944 and one which considerably improved the chances of shooting down opposing aircraft. Tempest pilots continued to use either the Type I Mk.III reflector gunsight, which projected the sighting graticule directly onto the windscreen, or the Mk.IIL until just after the Second World War, when the gyro gunsight was introduced in Tempest IIs.
| THE KIT |
In the earlier days of plastic modeling, the Tempest was quite well represented in 1/72 scale with kits by Frog, Matchbox and Revell seeing the light of day by the 1970s. Much later on, Academy released a version that is considerably nicer than these earlier kits. Even later the CMK group did several Tempests in their multi-media releases. I'm not sure which is older, the Revell or Frog kit, but I'm thinking perhaps the Frog one simply by its relative crudity.
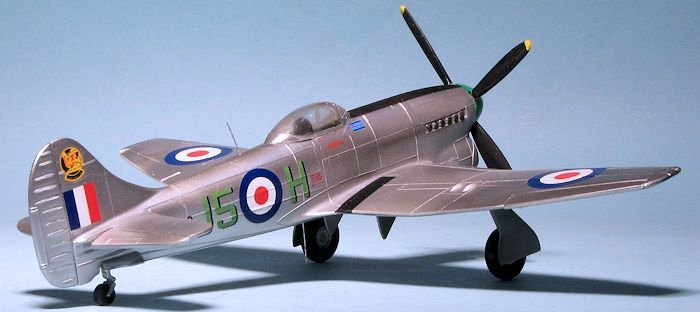 This kit was before the 'mad trencher' so it has raised detail
that in some places looks like someone tacked 1x1 inch stringers to the
fuselage. There are sink marks on many pieces, no real cockpit (seat and floor),
though one is supposed to fill it with a pilot. The main gear legs are basically
L shaped sticks. Main gear doors have holes all the way through them to fit onto
the pegs on the gear legs. Wheels are toys. The prop is an odd build of four
separate blades, each attached to a quarter circle of plastic which fits into
the spinner.
All of the control surfaces are separate and some are thicker than the surface to which they are to be attached. There are large slots on the underside of the wings for a variety of items. Either two fuel tanks (with pylons molded onto them), two 'bombs', or a set of very clunky rocket rails with eight rocket shapes.
There are no instructions, but there is a decal sheet (probably unusable) with two planes coded JF*E (Pierre Clostermann's plane), and ED*M. Pretty much all WWII Tempests were in the late fighter scheme and to be honest, finding replacement insignia and codes will not be an issue as a number of people make them.
| CONSTRUCTION |
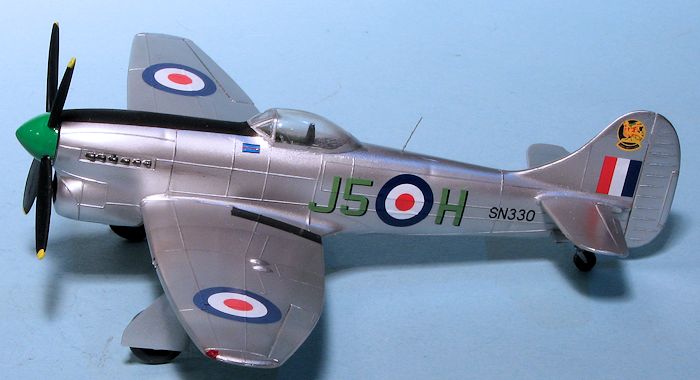 First thing I did was to round up all the bits from the bag and make sure I
had all I needed to actually build the kit. Having verified that, I first
assembled the wings and tailplanes. I then attached the seat to the cockpit
floor and painted all the interior bits using Model Master British interior
green. The interior was installed and I filed all the recepticals flush on one
side of the cockpit as the flash on them was such that the fuselage halves would
not close. Once that was done I installed the radiator bit and glued the
fuselage halves together.
Be advised that every join will need filler. I attached the tail planes and then the wings. Actually, the upper surface of the wings fit rather well, it was the underside that needed attention, some of the work being done to fill in sink areas opposite alignment pins and sockets. The elevators were attached slightly down. The rudder needed the alignment pins removed otherwise it would have fit too low. It is also wider than the adjoining area, a situation typical of all the flight control surfaces.
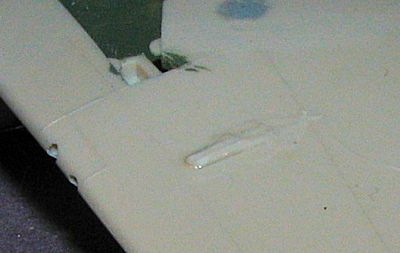 I wanted to built the plane
with no under wing ordnance. To do this, I first assembled the bombs and their
integrated racks. These were glued in place. When dry, I took a scalpel blade
and gently sawed between the lower wing and the rack. This left the alignment
tabs in place. These were then covered with super glue to fill the holes and
later sanded smooth. With the airframe complete, I replaced lost panel lines by
scribing them in. I know that some will blanche at the though of combining
raised and engraved lines, but I'm too lazy to rescribe the whole kit or stretch
sprue to replace the raised bits.
My next task was the clean up and mask the canopy. This was then attached. Fit is fair and the forward portion of the canopy needed filler. I then attached the inner main gear doors and the tail wheel doors, followed by the tail gear.
| COLORS AND MARKINGS |
 WWII Tempests are boring. I mean, they are green and
grey over a lighter grey with yellow wing leading edges. Generally the only
differences are serials and codes with an odd squadron badge now and then.
Fortunately, I had a nice Freightdog decal sheet, 72011, that had some post war
aircraft and in the mix was a Tempest from 3 Sq in 1947-48, flown by the
squadron commander. It included a nice, large, 'chicken on a brick' squadron
badge on the fin. Typical of the time, this one was in overall high speed
silver with a green spinner and nice green codes.
High speed silver is easy to paint. It is a bit unusual that no paint maker (that I know of) specifically makes this shade. Most of us have to resort to other means. In this case, I used the remainder of my French underside silver grey to paint the entire airframe. Then I went over it with Alclad II Aluminum. The end result was a plane that was not quite bare metal and looked more like aluminum lacquer. This was further enhanced later by a clear coat. With the silver painted on, the upper cowling was masked and painted matte black. I brush painted the prop spinner with Tamiya X-28 green.
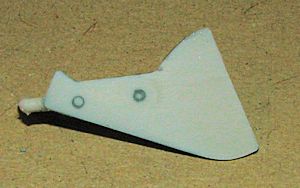 With the airframe painted, I proceded with the main gear. This
assembly is pretty basic as you get landing gear shapes with large pins onto
which the pre-drilled gear doors fit. Not wanting to have pins showing on the
outside, I first assembled the gear legs into the doors and when dry, filled the
holes with super glue. This was then sanded down and painted the exterior color.
I brush painted all the gear wells and inner gear doors with RAF interior green.
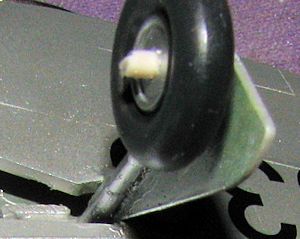 The kit wheels are really toys and look nothing like the real
ones aside from being round. These were painted and installed. The axles are far
too long, perhaps requiring the use of a heated knife to flatten them so the
wheels will roll. I used sprue cutters to cut them nearly flush with the wheel. Now that most of
the bits were attached, I put on the decals. These are printed by Fantasy
Printshop and are nicely done, though it seems the red is a bit too light in
comparison to the artwork in the instructions.
Once those were done, I used some 1/16" black stripe decal for wing walks (it is three pieces wide), Drilled holes for some .008" wire for the radio antennas and did the usual touch up painting along with adding formation lights using AK Interactive's clear red and green paint. This looks particularly convincing on a silver or white background. A bit of pastels for the exhaust, the masking was removed from the canopy and the prop installed after drilling out the back of it a bit so it would fit on the shaft.
| CONCLUSIONS |
 I'm often asked why I 'waste' my time on kits like
this. Well, model building is, by definition, a waste of time for most of us as
we don't get paid to do it. I also enjoy the build process, as do most of you
and it matters not whether the kit is a $30 new tool wonder or a freebie from
the past as was this. It will not get seen much past my display shelf though I
will probably haul it off to the local IPMS meeting in the near future. Kits
like this are not only fairly quick builds, but show us that while we have come
a long way over the decades, the basics are still the same.
| REFERENCES |
http://en.wikipedia.org/wiki/Hawker_Tempest
September 2014 If you would like your product reviewed fairly and fairly quickly, please
contact
the editor or see other details in the
Note to
Contributors.