Airfix 1/72 Spitfire PR. IV (PR type D)
| KIT #: | A02010 |
| PRICE: | $7.99 SRP |
| DECALS: | Two options |
| REVIEWER: | Scott Van Aken |
| NOTES: | Pavla U72-129 conversion set |

| HISTORY |
The
Mk I PR Type D (also called the
Extra Super Long Range
Spitfire) was the first PR variant that was not a conversion of
existing fighter airframes. The Type D carried so much fuel that it was
nicknamed "the bowser." The D shaped wing leading edges, ahead of the
main spar, proved to be an ideal location for an integral tank.
Accordingly, in early 1940, work started on converting the
 leading
edges, between rib four through to rib 21, by sealing off the spar,
outer ribs and all skin joins allowing 57 gal (259 l) of fuel to be
carried in each wing. Because the work was of low priority, and with the
urgent need for fighters the first two, hand-built prototypes of the PR
Type Ds weren't available until October. In addition to the leading edge
tanks these prototypes also had a 29 gal (132 l) tank in the rear
fuselage. An additional 14 gal (63 l) oil tank was fitted in the port
wing. The cameras, two vertically mounted F.24s with 8 inch (20.3 cm) or
20 inch (50.8 cm) lens or two vertically mounted F.8s with 20-inch
(510 mm) lens, were located in the rear fuselage. With the full fuel
load the center of gravity was so far back the aircraft was difficult to
fly until the rear fuselage tank had been emptied. Despite these
difficulties the type quickly proved its worth, photographing such long
distance targets as Stettin, Marseilles, Trondheim and Toulon.
Once the first two Type Ds, P9551 and P9552 had proven the concept the production aircraft, which were soon redesignated PR Mk IV, were modified to increase the leading edge tank capacity to 66.5 gal (302 l) and by omitting the rear fuselage tank. These aircraft were better balanced and had the more powerful Merlin 45 engine as used by the Mk V, along with heated cabins, which were a great comfort to pilots on such long flights. A total of 229 Type Ds were built. These aircraft were constantly modified for conditions and rarely were any two alike.
| THE KIT |
 You also get a nicely done cockpit with a decal for the instruments. The two
bottles for what I guess are pneumatic cylinders for some of the various
systems are included, something not found in most other injected Spitfire
kits. Sidewall detail is also nicely done, considering that the canopy bits
are one-piece. For those wanting to do a very early Mk. I, you have the two
bladed prop and the flat topped canopy. Most Mk. Is will be using the
deHavilland prop and more pointed spinner as well as the bulged canopy.
Though no stand is provided,
it is available from Hornby so a wheels up option is included, using
separate bits for this. Speaking of landing gear, the main gear legs are
molded with the doors and five spoke wheels are provided.
 | CONSTRUCTION |
First step was to see what I had to do to the kit to convert it to the PR.IV
version. This meant using the Pavla seat and the large fuel tank, both of which
had to be painted prior to installation. The tank is a red brown with aluminum
ends with the seat being red brown with black padding and a green-grey armor
plate. I am not sure if these planes would have had pilot armor due to the
weight, but perhaps it would have been left intact for peace of mind if nothing
else. The seat could well have been aluminum or green-grey, but on mine, it is
red brown. The rest of the interior parts were painted with the green-grey. For
this I used Agama paint while the red brown is a Vallejo shade. Both acrylics
and the Agama sticks
 better to
the resin. I also installed the fill in plate for under the oil cooler. The wing
had to have all weapons holes filled and that was done after the wing halves
were glued together. I used super glue for this task after first stretching some
sprue to fill the holes. All of the shell ejections chutes were filled with
super glue as well. I am not sure if the leading edge inspection plates would
have been filled, so left them as they were. I also drilled out the camera
openings. The instructions call for a 3mm hole. The closest I could get was a
#42 drill bit that is 2.969mm as a #43 bit is over by a tenth.
 At the interior, I built
up the cockpit using the Pavla Seat and additional fuel tank. Installing
this fuel tank means that the pair of bottles that goes on the fuselage side
wall will not fit (or be seen even if they did). I also removed the gun
sight from the instrument panel as without guns, it would not be needed. I
thought about removing the gun button as well, but figured they might use
that to trigger the cameras. The instrument decal went on without a hitch
and reacted well to setting solutions. A bit of painting was done for the
sidewalls and then the interior was glued together and installed in the
fuselage. Fit is actually very good and with that in place, the halves were
closed.
 Next, the wings were attached without any real trauma. The right aft root
seems to have a bit of a step, but sanding on the underside will help to
remove that. Tail planes are keyed to keep them on the proper side and the
separate rudder was glued in place as well. On the underside, the larger air
intake was cemented in place as was the smaller, tubular cooler. Then it was
time for the canopy bits. I really had some problems with this and do wish
Pavla offered a single-piece option. It all boils down to the fact that I am
not good with vac canopies, but as I needed the unarmored windscreen and
bulged canopy sides, I had no choice. Needless to say, the end result
clearly shows my lack of abilities in this area. I then masked everything
and headed for paint.
| COLORS & MARKINGS |
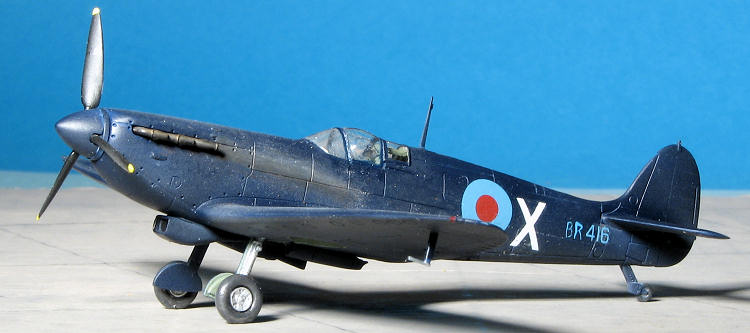
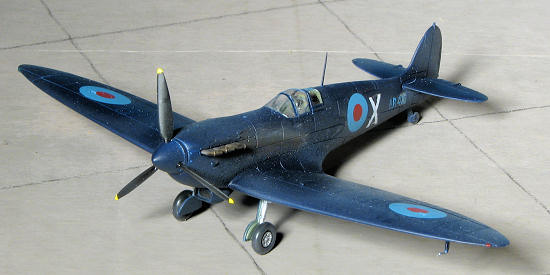
 According to Pavla, this aircraft was overall Royal
Blue, and gave an FS number of 35044 as the proper shade. This is US Insignia
Blue, a very dark blue and available in the Testors range, which is what I used.
If you look at the photo on the right, you will see that it is a much darker
shade than the wing of the PRU Blue aircraft un the lower left. After spraying on several coats, I went back and touched up the wheel wells with
RAF Interior Green. Now there is an excellent chance that these wells were also
painted Royal Blue, but I decided to keep them in the original primer. The main
landing gear were installed as was the tail wheel. Then the kit was given a coat
of gloss clear in preparation for the decals.
The only markings for this plane were with the
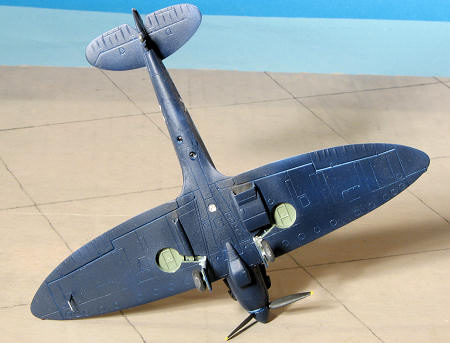
conversion sheet. Right away I noticed that I was missing the underwing
roundels. Perhaps they disappeared during the initial review if they were
separate or perhaps they were
 never included. I think the latter as the
decals were still sealed. As I know of no aftermarket replacement for these
markings, I had nothing to put on the underside.
The decals themselves are very thin. I had no issues with the roundels and used Mr. Mark Softener as they did not conform to the panel lines on their own and MicroSol had no effect on them either. Where I ran into issues were with the serial numbers and aircraft letter. The serials broke into sections and though I was able to save the number portion of them, the letter portions folded on themselves and then broke into pieces. I had no option to find replacement decals so hand painted the serial letters, and it looks like it. Fortunately, the color, Andrea Blue, is a perfect match. For the side letters, one X went on perfectly and the other did not, breaking apart. I scrounged a white X from the Modeldecal range, though it is a bit thinner than the other side. Both the set serial and letter decals silvered, even after using Mr. Mark Softener on them.
| FINAL CONSTRUCTION |
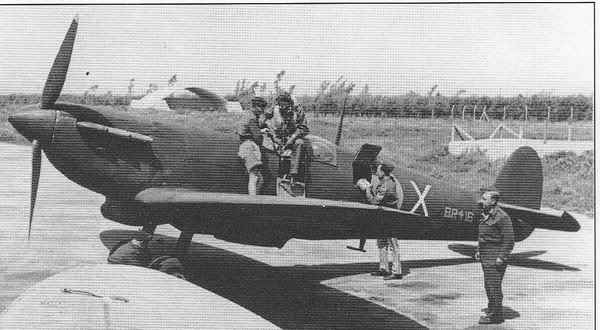
 rudder post for it. I also note that the carb intake in the photo and the one provided in the set is a bit different.
So, the spinner was pushed in place after the exhaust were painted Alclad
II's Exhaust Manifold and then installed. I used the more pointed spinner
provided in the kit and the wider of the three props. The model was then
given a matte clear and pastels were used for the exhaust stains. Masking
was removed from the clear bits, a dose of Pledge (with Future clear) was
applied to them to clear them up a bit. This was because of the poor fit of
the windscreen, which required filler and some fairing in to look proper.
Naturally, I could not prevent sanding the clear so buffed it out as best I
could. As a final touch, the camera ports on the underside had some clear
gloss swiped over them, and an MV Products lens was installed for the
landing light.
 | CONCLUSIONS |
 None of the glitches in this build were the fault of
the base kit. Even the conversion set was nicely done, aside from the decals.
You would think that after building a ton of models over the years that I would
not have issues with a build. This is one reason I do not build for others!
Still, it was worth the effort and I learned a few things along the way, which
is always a good thing. This will not be my last Airfix Spitfire, I can
guarantee you. I very much like the new tool kits that Airfix is producing and
see no reason why I shouldn't build even more of them. If you can get past the
somewhat simplified construct and the largish engraved detail, you will find a
kit that is a delight to build. Not only that, it looks great in my 1/72
Spitfire collection.
| REFERENCES |
http://en.wikipedia.org/wiki/Supermarine_Spitfire_%28early_Merlin_powered_variants%29
Thanks to Pavla Models for the
conversion set.
January 2012 Copyright ModelingMadness.com. All rights reserved. No reproduction in any form without express permission from the editor.
If you would like your product reviewed fairly and fairly quickly, please contact the editor or see other details in the Note to Contributors.