
Italeri 1/72 Spitfire IX
|
KIT # |
094 |
|
PRICE: |
$9.00 MSRP |
|
DECALS: |
Three options |
|
REVIEWER: |
Scott Van Aken |
|
NOTES: |
|
BACKGROUND |
For a look in the box and short historical background, please visit the preview.
|
CONSTRUCTION |
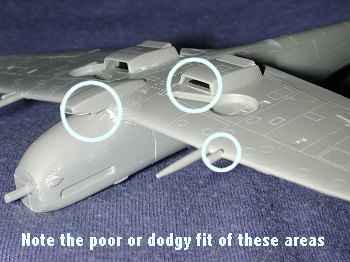
 As usual, construction started with the
interior and subassemblies. Actually, this kit doesn't have much at all
in the way of subassemblies, but I did glue the upper and lower wing
parts together. The fit is pretty poor and that is because of several
factors. One is that the plastic is actually quite thin and so flexes
quite a bit. The other is that the engineering of the wing sections is
such that basically the entire rear portion of the lower wing part has no
support at all. The result is that I ended up with the ailerons and flaps
being 'thicker' than the wing itself and jutting above the lower wing
surface. Were I to build this kit again, I'd insert some plastic strips
under the lower wing in the rear to bring it up to the level of the
ailerons. I shouldn't have to, but it seems a requirement. Other problems
with the wings is that there are rather large square 'thingies' where the
outer guns go. I think this is supposed to represent the tape put over
the gun ports, but if so, they are many scale inches thick! I also found
that the small recoil stubs for the cannon did not match to the lower
wing, resulting in a rather large gap.
As usual, construction started with the
interior and subassemblies. Actually, this kit doesn't have much at all
in the way of subassemblies, but I did glue the upper and lower wing
parts together. The fit is pretty poor and that is because of several
factors. One is that the plastic is actually quite thin and so flexes
quite a bit. The other is that the engineering of the wing sections is
such that basically the entire rear portion of the lower wing part has no
support at all. The result is that I ended up with the ailerons and flaps
being 'thicker' than the wing itself and jutting above the lower wing
surface. Were I to build this kit again, I'd insert some plastic strips
under the lower wing in the rear to bring it up to the level of the
ailerons. I shouldn't have to, but it seems a requirement. Other problems
with the wings is that there are rather large square 'thingies' where the
outer guns go. I think this is supposed to represent the tape put over
the gun ports, but if so, they are many scale inches thick! I also found
that the small recoil stubs for the cannon did not match to the lower
wing, resulting in a rather large gap.
The interior parts fit each other fairly well and make into a nicely done interior. That was until I tried to fit it into the fuselage halves. I first glued the fuselage halves together. Thanks to the thin plastic, this wasn't as simple a task as you might think. The entire forward engine cowling is a separate piece (undoubtedly to allow different variants from a single mold) and so the fuselage halves are quite flexible. Once the fuselage was glued, I inserted the interior from underneath. Fit here is not at all good and I had to do a lot of fiddling around to get things to fit in a reasonable manner. The kit offers the option of having the small door open, but I glued it in place, realizing that I didn't want the poor fitting cockpit to be easily seen. Not really a problem as I later came to discover.
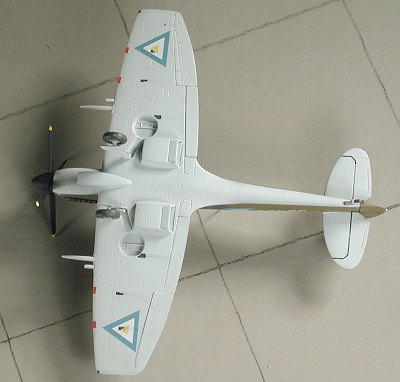
With the cockpit in place, I started to glue on the wings, when I realized I'd forgotten to install the wing radiator cores. Fortunately, it was not difficult to slide them in place from the side. These are keyed so be sure to put them in the proper way. Once that was done, the wing was glued to the fuselage. Fit here wasn't bad at all, though the aft section required quite a bit of filler as there was both a gap and a bit of a step. This kit has no 'gull' on the lower wing that is so typical of the Spitfire so in that regard alone, it may be a bit of a disappointment to many modelers. However, it does make it easier to sand and smooth out filler.
Moving on to the cowling. This is a three piece construction. I started by gluing together just the upper two parts. When dry, I test fit them only to find out that the bottom was too narrow. I then glued on the lower cowling part and that helped quite a bit is widening the overall construct. Here is another case of where I'd suggest gluing all three parts together at the same time and test fitting it before it completely dries. After attaching it to the forward fuselage, I found gaps that needed to be filled and sanded. Down side is that much of the nicely done detail goes away during all this.
 Now it was time to choose
the wing tips and carb intake. I was going to do a Burmese mk 9 so picked
the 'clipped' wing tips and the larger carb intake. The intake is two
pieces so those were glued and sanded smooth. The tips went on OK, but
there were gaps that needed filled and sanded. Mostly because the upper
and lower wings were not even at the end. I could have sanded the tips
flat, but decided to do the filler bit instead. When it came to attaching
the carb intake, it was a mess. The intake itself does not in any way
conform to the lower fuselage and cowling. It was made with a flat bottom
and should be quite curved. Rather than sand for ages to flatten the
bottom of the cowl or curve the heck out of the carb attachment, I
decided to glue it as it was and use filler on the various gaps. The end
result looks decidedly odd as the intake is a lot lower than it really
should be.
Now it was time to choose
the wing tips and carb intake. I was going to do a Burmese mk 9 so picked
the 'clipped' wing tips and the larger carb intake. The intake is two
pieces so those were glued and sanded smooth. The tips went on OK, but
there were gaps that needed filled and sanded. Mostly because the upper
and lower wings were not even at the end. I could have sanded the tips
flat, but decided to do the filler bit instead. When it came to attaching
the carb intake, it was a mess. The intake itself does not in any way
conform to the lower fuselage and cowling. It was made with a flat bottom
and should be quite curved. Rather than sand for ages to flatten the
bottom of the cowl or curve the heck out of the carb attachment, I
decided to glue it as it was and use filler on the various gaps. The end
result looks decidedly odd as the intake is a lot lower than it really
should be.
Nonetheless, the parts were finally smoothed out. Then I attached the clear bits. These fit fairly well, but not perfect. They are also not as transparent as one would expect from a new kit, but this also takes care of the problem of being able to see how poorly the interior fit in place! The tail planes were attached with no difficulty other than trimming back on the tabs. I now had a pretty complete aircraft so masked the canopy and headed for some painting.
|
COLORS & MARKINGS |
I had Carpena's old sheet # 72-10 for Exotic
Spitfires languishing in my decal files so thought I'd do something a bit
different from it. I keyed on a Burmese Spit 9 in Dark Earth/Dark Green
over light blue. For the Light Blue I used some Gunze FS 35622
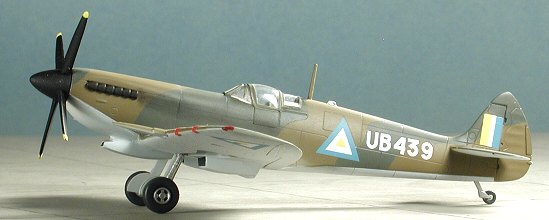 that I'd
had mixed up for years. It went on beautifully and covered quite well.
Then the upper surface was painted with Dark Green from the Testors Model
Master enamel range. After it had dried, I masked off the model and
painted the Dark Earth, also a Testors enamel. The next day, I remasked
along the lower surfaces and did the usual touch-up with the Gunze to
take care of the overspray. After it dried, the kit returned to the
workshop for more bits.
that I'd
had mixed up for years. It went on beautifully and covered quite well.
Then the upper surface was painted with Dark Green from the Testors Model
Master enamel range. After it had dried, I masked off the model and
painted the Dark Earth, also a Testors enamel. The next day, I remasked
along the lower surfaces and did the usual touch-up with the Gunze to
take care of the overspray. After it dried, the kit returned to the
workshop for more bits.
In this case it was the landing gear. I like to add the gear before gloss coating and decaling so that the kit has something to hold it up off the surface. The gear were painted Aluminum using Alclad II prior to being glued in place. I need to mention at this stage that the gear oleo scissors are solid so no chance to do the Bare Metal Foil trick on the oleos. You also really need to glue the gear doors on BEFORE gluing in the struts or the struts will be too short to accept the doors. Gluing the upper part of the doors to the lower wing helps what may be a rather weak gear. I had painted both sides of the gear doors with the undersurface color (which was also the color of the wheel wells), as most of the photos of rehabbed Spits I have show that inside portions of these parts were usually the same as the underside color.
 Then the gloss clear was added and it was time for
the decals. From what I've seen, many reworked aircraft did not
have full stencils or often any at all so I didn't add any. The Carpena
decals were slightly off register so I trimmed the little slivers of
white that I saw sticking out before getting the decals wet. Considering
that there were only insignia and a serial number, this didn't take long.
I did use the gun port covering decals from the Italeri sheet. These
decals were quite resistant to setting solutions and it was only after
multiple applications of Champ, the strongest setting solution I had,
that they begrudgingly drooped over the wings. I'd hate to see how anyone
without industrial strength setting solution would be able to get these
decals to drape over the wing edge. With those on and dry, a flat
coat was applied.
Then the gloss clear was added and it was time for
the decals. From what I've seen, many reworked aircraft did not
have full stencils or often any at all so I didn't add any. The Carpena
decals were slightly off register so I trimmed the little slivers of
white that I saw sticking out before getting the decals wet. Considering
that there were only insignia and a serial number, this didn't take long.
I did use the gun port covering decals from the Italeri sheet. These
decals were quite resistant to setting solutions and it was only after
multiple applications of Champ, the strongest setting solution I had,
that they begrudgingly drooped over the wings. I'd hate to see how anyone
without industrial strength setting solution would be able to get these
decals to drape over the wing edge. With those on and dry, a flat
coat was applied.
The last things to be glued on were the main wheels and the prop assembly. The prop assembly actually worked out well. It is a separate spinner and backing plate with four separate blades. The backing and spinner were glued together and smoothed out. Then the blades were glued in place. Fit was actually excellent and a nice change from the rest of the kit! The masking was removed from the canopy, the upper light lens was glued in and the wing tip formation lights were painted on. Then the exhaust was glued in place and some pastels used to simulate soot. That was it.
Finally.
|
CONCLUSIONS |
 Though the end result does look like a Spitfire, I have to
be quite honest and tell you that it isn't high on my list of kits I'd
build again. The lack of a proper under wing gull and the fussy build make
it one that most should think twice about buying. I've not built the
Hasegawa Spitfire IX, but it has to be a better build than this one.
Though the end result does look like a Spitfire, I have to
be quite honest and tell you that it isn't high on my list of kits I'd
build again. The lack of a proper under wing gull and the fussy build make
it one that most should think twice about buying. I've not built the
Hasegawa Spitfire IX, but it has to be a better build than this one.
June 2004
#1319 in a series
Copyright Modeling Madness.com. All rights reserved.
If you would like your product reviewed fairly and fairly quickly, please contact the editor or see other details in the Note to Contributors.