
AMtech 1/48 P-40F/L Warhawk
|
KIT # |
? |
|
PRICE: |
It will retail for $24.95 with the resin nose. |
|
DECALS: |
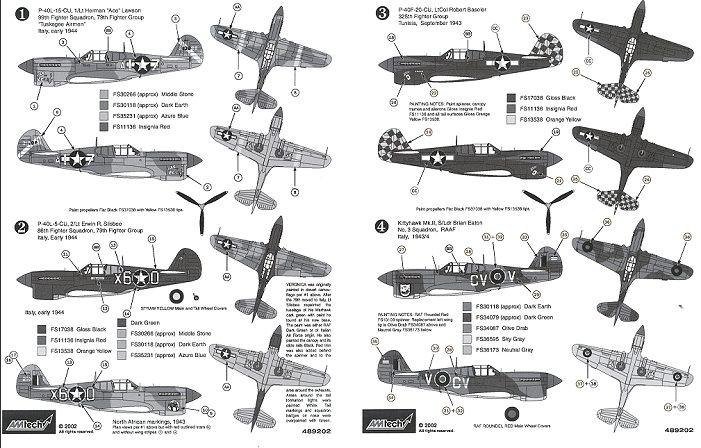
The sheet will have four options. |
|
REVIEW : |
|
|
NOTES: |
Kit is a test shot with no decals or instructions |

|
HISTORY |
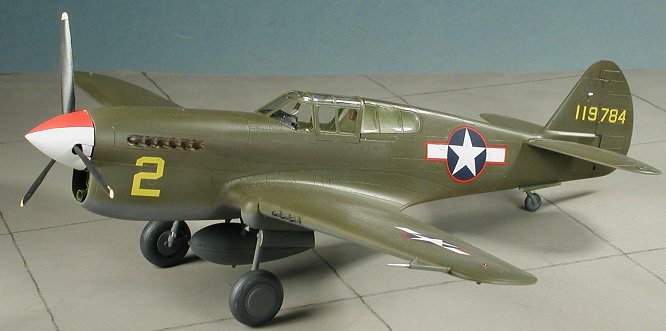
The P-40 was always a good low level fighter. Its Allison engine provided
sufficient power to allow it to outpace most of its opponents. In the Pacific,
the P-40 may not have been the nimblest fighter around, but its heavy armament
and strong construction allowed it to at least have a fighting chance. In the
European theater, it was a different kettle of fish. The Allison P-40 was unable
to operate at the higher altitudes that most of the fighting took place and was
relatively easy prey for the Germans. In the Desert, however, it was able to be
successfully operated as a fighter bomber. This was because there was
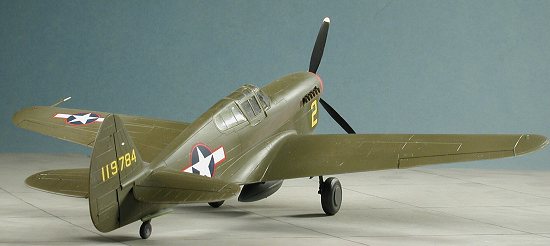 no real
overall air superiority as in Europe. Like Russia, air superiority was a local
thing and would often last for a very short period of time.
An attempt was made to improve the high altitude performance of the P-40 by installing a Merlin 28 engine into the aircraft. This engine was later produced by Packard and while it did eliminate many of the short-comings of the Allison engine, it did not transform the P-40F into the high altitude fighter that many had hoped. The P-40 F was built in rather large number with a total of over 1,300 of this variety built. The first 700 were short tailed versions with the rest being long tailed P-40Fs. Several P-40Fs were re-engined with an Allison engine to become a P-40R trainer. Interestingly, the 'block' system of aircraft identification was started with the P-40F in late 1941. This system is still in use today. For those not familiar with this system, a base aircraft might be the P-90A (a fictitious aircraft) with a minor modification being the P-90A-1. Another small modification would be the P-90A-2 with a bit more extensive mod being the P-90A-5. A major modification would result in the P-90B. The kit being reviewed today is depicted as a P-40F-15.
|
THE KIT |

 This particular
kit is a very early test shot provided by AMtech. After I had the airframe
completed and painted, AMtech decided that they would provide a proper nose for
this plane. That being the case, they contracted
for a resin replacement. The initial noses were very nice, but the upper
contours were not quite right and there was some problems with the cowl flap area. The
differences are minor, but AMtech wanted to make sure that you got the best
around. The second attempts were much better and are what is going to be
included in with the kit. This nose will also be sold separately so that those
of you with the short tailed AMT kit will be able to do a proper P-40F. Because
of
 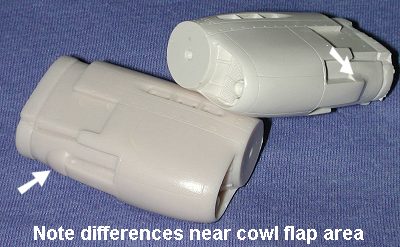 numerous delays in getting the resin noses from the
French company who did them, the release date has been put back many times. In all other respects, it
is like AMtech's P-40E kit other than the
long-tailed fuselage. As an additional note, there will be a full step by step
sequence on how to modify the kit for the resin nose. All you need is a razor
saw and some patience.
|
CONSTRUCTION |
Since it is so much like the previous P-40E kit, there really is little that I can add to things. I built this kit right from the box using no aftermarket parts and since it was together and painted before the new resin nose came in the mails, it is without the resin nose. Probably the part of the kit that is in the greatest need is the cockpit. While it is fine for most, it really could use improvement. For the cost conscious, the True Detail set, while made for a P-40N, will fit with a bit of fiddling. There are other more expensive ones available from other sources.
Construction provided the same
challenges that are found in ALL AMtech/AMT Warhawk kits. To say that there were
no fit problems would be untrue. The usual culprits were the engine cowling
covers, the aft wing/fuselage join (which needed plastic shims to cover the
gap), and one of the 'knee' fairings for the landing gear just isn't designed
right. It seems as if both 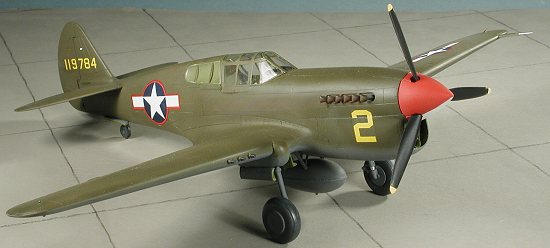 left and right fairings are the same in all respects,
which they shouldn't be. That means that one fits beautifully and the other does not. There is also the
fact that the canopy mold is thicker on one side than the other, but unless you
are going to build the kit with the canopy open (and to be truthful, it is nice
and clear so you can see the interior just fine), that isn't a
concern. If you use an aftermarket cockpit, then there are vac replacements
available. None of these problem areas are unfixable and they only require some of
your standard modeling skills to correct.
One thing I didn't find was a step in the tail/fuselage join. That was a real problem with the AMT kit. AMtech has gone to great lengths to align the molds as well as can be done so that you won't run into these problems. If you do have a glitch, their customer service is second to none as they want to keep you happy. The addition of the resin nose will take care of the engine panel problems and also cures the incomplete intake problem that AMT designed into the kit. (see the P-40L review to see where AMT goofed)
|
PAINT & DECALS |
As always when doing a test shot kit, markings are a question. Now I didn't
want to do one that was going to be appearing on the sheet, and there will be
four very nice choices for you. That meant scrounging through references in
search of something that one doesn't see too often. I keyed in on the cover of a
Christie & Ethell book 'Hawks at War'. Here is a color photo of three P-40s
from a fighter training school somewhere. One of them
was a P-40L, another a P-40K, and the middle plane was a P-40F-15. This was
determined by other photos of the same flight session, so that was the plane
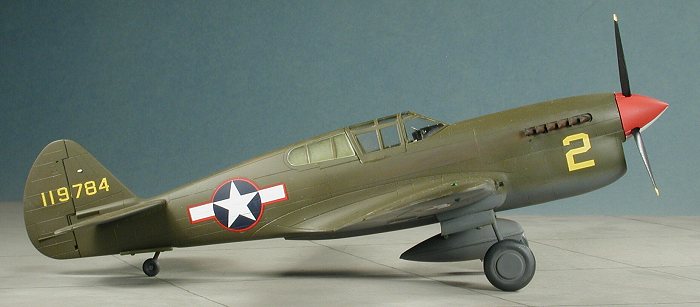
that I chose.  This plane is so common looking as to be boring, but these
aircraft served just as important a purpose in the scheme of things as did those
in theater. I also chose this scheme as I wanted one with red surround
insignia but didn't want another desert-painted plane.
Paint for this one was standard OD over Neutral Grey. I didn't see any Medium Green paint on the fin, which was applied to many P-40s, so did not paint any of it on the kit. Decals came from a set of Superscale Yellow numbers/letters that I had and the fuselage insignia came from a similar source. Hey, didn't most of us once do most of our models like this? There are times when I think that aftermarket has taken a bit of the fun out of building models. At least I know that there is probably not another model out there somewhere with these markings on it! Unfortunately, my sheet was a bit on the old side. and when I applied the first decal, it broke into large segments. A bit of Microsol Superfilm was applied to the others, and while that helped, it did not stop the cracking with one of the remaining insignia. The usual Solvaset treatment was all that was needed to have them snuggle down and while not perfect, it was all I had available to use.
|
CONSTRUCTION CONTINUES |
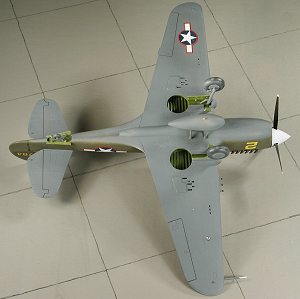 Once the decals were on, then the other bits like undercarriage, gear doors,
prop and such were glued in place. I painted the spinner half red and half white
as that is the way it seemed to be on the book cover. This plane also had no
radio mast so one must fill in the hole on the top of the fuselage. The kit
was then given a nice matte clear coat and the tape removed from the clear bits.
Naturally, I found I'd gotten some glue in between the windscreen and the
instrument dash area. I just HATE it when that happens! A #29
MV lens filled in for the 'thingie' on the clear sprue that is supposed to the
the landing light. The
exhaust was painted Burnt Iron and stains added with pastels. I should have make
this plane look rather ratty as training planes were not pristine, but it looked
in great shape on the book cover. Heck, welcome to Scotty's Pristine P-40s. Only
flown by a little old lady when she took it to church on Sundays. Some touch up
painting on areas that I missed or messed up and the kit was done.
|
CONCLUSIONS |
What can I say? Yet another P-40 for the collection. A long tailed F/L goes a long way to being able to do a full suite of Toma-/Kitty-/Warhawks. I know that this won't be the last one I'll do. To give you an idea of what markings are coming with this new kit, the box artwork at the top of the page has one option on it. Below is an image of all four planes. In addition to the Tuskegee Airman version on the box top, one will be the Basler's 'Stud' from the Checkertail Clan, as well as a 79 FG P-40 (which can be done in two different camo schemes), and an RAAF Kittyhawk. All are from Italy in 1943/44
January 2003
#1256 in a series
Copyright ModelingMadness.com. All rights reserved. No reproduction in part or in whole without express permission from the editor.
If you would like your product reviewed fairly and fairly quickly, please contact the editor or see other details in the Note to Contributors.
Back to Reviews Page 2016