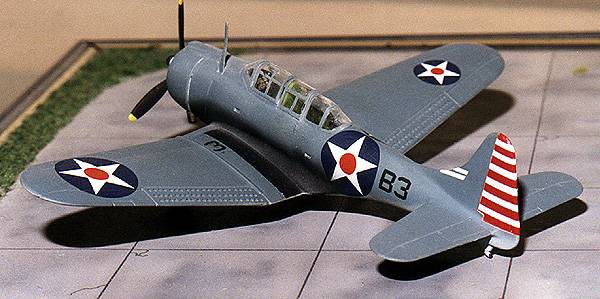
MPC/Airfix 1/72 SBD-3 Dauntless
Kit Number: 4003
Price: $3.00 MSRP when new
Decals: One version; USN 1943, tricolor scheme
Reviewer:Scott Van Aken
Date of Review: 7 August 1997

The Douglas SBD Dauntless was America's best dive bomber of WWII. It amassed victory after victory in the Pacific theater during the early and middle year of the war against Japan. There was no other Allied dive bomber that attained the success of the SBD. It soldiered on until finally removed from service in 1944; its last active campaign was from the USS Enterprise during the Guam invasion in the summer of that year. It was only successful because of the skill and dedication of its pilots. The SBD was considered unusable by the British and the USAAF had no luck with the aircraft at all, the A-24 being used only for training.
The Airfix kit of the SBD has been around for a long time, and when MPC had the rights to Airfix kits in the 1980s, this was one of the kits that was part of that catalog. This kit was built in the early 80s and was one that I particularly liked, not because of the quality of the kit, but because I was able to apply unique markings to it. More on that a bit later.
Typical of early Airfix kits, the Dauntless was festooned with rivets, had a very basic cockpit, and several o the other aspects of the kit were heavy-handed (like the gear doors) or non-existant (like the exhaust and enclosed wheel wells). While an SBD could be made straight from the box, modelers of that day had to actually do a bit of rummanging through the spares box or make parts for a more complete kit. Anyway, I slapped together the interior in no time as it consists of just a floor, seats, instrument panel, control stick; and in the back a machine gun shape with its mount. The thickness and distortion of the canopy means that I spent little time on the interior, as you cannot even tell there are seats in the plane without a flashlight! Just a basic coat of chromate green, black for the gun and the application of the instrument panel decal was all it took.
While this was drying, I got out the sandpaper and rid the SBD of every panel line and rivet. Thinking back, should I ever do this kit again, I will leave the rivets, because SBDs have a lot of very prominent rivets. That chore complete, it was time to glue some major subassemblies such as the wings, fuselage and bomb. Of the three, the bomb gave me the most headache. Mostly because it is one of those with body halves and fin halves. No real fun but the end was a bomb. Once the fuselage was finished (requiring the usual amount of putty--all my kits use putty) and the wings complete, they were assembled (again using putty). Looking at the model, I got a pretty good fit. Next the appropriately painted and drybrushed engine was fit into its cowling.
The cowling is a bit of a disaster, having no real good fit with extremely thick trailing edges. Once it was properly aligned (using the gun troughs), it was cemented and then filed and sanded to shape. Once smooth, the cowl guns were drilled out and exhausts made from tubing and attached. Next the horizontal stabilizers were fit with minimal fuss and the tail wheel and tailhook installed. I left off the prop until the final stage. Once the airframe was relatively complete, after many dry fits and sanding sessions, the canopy was coerced into place and glued. After masking, it was time for the antennas (one upper, two lower) to be attached. I guess the lower ones were the masts for the yagi radar antenna (not supplied) but I was ignorant of that back then and left them in place. I also did NOT drill out the 100+ holes in the dive brakes or even paint them black!
The airframe was then painted in the 1942 colors of blue-grey uppers and light grey lowers. I wished to portray an aircraft from the cover of a book on the battle of the Coral Sea that showed a bunch of SBDs and F4Fs on a carrier. In that photo were at least a half dozen differently marked SBDs. The one that caught my eye has huge roundels on the fuselage and port wing. The starboard wing had a smaller roundel. The aircraft also had rudder stripes. Code letters in black. A great scheme. None of the decals came from the kit. they came from solid color sheet cut to shape or from generic insignia and number/letter sheets. Since USN aircraft of the period rarely carried any special unit marks or badges, this is easy to do. One thing I did not do was to prepaint the rudder white so the white is a bit transparent allowing the underside blue-grey to appear through. The reason the photo looks so white is the magic of computer enhancement.
Once it was painted, gloss coated, and decaled, the undercarriage and propeller was attached. Since the kit was originally supposed to be an SBD-5, I had to find a prop spinner for it to be a proper SBD-3. I used one from an old 1/144 kit of some sort, painted it black with the white stripe and presto, a -3. A flat coat was put on it, the masking removed and I had a bonafide Dauntless from the Battle of the Coral Sea. Frankly it was a fun kit to build and despite the problems associated with old Airfix kits, I would recommend it to beginners.
Copyright ModelingMadness.com. All rights reserved.
Back to Reviews Page 2017