Academy 1/72 P-40M Warhawk
| KIT #: | 1668 |
| PRICE: | $9.50 when new |
| DECALS: | Three options |
| REVIEWER: | Scott Van Aken |
| NOTES: |
| HISTORY |
Though the most used USAAF aircraft in the early years of the
war, it was in the CBI (China/Burma/India) theater and in the Mediterranean
where the Warhawk was most used. Long after it had ceased to be a
 really
effective fighter, it soldiered on as a fighter-bomber. The rugged construction
was a major factor in its ability to perform this task well. It was also
supplied to a number of Allied nations until supplanted late in the war by more
capable aircraft like the P-51 and P-47.
really
effective fighter, it soldiered on as a fighter-bomber. The rugged construction
was a major factor in its ability to perform this task well. It was also
supplied to a number of Allied nations until supplanted late in the war by more
capable aircraft like the P-51 and P-47.
In China, where it wasn't usually up against technologically superior aircraft, it lasted as a front-line aircraft well into late 1944 and early 1945, when it was replaced by the P-51B and later P-51D Mustang. Built in very large numbers, the P-40 was the last great success of Curtiss aircraft. Follow-on projects were rife with delays and cost overruns. The debacle of the SB2C Helldiver was one of the last straws for what was once a giant in the field. Today, there are still a number of P-40s extant in museums the world over. Though not the prolific warbird that it was in the 60's, some can still be seen in the skies.
| THE KIT |
Whenever I see an Academy kit in a scale and of a subject that has already
been on the market, my first thought is to wonder whose kit was the basis for
the release. In this case, it seems as if it is probably the Hasegawa kit. The
overall feel of it is quite reminiscent. However, one thing I can say about
Academy is that they generally improve on earlier kits and this one is no
exception. The biggest thing you notice
 is that there are optional parts to do a
P-40M, a version that has not been kitted in this scale before. This is
accomplished by inserts that fit into the fuselage. In theory, it should work
quite well, as the engineering is sound. In order to allow you to do a proper M
or N, you get both canopy options. The canopy section itself is separate, though
it may be a bit thick to allow you to display it in the open position.
is that there are optional parts to do a
P-40M, a version that has not been kitted in this scale before. This is
accomplished by inserts that fit into the fuselage. In theory, it should work
quite well, as the engineering is sound. In order to allow you to do a proper M
or N, you get both canopy options. The canopy section itself is separate, though
it may be a bit thick to allow you to display it in the open position.
Other benefits of this kit are a choice of wheels (with or without spokes), and the option of a drop tank or bomb. The interior has also been improved with separate rudder pedals, a nicely done instrument panel and a flap lever that is missing in the Hasegawa kit. Like the Hase kit, the wheel wells have some detail, but are too shallow. This kit also repeats the overly exaggerated protrusions aft of the shell ejector chutes. Also a bit overly done is the fabric representation of the control surfaces. Nothing a bit of sandpaper cannot tone down, though.
The kit instructions are all
one would expect from today's kits. There are 11 construction steps and each has
painting information given. Some of the paints have FS 595 references to them.
There are three
 decal options, and Academy was kind enough to supply two full
sheets! Two of them are for P-40Ns. The first one is an OD over grey Warhawk
with the 74th FS, 23rd FW of the Flying Tigers in China. This plane has patches
of Medium green in various spots on the plane. Next is an RAAF P-40N of 80Sq
named Cleopatra III. This is in dark green over grey with white wing edges and
total empennage. It is also a scheme that is duplicated in the Hasegawa kit. The
final scheme is the lone P-40M. It is from 112 Sq RAF in Sicily so is in
dark earth and middlestone over azure blue with a red spinner. The decals
themselves are well printed.
decal options, and Academy was kind enough to supply two full
sheets! Two of them are for P-40Ns. The first one is an OD over grey Warhawk
with the 74th FS, 23rd FW of the Flying Tigers in China. This plane has patches
of Medium green in various spots on the plane. Next is an RAAF P-40N of 80Sq
named Cleopatra III. This is in dark green over grey with white wing edges and
total empennage. It is also a scheme that is duplicated in the Hasegawa kit. The
final scheme is the lone P-40M. It is from 112 Sq RAF in Sicily so is in
dark earth and middlestone over azure blue with a red spinner. The decals
themselves are well printed.
| CONSTRUCTION |
I have never built an Academy Warhawk so this would be a relatively new experience. I could see during construction how much this was similar to the Hasegawa kit, which was undoubtedly the inspiration for Academy, who has never been shy about using other people's products as a basis for theirs.
I started by assembling and painting the cockpit.
Don't bother with the rudder pedals as you'll never see them. The seat got a
masking tape harness. This was installed and after assembling the cooler intake
pieces in the front and gluing them in place, the fuselage halves were
 closed.
Academy gives the option for an M or an N by providing an insert. The one for
the M is two pieces. It is also smaller than the area in which it fits, so
you'll have to deal with a step. Pre-gluing these to the fuselage halves will
only result in a large gap on the upper surface that may also be too wide.
Gluing the top of the insert and allowing the lower parts to be wide enough for
the space will result in a large seam behind the cockpit, which will be
difficult to fill and sand. Really, no easy way around it. I just sanded the
heck out of the area around this insert to remove the step.
closed.
Academy gives the option for an M or an N by providing an insert. The one for
the M is two pieces. It is also smaller than the area in which it fits, so
you'll have to deal with a step. Pre-gluing these to the fuselage halves will
only result in a large gap on the upper surface that may also be too wide.
Gluing the top of the insert and allowing the lower parts to be wide enough for
the space will result in a large seam behind the cockpit, which will be
difficult to fill and sand. Really, no easy way around it. I just sanded the
heck out of the area around this insert to remove the step.
I then assembled the wings. Unlike the Hasegawa kit, the lower housing section is molded into the lower wing so no worries on seams for this part or the flaps. However, my lower wing was slightly short shot on the rear corners where it attaches to the lower fuselage, necessitating some major filler. I used several applications of super glue to smooth this out. I then installed the tailplanes, which fit well, but a bit loosely.
With the tailplanes in place, I masked the canopy and glued it in place after installing and painting the gun sight and head rest. The frame lines were not at all easy to see so that was a rather difficult process.
| COLORS & MARKINGS |
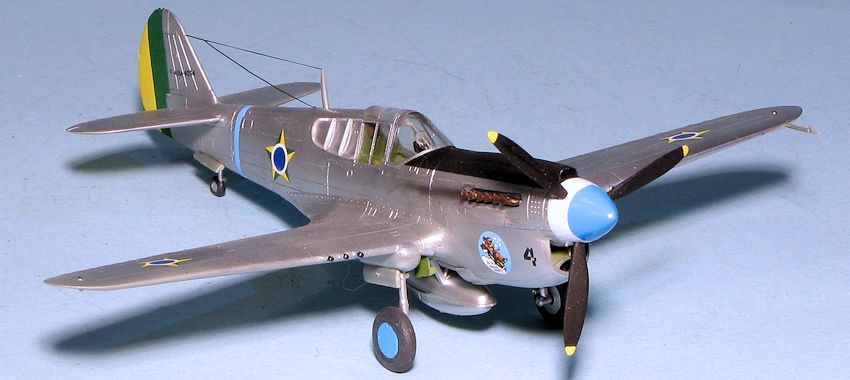
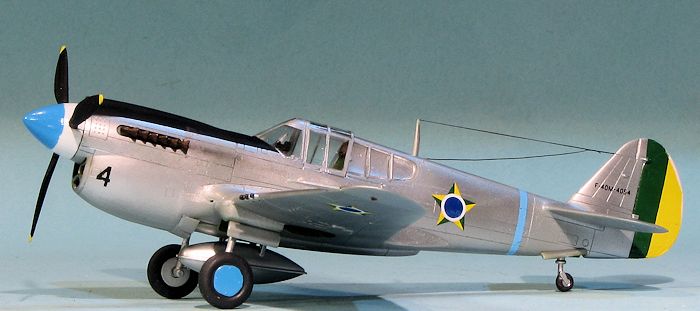
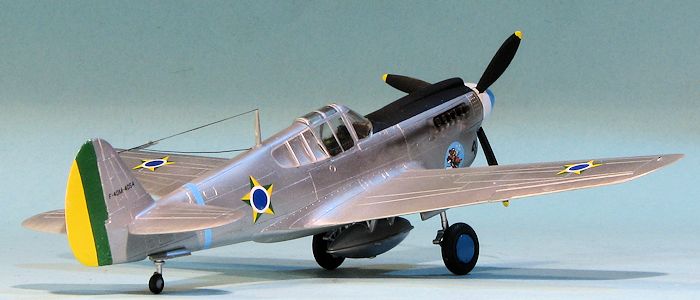
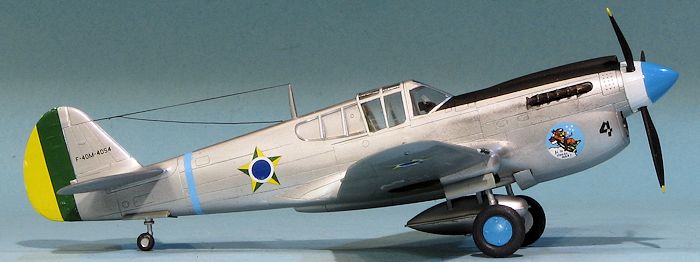
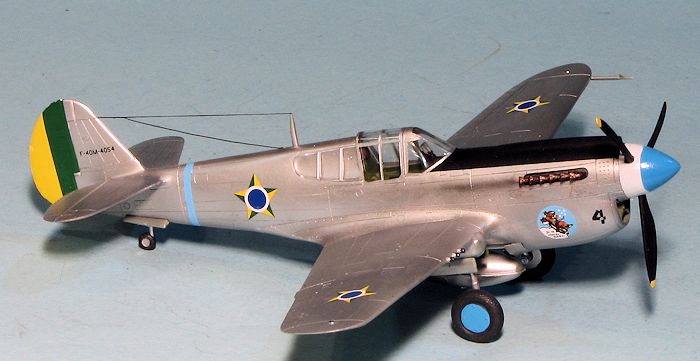
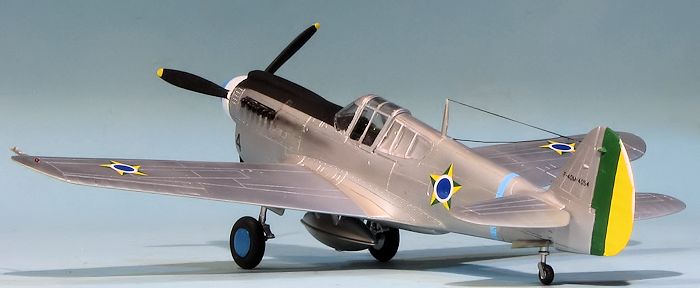
 This one would be in a fairly simple scheme of overall aluminum with a black
anti-glare panel. I used FCM 72-023 for this one and chose the lone F-40M
that was on the sheet from 1954. This scheme also required the spinner to be
painted white on the rear and blue on the front. I originally planned on
using French Blue, but it would have been too dark so I chose Tamiya Sky
Blue instead.
This one would be in a fairly simple scheme of overall aluminum with a black
anti-glare panel. I used FCM 72-023 for this one and chose the lone F-40M
that was on the sheet from 1954. This scheme also required the spinner to be
painted white on the rear and blue on the front. I originally planned on
using French Blue, but it would have been too dark so I chose Tamiya Sky
Blue instead. | FINAL CONSTRUCTION |
 With the
decals in place, I gave the airframe a coat of gloss clear acrylic, followed
by one of clear semi-matte to tone down the Alclad II aluminum. Then came
the part that seems to take longer than it does, adding all the bits and
final painting. I had bought a set of Quickboost exhaust and after painting
them, found the paint flaked off very easily. I glued them in place and
repainted them, hoping this second attempt would hold. I also attached the
gear doors, which are all butt joins, the radio mast, whose attachment hole
is twice as large as it needs to be, the drop tank and braces and the pitot
tube.
With the
decals in place, I gave the airframe a coat of gloss clear acrylic, followed
by one of clear semi-matte to tone down the Alclad II aluminum. Then came
the part that seems to take longer than it does, adding all the bits and
final painting. I had bought a set of Quickboost exhaust and after painting
them, found the paint flaked off very easily. I glued them in place and
repainted them, hoping this second attempt would hold. I also attached the
gear doors, which are all butt joins, the radio mast, whose attachment hole
is twice as large as it needs to be, the drop tank and braces and the pitot
tube. | CONCLUSIONS |
 It
is very obvious that Hasegawa was the influence for this kit. I would be
surprised if parts were not interchangeable. However, Academy's kit is about
15-20 years newer and so was able to refine a few of the areas in which the
Hasegawa kit is a bit Spartan. It also makes into a P-40M, which is what I
needed for this build. While not perfect, it is a fairly nice build and very
much looks the part when it is done. I'm glad I built it and equally glad that
there were some neat markings for it.
It
is very obvious that Hasegawa was the influence for this kit. I would be
surprised if parts were not interchangeable. However, Academy's kit is about
15-20 years newer and so was able to refine a few of the areas in which the
Hasegawa kit is a bit Spartan. It also makes into a P-40M, which is what I
needed for this build. While not perfect, it is a fairly nice build and very
much looks the part when it is done. I'm glad I built it and equally glad that
there were some neat markings for it.
November 2014 Thanks to me for putting the grabs on this one.
Thanks also to FCM for the decals and AK Interactive for the paint. Copyright ModelingMadness.com. All rights reserved. No reproduction in part or in whole without express permission from the editor. If you would like your product reviewed fairly and fairly quickly, please contact the editor or see other details in the
Note to
Contributors.