 MPM
1/72 E14Y1 'Glen'
MPM
1/72 E14Y1 'Glen'
MPM
1/72 E14Y1 'Glen'
Kit Number: 72111
Price: $14.95
Media: Short Run Injected Plastic with vacuform canopy and brass etched parts
Decals : two versions; lt. grey with red tail , and green/grey camo
Date of Review: 28 Dec, 1996
Comments: The Glen's one claim to fame is that it is the only Japanese aircraft to bomb the US mainland. This was done in Oregon where the bombs set afire a section of forest. It also scouted Pearl Harbor a week after the attack in 1941. It was able to do this as it was a submarine-launched aircraft. The wings were removed and the aircraft placed in a cylinder on deck. When needed, it was unshipped, assembled, then catapulted off. Unlike US and German submarines, Japanese submarines were huge and quite capable of carrying large numbers of people and other items like aircraft or midget submarines. Japanese subs also generally did not attack merchant ships feeling it was against the Bushido code of the warrior, though it did happen with the expected results.
The MPM kit is what I have come to expect from this Czech company. They
offer great subjects, but you have to work at getting a decent result. The
brass is mostly for the interior with only the rudders, antenna and engine
ignition ring outside of the cockpit. The rest of the kit is in a light
grey and somewhat brittle plastic. This brittleness was to cause me
some grief during construction. For a detailed explanation of the
construction of the kit, see the gory details at the end of the review.
kit is in a light
grey and somewhat brittle plastic. This brittleness was to cause me
some grief during construction. For a detailed explanation of the
construction of the kit, see the gory details at the end of the review.
The biggest problem I had was with alignment of the main floats. While I did get them to finally fit, I fear that they are just a bit off. Were I the kind of person who did these things, I would highly recommend a jig of some sort. I would also not use the brass flap hinges unless you cut slots in the flaps and wings to embed these items. I did not and it really helped construction. It is tough to handle the kit without handling the flaps since they are full span.
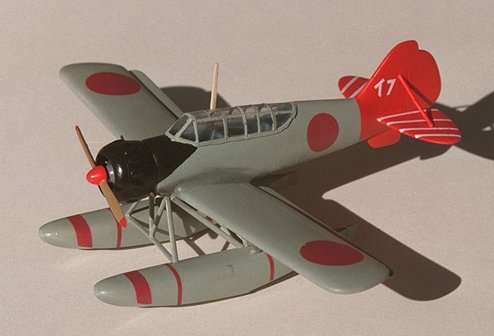
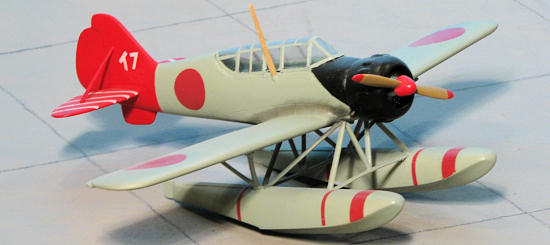
I chose to paint my kit as the one that scouted after the Pearl Harbor attack. This kit is in either aluminum with a red tail or light grey with a red tail. My resource "Japanese Naval Air Force Camouflage and Markings of WWII" by Thorpe, was unable to tell me which was most prevalent in late 1941. I chose the grey vice the aluminum and it works well. Had it been a kit of a floatplane from 1939 or early 1940, I would have gone with the aluminum.
The finished kit looks a lot better than it did during construction and is sitting on a shelf with other Japanese floatplanes including the Serian, 'Jake', 'Pete', and 'Rufe'. I have a kit of 'Rex', 'Alf' and 'Dave' awaiting construction. All that I need now are kits of 'Paul', 'Norm', and 'Slim' to complete all the floatplanes of the JNAF during WWII. I don't think there are kits in 1/72 of the last three unless Aoshima has a 'Paul' in its ancient inventory and I doubt if 'Slim', a training floatplane, will ever be kitted.
MPM #72111 1/72 E14Y1 'Glen'
1 Dec '96
I have always liked Japanese float planes,
but have been less than thrilled with MPM kits in general. This kit was on
sale so I figured 'why not'. I have spent a lot of time cleaning up the
parts and used a saw to cut the parts from the very thick sprues. I have
also installed all the interior brass bits (and there are a lot) as well as
completing the float assembly and gluing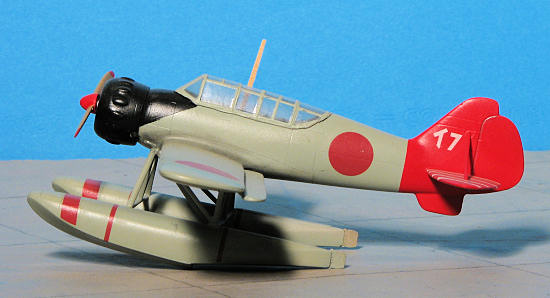 the engine together. The engine
cowling is a type with lots of little bumps to clear the valve covers of the
engine. Unfortunately, this one was engineered so that all the bumps came
in two halves and now must be puttied and cleaned up. A real pain in the
rear. Most of the parts have been cleaned up, the interior painted in a
bluish color and now it is drying so that I can assemble the fuselage halves.
Problems I have had are mostly due to the lack of specific locations for
the interior parts. The instructions are not very clear as to exactly what
goes where and that has caused a few problems. The control stick must be a
scale foot across with the yoke a scale inch in size. It looks rather
weird, but should be ok once the canopy is attached. Other interior brass
stuff are the foot pedals, a number of levers, and seat belts. I have
decided not to use the brass flap actuators after reading an article where they
built the kit and had nothing but trouble with these parts. I also hope
the kit decals are useable as I have heard or problems with Propagteam decals.
the engine together. The engine
cowling is a type with lots of little bumps to clear the valve covers of the
engine. Unfortunately, this one was engineered so that all the bumps came
in two halves and now must be puttied and cleaned up. A real pain in the
rear. Most of the parts have been cleaned up, the interior painted in a
bluish color and now it is drying so that I can assemble the fuselage halves.
Problems I have had are mostly due to the lack of specific locations for
the interior parts. The instructions are not very clear as to exactly what
goes where and that has caused a few problems. The control stick must be a
scale foot across with the yoke a scale inch in size. It looks rather
weird, but should be ok once the canopy is attached. Other interior brass
stuff are the foot pedals, a number of levers, and seat belts. I have
decided not to use the brass flap actuators after reading an article where they
built the kit and had nothing but trouble with these parts. I also hope
the kit decals are useable as I have heard or problems with Propagteam decals.
7 Dec '96
The interior has been completed and painted and looks pretty convincing. The brass instrument panels are smaller than the backing plates where they attach to the interior so they needed to be removed and repositioned. I also needed to file down the width of the floor to get the fuselage halves to match up. I have puttyed the fuselage and have installed the wings, which also needed some shaving to properly fit. Once the wing is dry and the wing/fuselage joint is puttied, I'll attach the float and the myriad of braces.
14 Dec '96
 The main floats have been attached and it
has proved to be a fussy job. I have also attached the horizontal
stabilizers and have finished up the engine cowling for attachment later. There
are braces that fit onto the horizontal stabilizers that are quite brittle and
have both broken, even though I carefully sawed them off the sprue with a fine
saw. I had the same problem with the additional float braces. The
braces from the outer wing to the floats do not fit at all well and required a
lot of preliminary sanding to get even a mediocre fit. The wing flaps were
attached without the brass fittings and they are quite a sturdy fit. I
have also cut out the canopy and if I had to do it again, would modify the
fuselage to remove two stepped areas rather than cutting the steps out of the
vac canopy.
The main floats have been attached and it
has proved to be a fussy job. I have also attached the horizontal
stabilizers and have finished up the engine cowling for attachment later. There
are braces that fit onto the horizontal stabilizers that are quite brittle and
have both broken, even though I carefully sawed them off the sprue with a fine
saw. I had the same problem with the additional float braces. The
braces from the outer wing to the floats do not fit at all well and required a
lot of preliminary sanding to get even a mediocre fit. The wing flaps were
attached without the brass fittings and they are quite a sturdy fit. I
have also cut out the canopy and if I had to do it again, would modify the
fuselage to remove two stepped areas rather than cutting the steps out of the
vac canopy.
21 Dec 96
The aircraft is pretty well complete. I have attached the last of the much repaired struts, the engine and the canopy. The fit of the canopy is not very good, but it will have to do as there is no spare for me to use. I have a couple of more brass bits to attach to the fuselage and I must also mask off the zillion windows of the canopy before I start painting. I am still not sure which paint scheme to use (green/grey or silver with a red tail).
28 Dec 96
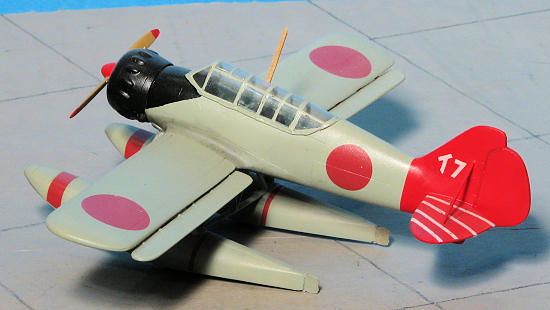 Well it is finished. These things
usually happen in groups as it is easier to paint a bunch of aircraft at once.
Anyway, I have decided to paint it JNAF grey with the red tail and black
cowling. The JNAF grey is a bit darker than I would have thought, but
better than silver. Before painting, I added all the exterior bits (rudders and
antenna) and masked off the engine with toilet paper. I used Model Master
for the red tail and black cowling/anti-glare panel, and Tamiya Acrylic for the
JNAF grey over several days. I need to mention that I undercoated the
entire aircraft with gloss white to get a good color to the red tail. I then
masked off the tail prior to applying the other colors. The black was
brush painted. After drying, I used Future floor wax to gloss coat the
model. I used the kit decals as, frankly, I doubt there will ever be an
aftermarket sheet. The decals are by Propagteam. I was leery of
using them as they are very thin and stick as soon as hitting the plastic.
I used a nice lubricant (spit) under each decal so that I could position
it and things worked out very well. After the decals dried, I sprayed on a
semi-matt. When that had dried, I took off the tape from the windows and
promptly broke the antenna. This was replaced with a toothpick sanded to
shape and painted. The kit came with no exhaust so I used some Contrail
tubing as a replacement. No rigging is necessary and the completed kit
looks just great. It is not that small for a submarine launched aircraft and
looks right at home with my other Japanese float planes.
Well it is finished. These things
usually happen in groups as it is easier to paint a bunch of aircraft at once.
Anyway, I have decided to paint it JNAF grey with the red tail and black
cowling. The JNAF grey is a bit darker than I would have thought, but
better than silver. Before painting, I added all the exterior bits (rudders and
antenna) and masked off the engine with toilet paper. I used Model Master
for the red tail and black cowling/anti-glare panel, and Tamiya Acrylic for the
JNAF grey over several days. I need to mention that I undercoated the
entire aircraft with gloss white to get a good color to the red tail. I then
masked off the tail prior to applying the other colors. The black was
brush painted. After drying, I used Future floor wax to gloss coat the
model. I used the kit decals as, frankly, I doubt there will ever be an
aftermarket sheet. The decals are by Propagteam. I was leery of
using them as they are very thin and stick as soon as hitting the plastic.
I used a nice lubricant (spit) under each decal so that I could position
it and things worked out very well. After the decals dried, I sprayed on a
semi-matt. When that had dried, I took off the tape from the windows and
promptly broke the antenna. This was replaced with a toothpick sanded to
shape and painted. The kit came with no exhaust so I used some Contrail
tubing as a replacement. No rigging is necessary and the completed kit
looks just great. It is not that small for a submarine launched aircraft and
looks right at home with my other Japanese float planes.
2010 Note: I upgraded the article with new photos.
Copyright ModelingMadness.com. All rights reserved.
Back to Reviews Page 2021