
Airfix 1/72 Bf-109E-4
| KIT #: | A01008 |
| PRICE: | $7.25 SRP |
| DECALS: | One option |
| REVIEWER: | Scott Van Aken |
| NOTES: | New tool kit |

| HISTORY |
The Bf-109E-3 was the most widely built of
the 'square wing' versions, but was replaced by the
E-4
(with many E-3 airframes being upgraded to E-4 standards starting at the
beginning of the Battle of Britain) which was different in some small
details, most notably by using the modified 20 mm MG-FF/M wing cannon and
having improved head armor for the pilot. With the MG FF/M it was possible
to fire a new and improved type of explosive shell, called
Minengescho▀
(or 'mine-shell') which was made using
 drawn steel (the same way brass
cartridges are made) instead of being cast as was the usual practice. This
resulted in a shell with a thin but strong wall, which had a larger cavity
in which to pack a much larger explosive charge than was otherwise possible.
The new shell required modifications to the MG FF's mechanism due to the
different recoil characteristics, hence the MG FF/M designation.
The cockpit canopy was also revised to an easier-to-produce, "squared-off" design, which also helped improve the pilot's field of view. This canopy, which was also retrofitted to many E-1s and E-3s, was largely unchanged until the introduction of a welded, heavy-framed canopy on the G series in the autumn of 1942. The E-4 would be the basis for all further Bf 109E developments. Some E-4 and later models received a further improved 1,175 PS (1,159 hp, 864 kW) DB601N high-altitude engine; known as the E-4/N this first appeared in July 1940. The E-4 was also available as a fighter-bomber with equipment very similar to the previous E-1/B. It was known as E-4/B (DB 601Aa engine) and E-4/BN (DB 601N engine). A total of 561 of all E-4 versions were built, including 250 E-4, 20 E-4/N, 211 E-4/B and 15 E-4/BN. Many E-4s were retrofitted with the E-7's major improvement; a long range drop tank, starting in October of 1940.
| THE KIT |
You would think that there would be enough Bf-109Es on the market, but we all know that is not really the case. This is an all new tool 1/72 kit designed to replace the older molding and looking very much like their 1/48 release.
 I should mention right off that the engraved panel
lines seem to be more subdued than in earlier 1/72 releases, so that should
please those who did not like the earlier ones. I also notice that this is made
in India. It seems Hornby is fed up with the B.S. that is part of dealing with
the Chinese and is going with a more reliable source.
The kit has an engine block of sorts molded in with the fuselage halves, like you will find with the Tamiya kit. This includes a lower engine section and separate lower cowling. The interior is very much like the bigger scale kit with separate rudder pedals, sidewall detail and harness detail on the seat. There is also a pilot if you wish one.
The kit also has separate flaps that can be modeled in the down position and Airfix has included the aileron mass balances that were missing from their Bf-110 kits. Also separate is the rudder, which you could place at an angle as the leading edge of the rudder is rounded. The canopy can be built in the open position and the three piece construct is quite clear with well defined frames. Typical of Airfix kits, the gear can be built up, though no stand is included. Both the main wheels and tail wheel have a flat spot on them.
 What you do not get with this is any way to model any
other aircraft other than a Battle of Britain 109E-4. There is no drop tank or
rack and no sand filter as used in North Africa. You also get just one spinner
so cannot do
an E-7. I am going to assume that these will be other boxings as there are areas
on the sprues that could easily hold these parts.
Instructions are well done using only Humbrol paint numbers for references. You already know how I feel about this. Markings are for a single aircraft as flown by Franz von Werra during August 1940 with II./JG 3. The aircraft is in RLM 71/02/65 with white bits on the rudder and wing tip. The nose is a lighter blue, perhaps something like RLM 76, though the instructions would have you mix white with the RLM 65 underside color. No mottling on this so it will be one that brush painters will like. No swastika either so you will need to rob your spares bin for a historically accurate finish. I should mention that the instrument panel is a decal, which is pretty much the norm for this scale.
| CONSTRUCTION |
First thing I did was to glue together all the cockpit parts. Then, I prepainted a bunch of stuff. Interior was RLM 02 as were the wheel wells, inside of radiators, oil cooler, interior of gear doors and the landing gear. Some detail painting was then done in the interior and on the sidewalls with the engine painted black. The prop was painted RLM 70 as was the spinner backing plate and spinner, though I may have to repaint these later depending on the scheme I choose.
I added some photo etch seat belts from Eduard over
the ones molded into the seat. These just look nicer and I had them anyway
 so
may as well use them. The decals were then put in place on the instrument panel.
They are oversize by about 20 percent. With those installed, the cockpit was
attached to the interior. It is a very snug fit. I then joined the fuselage
halves and turned to gluing the wings. With the wings glued, they were attached
to the fuselage. The fit is very tight and results in no wing dihedral. I
removed the wings after test fitting and sanded down the wing roots to get a
better fit. I will caution the reader not to sand too much as it is easy to do
with the soft plastic. on future builds, it might be a better way to go to sand
on the upper wing halves prior to gluing rather than the wing roots. All the
seams were then given a dose of super glue and sanded down.
Next, I glued in the flaps and the tailplanes with braces. The flaps sit a bit proud of the wings and you may wish to trim the attachment tabs a bit if you do not like the look. The tailplanes were a bear to install as they were an incredibly tight fit. One does have to ensure that the struts fit into the holes on the underside of the tailplanes, so it is a good idea to thin down the tailplane tabs a bit to give a bit looser fit so that can easily be accomplished.
With a relatively complete airframe, I decided to do a bit of painting.
| COLORS & MARKINGS |
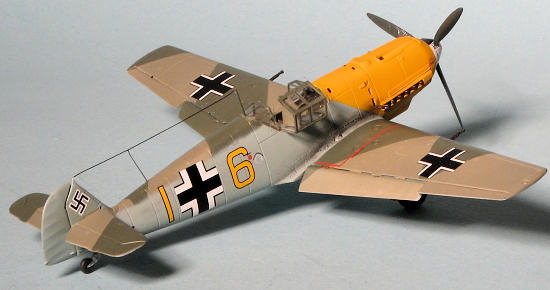
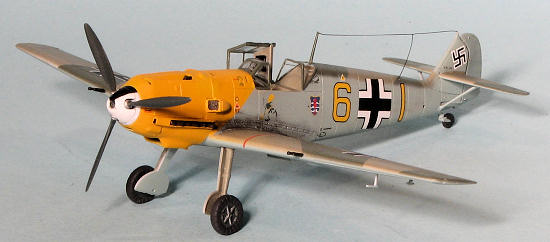
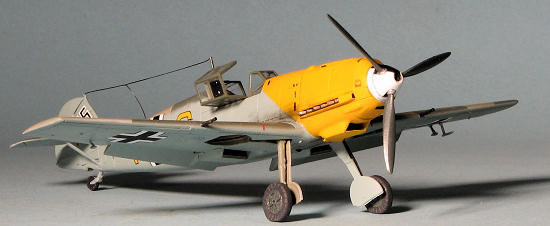
The scheme I chose is a Battle of Britain scheme that
is devoid of mottling and in the RLM 71/02/65 scheme. This plane has a yellow
nose as its main color interest. I first sprayed all the upper surfaces in RLM
02 using Testors Model Master enamels after masking off the cockpit. Then
the nose was painted white using the excellent, pre-mixed Tru-Color paint. The
spinner and
 backing plate were also sprayed this shade. This was shortly
followed by the RLM 04 using Xtracolor enamel. The RLM 02 was masked off and RLM
71 was then sprayed. The upper colors appear to be quite hard edged, hence the
masking.
I then masked off those colors and sprayed the rest of the airframe with RLM 65, also using Model Master paints. For the demarcation line on the fuselage, I hand sprayed that. I then yanked off the masking and returned to the bench to add the landing gear. The main legs fit very tightly and it took a bit of force to get them all the way into their sockets. A coat of Pledge was then sprayed on the model in preparation for the decals. Meanwhile, the spinner and backing plate were painted white then carefully masked off and 1/4 of it painted black.
For this kit, I decided to use a set of decals offered in Luftwaffe im Focus #5. This sheet contained a single 109E-4 as flown in September 1940 with 9./JG 3. I liked it because of the large yellow nose and the lack of mottling. Not that I have anything against mottling, but I find the 'unmottled' scheme to be quite pleasing. This sheet contains only the unique markings, so for insignia, I used an older Superscale sheet, # 72-834, which has a variety of insignia and swastikas appropriate for the Bf-109 and FW-190. These were trouble-free on application. Equally trouble-free were the LiF markings. Both worked well with a bit of help from Mr Mark Softer.
| FINAL CONSTRUCTION |
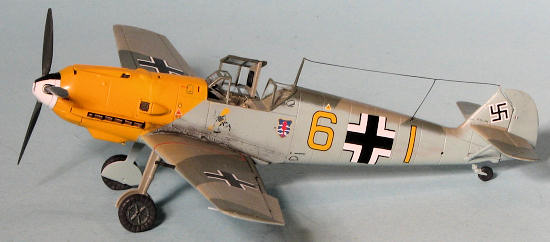 Next
were a bunch of small parts. During the removal process, I lost one of the
aileron mass balances and the radio mast snapped in half. I had to scratch
build a mass balance using putty and stretched sprue. Not an easy task. The
radio mast was duplicated with stretched sprue and the guns installed. I
also painted the exhaust with Vallejo Tinny Tin and put them in the exhaust
slots. With these items in place, some touch up painting was done and then a
clear matte sprayed over the airframe.
 | CONCLUSIONS |
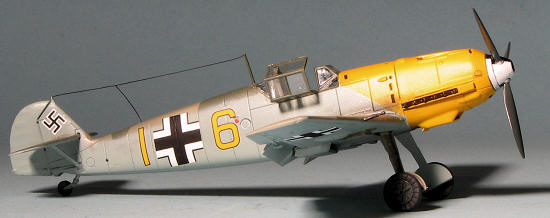 It is a
very satisfying kit and especially at the most reasonable price that Airfix asks
for this. I can see a lot of these being built by 109 fans and I would very much
like to see an E-3 and E-7 included in their catalogue. I found that some of the
parts were quite fragile while others were a very tight fit. It makes me think
that these kits would not be all that suitable for children who have little
experience with kits as they will break a lot of parts during assembly. Heck, I
am a bit out of childhood myself and still broke/lost parts. I am sure the
aftermarket folks will be doing a cockpit for this one in the near future and I
have to say that while not quite as nice as the Tamiya and other early 109 kits,
it is still one that makes into a most acceptable kit and does so for well under
half the price of the Japanese version.
| REFERENCES |
http://en.wikipedia.org/wiki/Messerschmitt_Bf_109_variants
June 2012
Thanks to me for buying this one so you can see what it is like.
If you would like your product reviewed fairly and fairly quickly, please contact the editor or see other details in the Note to Contributors.