Penelope Pit Lane 1/32 1958 Ferrari 246 Dino F.1
| KIT #: | ? |
| PRICE: | £42.90 which converted to $72.53. Shipping included |
| DECALS: | multiple options |
| REVIEWER: | Scott Van Aken |
| NOTES: | Slot car |
| HISTORY |
The Ferrari 246 F1 was a Ferrari racing car built for the Formula One World Championship of 1958. The regulations for 1954-1960 limited naturally aspirated engines to 2500 cc and for the 1958 season there was a change from alcohol fuels to AvGas.
The 246 used a 2417 cc Dino V6 engine with a 65° angle
between the cylinder banks. This was the first use of a V6 engine in a
 Formula
One car, but otherwise the 246 was a conventional front engine design. The
Ferrari 246 was good enough to win a World Championship for Mike Hawthorn and a
second place in the Constructors Championship for Ferrari.
Formula
One car, but otherwise the 246 was a conventional front engine design. The
Ferrari 246 was good enough to win a World Championship for Mike Hawthorn and a
second place in the Constructors Championship for Ferrari.
The Ferrari 246 was not only the first V6 engined car to win a Formula One Grand Prix, the French Grand Prix at Reims in 1958, it was also the last front engined car to win a Formula One Grand Prix. This occurred at the 1960 Italian Grand Prix at Monza, where the major British teams boycotted the race.
In 1960, the Ferrari 246 designation was also used for the first mid-engined Ferrari, the 246P Formula One car, again using a Dino V6 engine of 2417 cc. But 1958 was its year for glory, though at a cost. During the season, both Peter Collins and Luigi Musso lost their lives driving this car.
| THE KIT |
As with all racing cars, there are a myriad of
differences. This kit, which is not sold as an all in one kit but needs to have
the various bits purchased separately, is of the early 1958 cars with the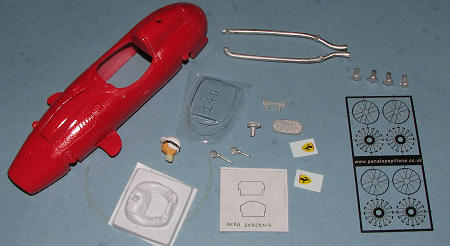 solid hood scoop as raced at the Belgian, French and British GP that year. The
chassis is the same as on the previously reviewed
Scarab
car, but with a faster motor. This quicker motor was not requested specifically,
but was part of the chassis package. I simply requested that Penelope Pit lane
send me all the bits needed to make this car and they put together all that was
needed.
solid hood scoop as raced at the Belgian, French and British GP that year. The
chassis is the same as on the previously reviewed
Scarab
car, but with a faster motor. This quicker motor was not requested specifically,
but was part of the chassis package. I simply requested that Penelope Pit lane
send me all the bits needed to make this car and they put together all that was
needed.
The body is very nicely molded and if you compare the hood scoop to the photo of the car you can see a difference. This is due to the limitations of most resin molding. There isn't enough resin material on the bottom of the scoop area to allow it to be cut back as it should. However, most people would not notice this glitch unless it was pointed out and it looks fine as it is. The kit comes with the parts you see in the photo ( I'd already painted the body at this stage) and includes the options of an 'aero' windscreen, or the wrap around version. When using the wraparound variant, it was normal for the aero version to be in place as well. This kit also differed in having wire wheels with a set of nicely done photo etch wheel hubs included.
| CONSTRUCTION |
As before, most of the construction consisted of
assembling the chassis. The wire wheels were a neat assembly as well. These are
two parts. First, the inside of the wheel was painted black. Then the first part
of p.e. is pla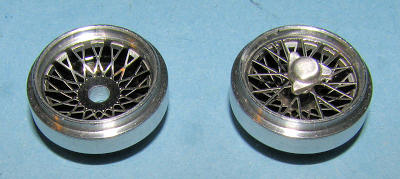 ced
on the wheel with the axle already through it for alignment. Then a section of
plastic tubing is placed over the axle and one simply pushes it in place. The
result is a nice conical installation. The knock off is then cemented to the
outer piece and that is pressed into place at the rim with a toothpick. In the
process of sanding off the little p.e. nubs, I guess a couple of them were made
a bit undersize as they fit very easily and rotated so a dab of super glue is
holding them in place. The end result is quite convincing.
ced
on the wheel with the axle already through it for alignment. Then a section of
plastic tubing is placed over the axle and one simply pushes it in place. The
result is a nice conical installation. The knock off is then cemented to the
outer piece and that is pressed into place at the rim with a toothpick. In the
process of sanding off the little p.e. nubs, I guess a couple of them were made
a bit undersize as they fit very easily and rotated so a dab of super glue is
holding them in place. The end result is quite convincing.
The rest of the build is the body. As hindsight, I suggest drilling out the holes for the aero screen more if you are going to use it, and once the chassis is built, drill out the mounting holes. More on that a bit later. It is also a good time to be sure all fits well and doesn't rub anywhere before your paint application. I did not do this and it caused extra work. I also found that, like the previous Scarab build, getting the radiator piece in place was a lot of fiddling about before it was in position.
| COLORS & MARKINGS |
It is a Ferrari so it is red. Ferrari has had a number of red shades over its life time so I simply primed it with white gloss enamel and sprayed several coats of standard Tamiya Red acrylic on it. Once that was done, a Future clear gloss was sprayed on so that the final gloss lacquer wouldn't damage the underlying paint (don't ask me how I know this will happen).
 Penelope
Pit Lane includes white metal bits for mirrors, screen mount, fuel cap, exhaust.
Some of those were test fit prior to painting (for some reason I didn't test fit
the aero frame). These all need to be either painted or polished to some degree.
There is also a sheet of number and roundels. I was very pleased to notice that
the roundels are quite opaque and they snuggled down without any need for
setting solutions. Thankfully they sent extras which I can use for future
projects.
Penelope
Pit Lane includes white metal bits for mirrors, screen mount, fuel cap, exhaust.
Some of those were test fit prior to painting (for some reason I didn't test fit
the aero frame). These all need to be either painted or polished to some degree.
There is also a sheet of number and roundels. I was very pleased to notice that
the roundels are quite opaque and they snuggled down without any need for
setting solutions. Thankfully they sent extras which I can use for future
projects.
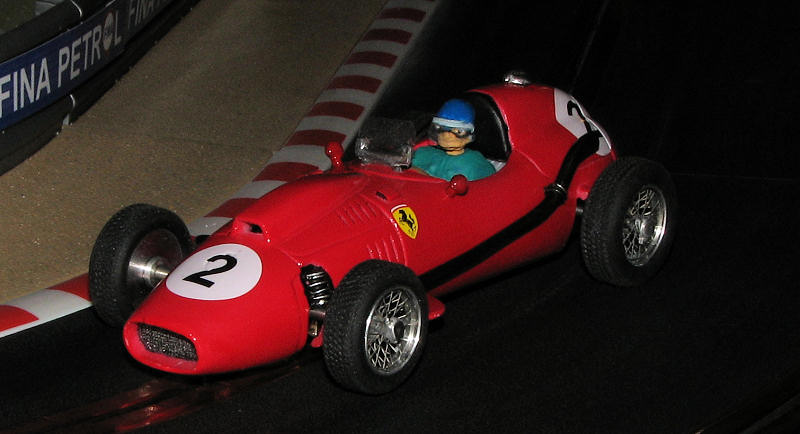
 I
chose to model car #2 as driven by Mike Hawthorne to second place at the British
GP in 1958. I was lucky enough to find a color photo of this car at this event
to use as a guide. While the decals were drying, I painted the driver body (a
vacuformed sheet) with colors matching those in the photo as much as possible.
The head, which was painted for a previous car but not used, had the helmet
painted blue with a white brim. Hawthorne often used a face shield on his helmet
and this was duplicated with a piece of clear tape cut to shape and further held
in place by clear, gloss paint. I cut out the appropriate aero screen as
Hawthorne generally used this and not the wrap around version. The exhaust,
which I had painted with Alclad II 'Jet Exhaust', was given a very light rub
with graphite from a pencil to provide some break from the solid shade.
I
chose to model car #2 as driven by Mike Hawthorne to second place at the British
GP in 1958. I was lucky enough to find a color photo of this car at this event
to use as a guide. While the decals were drying, I painted the driver body (a
vacuformed sheet) with colors matching those in the photo as much as possible.
The head, which was painted for a previous car but not used, had the helmet
painted blue with a white brim. Hawthorne often used a face shield on his helmet
and this was duplicated with a piece of clear tape cut to shape and further held
in place by clear, gloss paint. I cut out the appropriate aero screen as
Hawthorne generally used this and not the wrap around version. The exhaust,
which I had painted with Alclad II 'Jet Exhaust', was given a very light rub
with graphite from a pencil to provide some break from the solid shade.
| FINAL CONSTRUCTION |
 With the
body painted and decals on it, a coat of Testors One Step Clear Gloss Lacquer
was applied. After a day of curing, I decided to attach the chassis. Well, a
problem. The forward mounting post was not in alignment with the forward
mounting hole in the chassis. Apparently, there was a shift in the molding that
moved the post too far forward. Nothing to do but to grind a large chunk out of
the chasses to get a screw in there. Not pretty, but it works. I then drilled
out screw holes in the body mounting posts to which I'll later attach sheet
metal screws. I then attached the metal bits. The mirrors were hand
painted with red, but not having a white undercoat, are darker than the rest of
the body.
With the
body painted and decals on it, a coat of Testors One Step Clear Gloss Lacquer
was applied. After a day of curing, I decided to attach the chassis. Well, a
problem. The forward mounting post was not in alignment with the forward
mounting hole in the chassis. Apparently, there was a shift in the molding that
moved the post too far forward. Nothing to do but to grind a large chunk out of
the chasses to get a screw in there. Not pretty, but it works. I then drilled
out screw holes in the body mounting posts to which I'll later attach sheet
metal screws. I then attached the metal bits. The mirrors were hand
painted with red, but not having a white undercoat, are darker than the rest of
the body. More detail painting was done and the driver figure taped in with strapping
tape. Then the body was screwed in place. During this process, i broke off the
windscreen mount so had to do a bit of shaving and glue it back in place. I'm
sure it will last until the first roll-over wreck. This car is considerably
faster than the Scarab, which it should not be. I'll have to find another motor
for the Scarab to bring it back up to speed. On the rubber tires provided, the
car runs fairly well, but as I have a rather smooth track surface, grip is not
very good. I'll replace it with some silicone tires at a later date. I also
found out that the crown gear provided was warped and rubs against the chassis.
That was sanded down to remove the rubbing.
More detail painting was done and the driver figure taped in with strapping
tape. Then the body was screwed in place. During this process, i broke off the
windscreen mount so had to do a bit of shaving and glue it back in place. I'm
sure it will last until the first roll-over wreck. This car is considerably
faster than the Scarab, which it should not be. I'll have to find another motor
for the Scarab to bring it back up to speed. On the rubber tires provided, the
car runs fairly well, but as I have a rather smooth track surface, grip is not
very good. I'll replace it with some silicone tires at a later date. I also
found out that the crown gear provided was warped and rubs against the chassis.
That was sanded down to remove the rubbing.
| CONCLUSIONS |
 Overall,
a nice representation of this championship car. Yes, there were some glitches
that had to be overcome, but nothing that anyone with some mechanical aptitude
and experience with resin couldn't handle. It adds to a slowly growing stable of
cars of the 1950s and I'm looking forward to adding another sometime in the near
future.
Overall,
a nice representation of this championship car. Yes, there were some glitches
that had to be overcome, but nothing that anyone with some mechanical aptitude
and experience with resin couldn't handle. It adds to a slowly growing stable of
cars of the 1950s and I'm looking forward to adding another sometime in the near
future.
| REFERENCES |
http://en.wikipedia.org
August 2009
Copyright ModelingMadness.com. All rights reserved. If you would like your product reviewed fairly and
fairly quickly, please
contact the editor or see other details in the
Note to
Contributors.
Back to the Review
Index Page 2019