| KIT #: | 14577 |
| PRICE: | $19.95 MSRP |
| DECALS: | One option |
| REVIEWER: | Scott Van Aken |
| NOTES: |

| HISTORY |
The DC-6 was basically an evolutionary development of
the DC-4/C-54. Thought it used the same wing, it had larger engines and a longer
fuselage. Thanks to its cabin pressurization, it offered more comfortable
passenger amenities than the earlier model. Those who have seen the movie 'The
High and the Mighty' have seen a DC-6. The military also purchased the DC-6 as
the C-118A. This was basically due to its intercontinental range and large
passenger capacity. One thing about old airliners is that they refuse to die a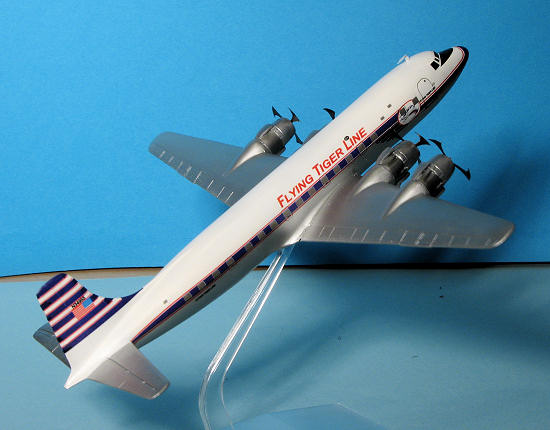 nd
while there may be some still hauling cargo and perhaps passengers as well, the
most widespread use is as a fire bomber. The addition of tanks to carry water or
slurry to fight fires has made these large aircraft a most welcome part of the
fire fighting fleet. However, recent catastrophic events have severely limited
their use and in many cases, these old war birds have been removed from
firefighting.
| THE KIT |
As is so typical of most kits in today's market, this is about the 4th or 5th boxing of the C-118/DC-6 that Minicraft has produced. Molded in white plastic to make it easier to paint, the kit includes a clear windscreen though there is no cockpit. In fact, most will simply putty it in place and use the decals. The fuselage tank shown in the sprue shots is not included in this kit.
The DC-6 kit in and of itself is fairly nicely done. The fuselage is slick to allow you to use decals for all the windows. Some airliner builders prefer this and others like to have clear bits included. The various doors and hatches are engraved into the fuselage. The rest of the kit has engraved detail as well; some say it is a bit overstated for this scale, but it looks fine once the kit is built.
Probably the most difficult part of the build will be to get the engine cowlings to look right. These are split vertically and so there will be a seam alone the upper and lower lip of the cowling. These are usually quite difficult to remove and while a separate forward cowling would have been nice, the use of super glue or epoxy filler can be used to eliminate the external seam. A nicely detailed landing gear and wheels are provided, though the wells themselves have no detail at all. The prop hubs look a tad skinny to me, but I'll wait until the kit is built to pass final judgment.
You also get a cockpit floor and rear bulkhead, but no
seats. The kit
also includes a wide variety of
antennas to be used as the
 builder sees fit. I found some small sink areas on
the tail planes and that was about it for glitches. No ejector pin marks in
visible locations and no flash at all.
Instructions are well done, and provide a parts layout, nine construction steps and a painting/decal guide. Color information is provided during the construction process where needed. The Capital Airlines decal sheet for this one is nicely done and is printed by Cartograf in Italy.
| CONSTRUCTION |
First thing I did on this one was to cement the fuselage halves together. As I am doing this as a stand model, I did not install the cockpit or the bulkhead. I also glued on the cockpit clear section and applied filler to all the joins. Since the DC-6A has a shorter nose, I also sanded the nose back quite a bit to a more rounded profile.
Next step was to arrange for this to be done gear up. Minicraft has designed
the kit for gear down so there is no handy 'Gear Up' option. As a result, I have
to use the kit gear doors, which are not designed for this to fill the wells.
The fit is atrocious in all regards. Basically, I glued on the doors best I
could (in some cases the doors were too small and others too larger). When dry,
I liberally applied super glue to the door areas and when dry, s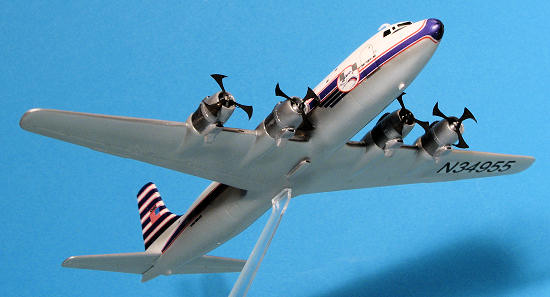 anded it all
down. Of course, I needed to use standard filler as well for the super glue does
not provide the smooth surface I'd like. One thing I noticed, and it may just
have been me, is that there are more right hand main gear doors than left as I
had to use a right hand door upside down to fill a left side opening (if you
know what I mean). Could be that I put in a left door in the right side
backwards as well, but thought I'd mention this. So be careful when doing
something similar. All of this took about a week of filler, dry, sand, repeat.
With the doors being worked on, I also glued the upper and lower wings together. Filler and some sanding needed all around the joins on this one.
When dry, the fuselage had the tail planes glued in place to help with wing alignment. The fit of the wings is not that great, but not that terrible either. I found that I had to do some carving to get a good fit and I also had to glue one wing root at a time. After the first side was solid, I glued the second and used tape to match the dihedral. Actually, I put in a bit more as I knew that when relaxed it wouldn't stay at that angle.
So I now had a full airframe minus engines. The engine nacelles are a PITA. They are two halves that when joined, don't exactly match. This is why there is filler and super glue. Both were used liberally. You do have to install the engine faces (which actually have pretty good detail) when joining the nacelle halves. Once I thought I had all the filler and sanding done. Both the airframe and engines got a coat of Alclad II primer.
EEEEEP!
Apparently what I thought was good to go wasn't. Several more attacks with super glue and files and sanding with primer coats in between and things were looking much better.
| COLORS & MARKINGS |
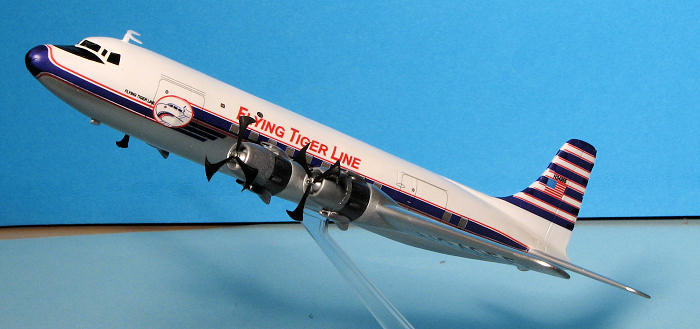
Simple paint. Upper fuselage white, the rest of it aluminum, with steel bits around the hot areas of the exhaust. I had thought to copy the decals I was using to make a mask. Didn't even come close to working thanks to the curvature of the fuselage so I just painted the upper fuselage and fin in white, let it dry a few days, then used Tamiya tape to guesstimate the demarcation line. It worked well......to a point.
 Decals.
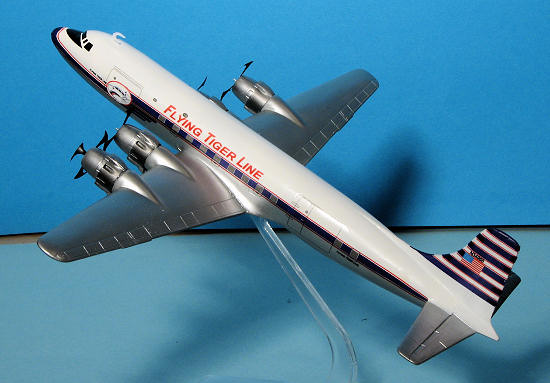
Well, I bought a set of Flying Tiger Line decals from the LHS who got them from a collection he bought. The are from F-DCAL and are ALPS printed. Having used Mike Grant decals, who also used an ALPS, I stupidly thought they'd be fine. Problem one; the dark blue stripes are purple. I had seen this before from some other ALPS printed decals but didn't think about it when I bought the sheet. Still, I figured, 'what the heck, who will know', so carried on. Problem two; they are somewhat transparent. Not a problem on the white background, but the spots where I didn't get the paint just right (like under the badges near the nose) it was apparent I screwed up. F-DCAL provides a second set of cheatlines on white paper, but this white paper is pretty transparent in itself. I cut out the logo and put it over the one already there. You can still see the background colors quite easily. Problem three; the decals are quite impervious to any setting solution and refuse to properly conform to compound curves. They can be pressed into a curve once thoroughly doused with Solvaset, but then the transparency issue raises its ugly head and where the color is doubled up it is denser. Problem four is that the fin decal is too small for the kit. While I was able to cut some of the purple bits from the spare decal printed on white, that spare only has the fuselage cheat lines so no small red stripes for the very front and back of the fin. While it does look a lot better in images, it took a heck of a lot of work cutting small bits to fill in the gaps. I do not recommend these markings to anyone not willing to put up with the hassles. Oh yeah, all the clear areas silvered as well so no clear coat on these.
| FINAL CONSTRUCTION |
Now that the fiasco that was decaling was over, I could get to
the engines. Before painting, I took my motor tool and cleaned up around the
intakes. I also cut depressions into the upper and lower intake to give them
some depth. Miniature motor tools can be
 quite helpful
for this. The cowlings were painted steel for the hot area with the rest in
aluminum. For props, I used Prop Blur. Actually, it is the reason I built the
kit. I painted the props on the fret with lacquer paint. Bad idea as the paint
covered up all the little etchings. The paint also chipped when cutting the
blades from the fret. Best to paint them later and with a thinner paint. I
needed prop shafts for these. The holes in the center of the props are .03
inches in diameter. Best I could find was some .025 wire. This was cemented into
the nacelles with super glue. Then the props were glued atop them. Had I
sufficient time, I'd have cut the hubs from the kit props and sanded them down
to fit on the wire that sticks out from the blade. I might also have added
exhaust stains, but this is a stand model and those are generally devoid of such
things. Besides, it is my model and I like them clean. Besides, as I write this
the night before publishing, the time isn't there. The cowlings were then glued
onto the nacelles. Fit is not good. I had to cut away the alignment tabs on the
nacelles to get the cowlings properly aligned. While I'm mentioning glitches. I
highly recommend anyone using aftermarket decals on these plane to be sure to
fill in all the doors and exits that are on the model. I did not and there are
many mis-matches to the door/hatch markings on the decals and the engravings on
the model.
Then I started hunting around for a stand. I found one from an old kit that seemed to be about right. Again using my motor tool, I started cutting a slot in the underside of the aircraft right about the center of gravity. Once I got the slot to the size where it was a snug fit, I glued the model to it. A bit of touch-up work and I was done.
| CONCLUSIONS |
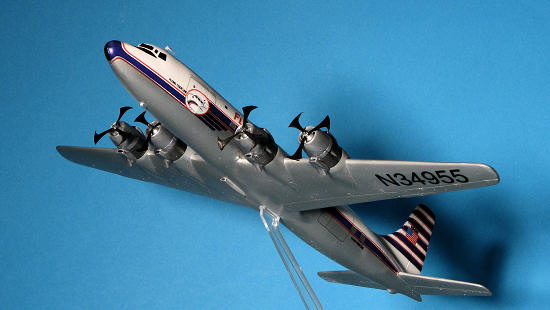 Several
notes. One is the decals I used suck. Is that too harsh? I don't think so.
Secondly, the kit isn't a bad one, just needs a bit of work and some skills to
get right. Had I allowed another week, I could have well taken care of some
things, but I didn't. Maybe in the future, I'll fix a few things. Finally, I
like the Prop Blur effect, though they are a bit too short for the DC-6 by about
1/10 or 1/8 of an inch. I determined that by placing one of the kit props over
them and noting the difference in length. The folks at Prop Blur may want to
take that into consideration and do extra length ones for propliners
Even after all those trials and tribulations, I'd be lying if I didn't say that I'm somewhat pleased with the final result. I know of the glitches now and for the next one, I'm sure to do a better job and make some better choices when it comes to decals.
July 2010
Copyright ModelingMadness.com. All rights reserved.
Thanks to me for the kit and decals and thanks to Prop Blur www.propblur.com for the props.
If you would like your product reviewed fairly and quickly, please contact the editor or see other details in the Note to Contributors.