
|
KIT # |
9075 |
|
PRICE: |
$25.00 |
|
DECALS: |
Two aircraft: VC-21 and VMA-513 |
|
REVIEW : |
|
|
NOTES: |
Dangerboy Wingfold (Company out of business) |
|
HISTORY & THE KIT |
I'll let Tom Cleaver's preview suffice for this information. For the preview of the wingfold set, go here.
|
CONSTRUCTION |
 As with most of my models, the first thing I did was to assemble
some subassemblies. This basically meant the cockpit and fuel tanks.
Fit was very good for these. One thing I noticed during this is that this kit
just doesn't seem to be up to the same standards as earlier kits. Perhaps it
comes from expecting a lot from Hasegawa, but I didn't expect to see flash and
to find a lot of sink marks on the landing gear doors and other bits with lots
of detail on the other side. While the flash was minimal, it shouldn't have been
there at all, in my opinion. Sink marks are generally caused by thick plastic
parts and/or removing parts from the molds too quickly (i.e. running the presses
too fast). Perhaps it is nitpicking and I wouldn't complain about it were it an
MPM kit, but Hasegawa is supposed to be an industry standard, and I expect
nothing but the best from them.
As with most of my models, the first thing I did was to assemble
some subassemblies. This basically meant the cockpit and fuel tanks.
Fit was very good for these. One thing I noticed during this is that this kit
just doesn't seem to be up to the same standards as earlier kits. Perhaps it
comes from expecting a lot from Hasegawa, but I didn't expect to see flash and
to find a lot of sink marks on the landing gear doors and other bits with lots
of detail on the other side. While the flash was minimal, it shouldn't have been
there at all, in my opinion. Sink marks are generally caused by thick plastic
parts and/or removing parts from the molds too quickly (i.e. running the presses
too fast). Perhaps it is nitpicking and I wouldn't complain about it were it an
MPM kit, but Hasegawa is supposed to be an industry standard, and I expect
nothing but the best from them.
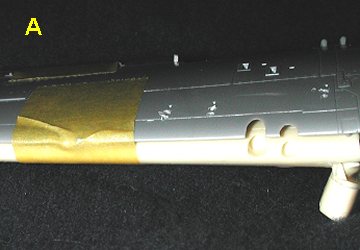
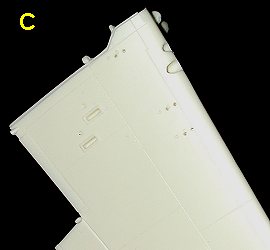
Anyway, this kit is to be more on the resin wing fold set from Dangerboy Hobbies than the Corsair itself. First thing I did to the wing fold set upon receipt, was to drill the holes for the rocket rails. This was easily accomplished by drilling out the holes in the kit lower wing first, then simply taping the lower wing over the resin wing. The photos show a bit of distance in the resin wing from the kit wing, but when held together, that distance is much less.
First the two wings are aligned with each other and then taped (Image A). The tape is to keep the two wings from sliding around too much in relationship to each other. Then, with a #70 drill bit, the holes were drilled through the kit wing into the resin wing below it (Image B). Then the tape was removed and I had the resin wing all drilled out and ready for the rocket stubs (Image C). A very simple operation that took less than 10 minutes.
 |
 |
 |
 While all this was drying, I assembled the engine. The cylinders
were painted steel with a medium grey crankcase housing. I then used Rustall
wash on the engine to bring out the highlights. It works quite well and can be
recommended. After the fuselage had been sanded down, the resin center
wing was attached. This left a few more gaps than what I would have liked (I'll
mark that down to this set being a test shot) and those were filled with
superglue. Mr. Surfacer 500 was then run around the wing/fuselage join to check
for any roughness as superglue is very hard to see. Once that was done, the area
was lightly sanded. There is a seam that runs just under the leading edge of the
center section that also has to be carefully sanded down. No filler is needed.
While all this was drying, I assembled the engine. The cylinders
were painted steel with a medium grey crankcase housing. I then used Rustall
wash on the engine to bring out the highlights. It works quite well and can be
recommended. After the fuselage had been sanded down, the resin center
wing was attached. This left a few more gaps than what I would have liked (I'll
mark that down to this set being a test shot) and those were filled with
superglue. Mr. Surfacer 500 was then run around the wing/fuselage join to check
for any roughness as superglue is very hard to see. Once that was done, the area
was lightly sanded. There is a seam that runs just under the leading edge of the
center section that also has to be carefully sanded down. No filler is needed.
The next step was to attach more bits and pieces to the kit. To this end, the tailplanes were glued in as was the short under-fuselage UHF antenna. Then it was time to start gluing on some of the flaps to the resin wings. I didn't want to have mine in the 'down' position when the wings were folded. The main reason is that most of the images I found of Corsairs with folded wings had the flaps 'up'. At this time, the engine exhausts were glued to the cowl flap piece and this assembly was then glued to the front of the kit. The cowling itself was cleaned up and press fit onto the cowl flap assembly. Not exactly a perfect fit as the cowling seems to be a bit larger than the attachment points. However it is flexible so a bit of help with superglue should get it right during final assembly.
 Attaching
them wasn't simply a matter of applying glue and sticking them in. I found that
some trimming was needed in order to get them to fit properly. Some of this
trimming was to the wing itself and some to the flap pieces. I found a round
file to be most helpful with the back of the wing. The flap parts were attached
with superglue. At this same time, the small air bubbles were filled in the wing
using a combination of filler and superglue (not together; more like first some
filler, let it cure and them some superglue followed by more filler to smooth
things out). Then the radome was attached to the right wing and any gaps filled
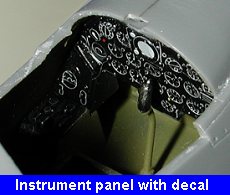
with Mr. Surfacer 500. The gunsight was glued in, the glare shield painted flat
black and the windscreen was glued on. The canopy itself has a seam running down
it as it was the only way to mold the bubble of the canopy. This was sanded off
using several grits of sandpaper and then polished with a wool sock. If you need
some guidance in doing canopy polishing, here is a
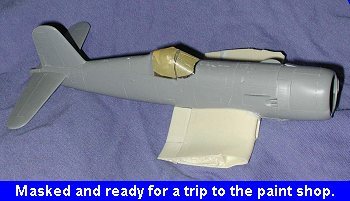
how-to. Both it and the windscreen were masked with Tamiya Tape and it was
off to the paint shop for the first application of paint.
Attaching
them wasn't simply a matter of applying glue and sticking them in. I found that
some trimming was needed in order to get them to fit properly. Some of this
trimming was to the wing itself and some to the flap pieces. I found a round
file to be most helpful with the back of the wing. The flap parts were attached
with superglue. At this same time, the small air bubbles were filled in the wing
using a combination of filler and superglue (not together; more like first some
filler, let it cure and them some superglue followed by more filler to smooth
things out). Then the radome was attached to the right wing and any gaps filled
with Mr. Surfacer 500. The gunsight was glued in, the glare shield painted flat
black and the windscreen was glued on. The canopy itself has a seam running down
it as it was the only way to mold the bubble of the canopy. This was sanded off
using several grits of sandpaper and then polished with a wool sock. If you need
some guidance in doing canopy polishing, here is a
how-to. Both it and the windscreen were masked with Tamiya Tape and it was
off to the paint shop for the first application of paint.
|
PAINT |
The kit was sprayed with a matte black enamel and when dry was given several coats of Future. I didn't use gloss black as I have a terrible time with it and find that the flat black not only covers better, but also is easier to see thin areas on than the gloss black. I also painted the wing sections flat black. Once that was done, the kit was returned to the work area to have more bits and pieces glued onto it.
|
CONSTRUCTION CONTINUES |
I then turned my attention to the fuselage. The landing gear were assembled
and glued into place. The tail wheel structure had been prepainted before
gluing. The main gear hadn't. I had to fill a few ejector pin marks before
gluing the struts in. They fit without too much problem.
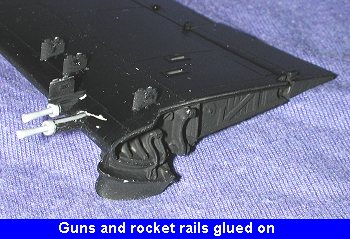 This is when the smaller
sections were glued on. The first things were to attach the underwing rocket
stubs and the guns. There was a need to do a bit of adjusting to get these to
fit. The gun slots had to be slightly enlarged to have the barrels fit in. I
also had to use a larger drill bit on the forward holes for the rocket stubs. It
was a relatively quick procedure and I used superglue to attach the pieces. They
were then resprayed with flat black when done.
This is when the smaller
sections were glued on. The first things were to attach the underwing rocket
stubs and the guns. There was a need to do a bit of adjusting to get these to
fit. The gun slots had to be slightly enlarged to have the barrels fit in. I
also had to use a larger drill bit on the forward holes for the rocket stubs. It
was a relatively quick procedure and I used superglue to attach the pieces. They
were then resprayed with flat black when done.
 It was then that I turned my attention to the stuff under the wings. Wasn't
sure if I wanted to do bombs and rockets, drop tanks and rockets, rockets only
or drop tanks only. So I went and made them all up. Drop tanks were a bit warped
and I had a gap in the front of both of them that needed some filler.
Mr.Surfacer 500 did the trick. The bombs were not a bad fit, but the inside of
the fins is very rough and will need much cleanup. The rockets are a two-piece
assembly with a body and separate rear fins. Why this couldn't be done as one
molding is beyond me. Each rocket body and each fin assembly had two ejector pin
marks that had to be filled and sanded. A real pain in the butt, especially when
doing eight rockets!
It was then that I turned my attention to the stuff under the wings. Wasn't
sure if I wanted to do bombs and rockets, drop tanks and rockets, rockets only
or drop tanks only. So I went and made them all up. Drop tanks were a bit warped
and I had a gap in the front of both of them that needed some filler.
Mr.Surfacer 500 did the trick. The bombs were not a bad fit, but the inside of
the fins is very rough and will need much cleanup. The rockets are a two-piece
assembly with a body and separate rear fins. Why this couldn't be done as one
molding is beyond me. Each rocket body and each fin assembly had two ejector pin
marks that had to be filled and sanded. A real pain in the butt, especially when
doing eight rockets!
|
DECALS |
With several coats of Future on the model, it was time to apply decals. I know that Hasegawa decals are generally very good, but need hot water. Dutifully applying the decals with hot water, I was quite pleased with how they looked. The red is undercoated with white so stands out quite well. After letting the decals dry, I came back and was horrified to see that they had silvered horribly!
 Having nothing to lose, I applied some Microset to them
and pressed them down firmly. Unfortunately, they wrinkled and stayed that way.
AARRGGHH! I knew it was too good to be true. Removing the Tamiya decals I
started hunting around for replacements. Brother, let me tell you that finding
red 1/48 lettering is nearly impossible. I did find an old Tigercat sheet that
supplied the unit codes, but numbers were a problem as the Tigercat only carried
them on the nose and I needed wing decals. My only hope was a 1/72 Aeromaster
sheet. I found one at the hobby shop and it looked about right. Naturally, the
largest numbers were a bit too small and the color wasn't the same as these red
decals are not backed up by white.
Having nothing to lose, I applied some Microset to them
and pressed them down firmly. Unfortunately, they wrinkled and stayed that way.
AARRGGHH! I knew it was too good to be true. Removing the Tamiya decals I
started hunting around for replacements. Brother, let me tell you that finding
red 1/48 lettering is nearly impossible. I did find an old Tigercat sheet that
supplied the unit codes, but numbers were a problem as the Tigercat only carried
them on the nose and I needed wing decals. My only hope was a 1/72 Aeromaster
sheet. I found one at the hobby shop and it looked about right. Naturally, the
largest numbers were a bit too small and the color wasn't the same as these red
decals are not backed up by white.
However, it was the only game in town so I used them. I also had to scrounge new insignia from an old Microscale sheet. Fortunately, that wasn't a problem. Unfortunately, these decals silvered as well, even when floating in Microset. I grabbed the faithful Solvaset and gave the decals a quick swipe. That cured the silvering problem for the most part.
|
MORE CONSTRUCTION |
Once the decals had dried, it was time to add on some of the final bits. The biggest of these are the gear doors. Dangerboy Hobbies supplies a set of resin gear doors. Now you are probably wondering why this is. After all, there is a perfectly good set of Hasegawa gear doors. Yes there is, and those Hasegawa gear doors each have a nice ejector pin mark or two on the inside of them. The resin doors don't. Your choice! Take a peek at the doors in the preview of this set and you'll see. The kit tail wheel doors are perfectly good so I attached all the doors with superglue.
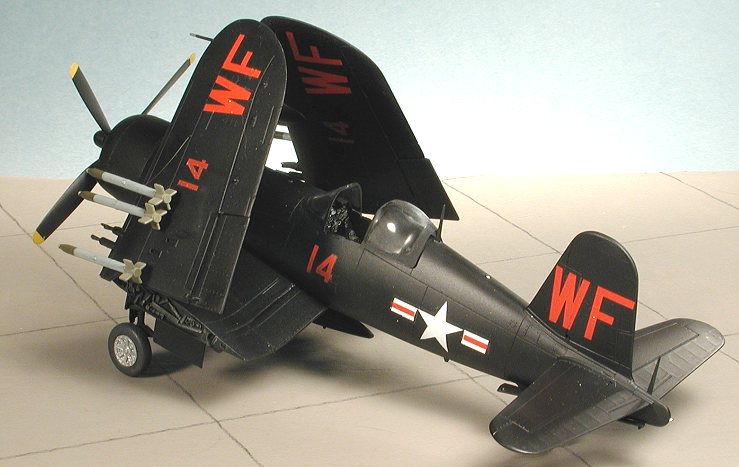
 The next bits were the two
upper antennas. These fit with no trauma. The wheels were then glued together
and glued on. The tires look a bit on the thin side. Not sure how to fix this
other than aftermarket wheels or cutting them in half and inserting a spacer
(which is waaaay too much work for this kid). I then glued on the
underfuselage/wing ordnance and let it dry. I chose to mount six of the eight
rockets as well as one drop tank and one bomb. This mixed load was not at all
uncommon as the Corsairs were often used as night intruders instead of dedicated
night fighters. Same with the Tigercats. While the bomb and drop tank fit very
well, the fit of the rockets wasn't really that great. There was no positive
locator so it ended up being a butt join, not the best solution
The next bits were the two
upper antennas. These fit with no trauma. The wheels were then glued together
and glued on. The tires look a bit on the thin side. Not sure how to fix this
other than aftermarket wheels or cutting them in half and inserting a spacer
(which is waaaay too much work for this kid). I then glued on the
underfuselage/wing ordnance and let it dry. I chose to mount six of the eight
rockets as well as one drop tank and one bomb. This mixed load was not at all
uncommon as the Corsairs were often used as night intruders instead of dedicated
night fighters. Same with the Tigercats. While the bomb and drop tank fit very
well, the fit of the rockets wasn't really that great. There was no positive
locator so it ended up being a butt join, not the best solution
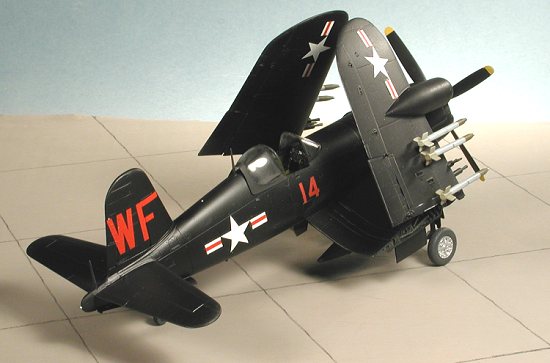
The last things to be fit were the pitot tube (which required the hole in the wing tip to be drilled larger) and the canopy. The canopy was left loose so that I could pose it in the open or closed position. Then the masking was removed from the clear bits, the outer wings glued in place and that was all for the construction. Final touchup painting included the formation lights and the pitot tip.
|
CONCLUSIONS |
Overall, I found this to be quite a nice build. The extra time required for the resin wings was well worth it. I didn't find any real problems with mismatched noses that have been bemoaned by many. Perhaps I was just lucky. Having completed this kit so soon after finishing the Tamiya 1/72 kit has burned me out on the bent winged bird for a while, however, it does make a very nice addition to the display case. I can heartily recommend the Dangerboy Hobbies wing conversion and the Hasegawa Corsair.
|
REFERENCES |
The two Corsair in Action books by Squadron/Signal
March, 2001
Copyright ModelingMadness.com. All rights reserved. No reproduction in part or in whole without express permission from the editor.
Review kit courtesy of me and my wallet, wing fold conversion courtesy of Dangerboy Hobbies
Nov 2004 update: Please note that Dangerboy is now out of business and their materials are no longer available.
If you would like your product reviewed fairly and fairly quickly, please contact the editor or see other details in the Note to Contributors.