
Minicraft 1/144 NB-52B Stratofortress
| KIT: | Minicraft 1/144 NB-52B Stratofortress |
| KIT # | 14430 |
| PRICE: | $20.00 |
| DECALS: | One aircraft |
| REVIEWER: | |
| NOTES: | Cutting Edge NB-52B conversion set used |

| BACKGROUND |
Click on the hyperlinks for a look at the Minicraft kit and the Cutting Edge conversion set.
| CONSTRUCTION |
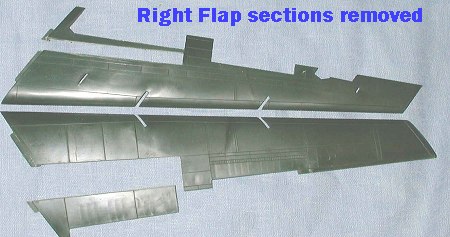
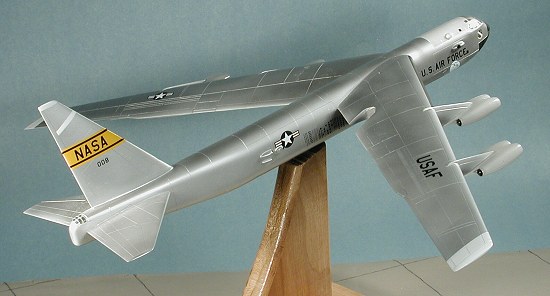
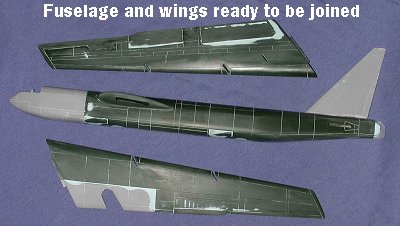
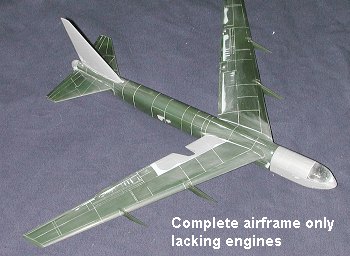
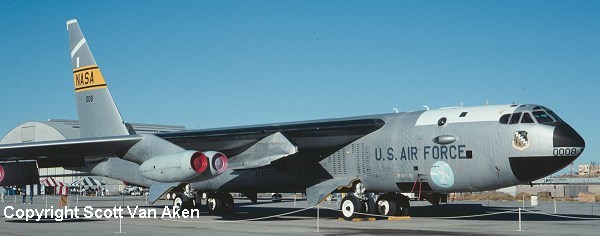
Once that was done, the two resin nose halves, the fin, the tail piece, canopy, and the new right side flap were cut away from their resin backings and cleaned up for use. I found the canopy to With the fuselage somewhat truncated, the section for the landing gear was glued into one of the halves and the two fuselage halves were mated together. It is important that a small piece of the fuselage stiffener sticks out just a bit as it will help align the new nose. With the fuselage together, the tail section and front piece was test fit to make sure that it would fit when the time comes. With the fuselage dry, the kit fin was cut off in preparation for the new one. Meanwhile, I glued together the horizontal stabilizers and the wing halves. On the wings, I installed the separate flaps in the up position. To do so, you need to cut away the flap tracks. The fit is fairly good, though I noticed a LOT of sink areas on the wings that will have to be filled and sanded smooth. The NB-52s were the only B-52s authorized to land and take off without flaps. The reason is that they were usually carrying something when flying and that did not allow for flap usage. Even when 'empty', the large cutout in the right flap would have made for some rather unusual asymmetrical landing characteristics. With the miles of dry lake to land and take off from, flaps really were not needed. Of the many photos I've seen of this plane, I don't ever recall seeing one with the flaps extended. Back at the fuselage I started to glue on the various bits. First I attached the new nose. Fit is pretty good though the usual filler was used. Make sure that the interior is placed into the new nose before gluing the halves together or it will be just that more difficult. I had to cut back the interior a bit to fit the nose as the very tip of it is solid in the replacement. I also glued in the new tail piece. I apparently cut the old tail off a tad short as the new one was a bit smaller, but no problem that sanding and filler can't cure! Since this was to be an 'in flight' model, I glued the gear doors in place. These are basically too small to fit properly. It isn't something that is a problem with gear down, but is very noticeable with gear up. It took many applications of filler to get them to come up to the fuselage. Now that the fuselage was doing well, I started attaching flying surfaces. Starting at the back, the two horizontal stabilizers were glued in place. No muss, no fuss. I then went to put in the right wing. The resin tab is a bit too long so that was trimmed a touch to get the wing to slot in properly. It was a bit of a tight fit, but fit was quite good. As much as I'd have liked to add the proper curve to the wing to denote the flight load, I just left things the way they were. Some filler was needed on the join area. Same with the left wing. I must confess that I'd considered installing the engines and pylons before gluing the wings in place, but figured it would be easier to do things this way. The next thing was to install the cockpit canopy. I painted the interior flat black and then started to trim the canopy. Now I'm not exactly sure what the deal is with the canopy, but it remained 'sticky' throughout construction. I even cleaned it off as best I could with soapy water, but that only seemed to cloud it up and it still wanted to retain finger prints where I held it. Not much left to do since I'm not using the landing gear or any of the very large weapons sprue. The engine pylons were glued in place and provided no problems. By this time I had something that looked very much like a B-52, though sans engines. Speaking of engines, these were removed from their resin pour stubs. Now I must confess that I'm not at all good at removing things so that the area is perfectly flat. Even during sanding I can't seem to do a proper job of things. I do wish that there was some sort of easy way to do this without making a mess of things, but in the decade I've been working with resin, I've not been able to master this particular job. Once the engine pods were painted, the Black Magic canopy masks were used and they fit fairly well. CAMOUFLAGE & MARKINGS Once that was on, I sprayed on several coats of Alclad II aluminum. With that dry, I knew I could mask without having to worry about the underlying paint coming up. Basically there are areas of black and white that need to be done and the instructions show you where that is needed. I also used the photo at the bottom of the page that I took in 1989 for a reference. After the kit was painted, I installed the engines. These are butt joins, but a bit of superglue holds things on quite nicely. Anyway, the decals are very thin, so much so that you really need to be careful applying the long ones or they will fold up on themselves, making a real mess. Keep a bowl of clear water handy for 'refloating' these. I also found that I had some fit situations. For instance, the NASA tail band seemed to be too short and I had to place it higher on the fin that I though I should. I also think I got it on crooked. The '0008' for the nose was too tall for the space the kit gives so it overlaps onto the radomes. I also found that there was no lower wing placement guide, and since they definitely won't fit in the same places on the underside without overlapping the pylons, one has to make a guess. Another real help in the conversion instructions would have been a scale drawing for the placement of the camera pods. I found that I had placed some of them where decals were supposed to have gone. Aside from that, they are really superbly done and it is nice to have the additional little black squares for windows. I never did find out where the yellow and red stripes went.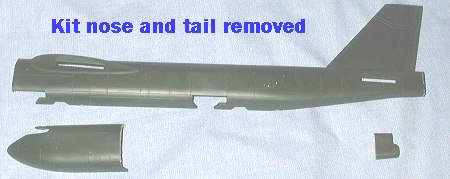 As with all conversions, the first thing that needs done is some serious cutting and hacking. In this case, the nose and tail section of the B-52 fuselage need removed (fortunately, these are along panel lines to make it easier) and on the wings, the right hand flap needs to be taken off. Again, the flap is along a panel line so removal is quite easy.
  be strangely a bit sticky and my finger prints were easily transferred to the clear parts. Once there, they didn't want to easily come off. I'm not sure why this is as the tail section (also clear resin) didn't have this rather peculiar trait.
  There was a LOT of filling needed on the wings for several reasons. One is the number of sink areas that needed filled and the other was that the flaps were not the same thickness as the wing. I also had to fill the small holes for the wing tanks and on the left wing, the pylon hole needs to be filled as well. I left the other hole open as I'm hoping that the pylon for the various items carried under the wing will fit into this opening. The small outrigger gear doors were glued in at this time as well.
 During all this, I glued the new fin in place. Hindsight told me that I'd have been smart to make some sort of tab on the fin rather than rely on a butt join, however, it seems to be holding well. I did use superglue and did the usual amount of filling and sanding on it. In the way of Zen Modeling, I have become one with the 400 grit.
 Most unusual. I glued it in place with superglue and put a bit of filler around the edges. A few filler/sanding sessions were needed to get a good join. I fear that I just may end up painting the cockpit area black, applying the masks and leaving it go at that as it is in no way clear. It isn't that it is scratched, but it is cloudy on the inside and doesn't seem to want to clear up at all. I can only assume that something went amiss with this particular molding.
 Were I a particularly talented mechanical engineer, I'd devise a system that clamps these bits in such a way that one only needs to run the device over a piece of sandpaper in order to get a perfectly flat mating surface. The bit holding the resin part would be on screw jacks of some sort so that once we cut off the main pouring block and align the part in the device, we could slowly lower the part as the resin is sanded away. There you have a great idea to help us out. Anyway, the result of my rather poor cutting and sanding ability was that there were high spots on all the pieces. Additional sanding only threatened to make the situation worse. I got them best I could and glued them together, making quite a mess and leaving large gaps on all the engine pods. These were filled and I started the sanding routine. A couple of coats of my ever-thickening Mr Surfacer was all that was needed to level things out a bit. I had to be very careful in sanding not to overdo things, though CE's resin seems a bit harder than most.
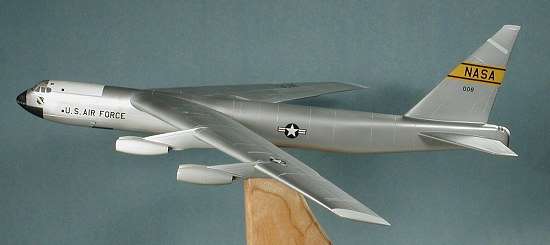
 Since I was using Cutting Edge's NB-52B sheet, I had a choice of three markings for this plane. I chose the latter scheme, but planned on backdating it a bit as I wanted the NASA tail stripe. This plane is in painted aluminum. Well I planned on using Alclad II Aluminum as it is more dull than several of the brighter shades and looks more like it was painted on. First, I sprayed the entire aircraft and engine pods with light aircraft grey (FS 16473 will do equally as well). The engines will stay this shade. I used Xtracolor paints because they dry pretty fast for a gloss (especially when thinned with lacquer thinner), and I needed a smooth surface to cover all the filler!
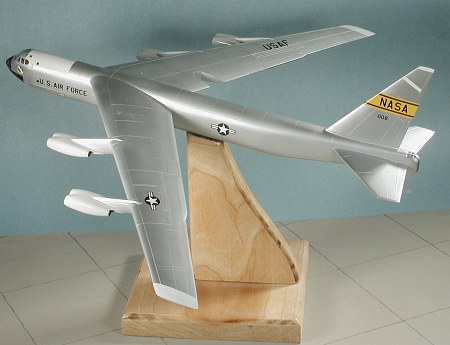 Next step are the decals. These are from a new Cutting Edge sheet specifically designed to go with this kit and conversion set. As mentioned in the review, there are three different generations of schemes to do and I picked one between the second and third scheme as I had a photo to go by. One of the benefits of not having a pylon is that the left side decal with all the mission markings on it is rather easy to apply. The pylon would have made it most difficult.
| FINAL CONSTRUCTION |
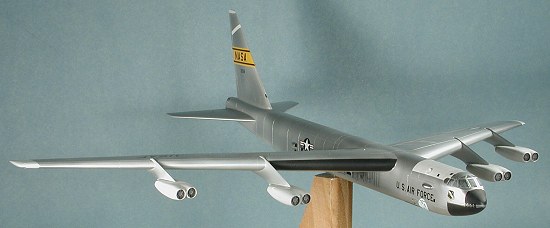 This consisted of some touch up painting and painting the camera aperture areas on the pods flat black. This was normal as it kept unwanted reflections out of the cameras. I removed the masking and put some black wash into the engines to provide a bit of depth. The last thing I added was the astrodome on the left forward fuselage. It seems a bit large to me and I also had trouble keeping it clear. I'm obviously doing something wrong when it comes to clear resin parts as all but the tail section ended up cloudy. I found the center of gravity and drilled a hole in the lower fuselage. Rummaging through my available home made stands, I picked one that seemed appropriate and placed the completed model on it.
| CONCLUSIONS |
I think it is great the Cutting Edge is coming out with these NASA theme items. I enjoyed the build, though I did make a number of errors when doing it. Now all I need is something to put under the wing. Hopefully a series of interesting vehicles will come along.
Late Note: July 2008. Well, there will not be any stuff to put under the wing as Cutting Edge is now out of business and any remaining items are currently selling for VERY high prices on the auction sites.
August 2003
#1280 in a series
| REFERENCES |
Thanks to Cutting Edge for supplying the conversion set and decals.
If you would like your product reviewed fairly and fairly quickly, please contact the editor or see other details in the Note to Contributors.