
Platz 1/72 T-33A Shooting Star
| KIT #: | AC-6 |
| PRICE: | $42.00 SRP |
| DECALS: | Nine options |
| REVIEWER: | Scott Van Aken |
| NOTES: | New tool kit (2012) |

| HISTORY |
The Lockheed T-33 Shooting Star is an American-built jet
trainer aircraft. It was pro duced by Lockheed and made its first flight in 1948,
piloted by Tony LeVier. The T-33 was developed from the Lockheed P-80/F-80
starting as TP-80C/TF-80C in development, then designated T-33A. It was used by
the U.S. Navy initially as TO-2 then TV-2, and after 1962, T-33B. While there
are no more military T-33s still in active service, the type is very popular
with the jet warbird crowd. Many T-33s spent over 40 years on active service
before being retired.
| THE KIT |
The T-33 has been seeing some popularity in the last few years. Prior to this resurgence, the only T-33s kitted in 1/72 were by Hasegawa (one of their first generation kits) and Heller. Both were from the 60s and 70s. A few years back, Sword released their T-33 as part of their Shooting Star series, all of which are short run kits and all of which sold very well.
 Now we have a new tool kit from Platz, and
judging by the labeling of some of the sprues, it will also be part of a
Shooting star series. Of the four main sprues, two are specific to the T-33.
Typical of Platz kits, the molding is top notch. The cockpit is very well
done with raised detail on the instrument panels and decals to put over them
if one so wishes. The seats appear to be the proper version. This is all
covered by a one-piece canopy.
Since this is to be part of a series of kits, it is not surprising that the fuselage is modular. It is split about where the real aircraft is divided to gain access to the engine. There is, of course, no engine in this boxing, but there is a lot of detail on the inside of the fuselage that hints at something like this in the future. There are blanking plates for the engine intakes and a nice, long tailpipe for the exhaust.
Landing gear are well molded with all the appropriate struts. You also get separate speed brakes that can be molded open. As these usually bled down after the engine was shut off, it is an appropriate option. No indication of nose weight is give in the instructions, but wise modelers will add some just to be sure. From the look of things, this kit is not designed to be built gear up.
 Instructions
are very nicely illustrated and provide Gunze paint references as well as FS
595 when appropriate. The instructions are mostly in Japanese so any advice
given during the build will be illegible to many. The sheet provides
markings for nine different aircraft. Basically speaking, every fighter unit
had at least one T-33 to use as a hack and to allow desk pilots to get their
hours. These planes could be aluminum lacquer or unpainted metal so one
truly needs a photo to get that information down. The high visibility marks
were often as not International Orange, especially in the later years. A
superb data markings guide is part of the instruction sheet. Decals are
printed by Cartograf and include not only the usual markings, but also those
for inside the canopy or on the seats.
| CONSTRUCTION |
For this build, I decided to use the very nice Platz photo etch set, # MT
72-23, which is designed for this kit. While the set in labeled for JASDF T-33A,
I see nothing that would preclude it from being used for any
 T-33 build. This
set is in full color and made by Eduard. This also means that the background
color for some of the parts is the wrong shade to match paints without
lightening the paint. This is most noticeable on the side consoles. First thing
I did was to paint the interior in Dark Gull Grey. The instructions give no
information on cockpit painting or anything else that I could decipher, but that
is pretty much the standard color for jets and still is when US aircraft are
concerned. The color photo etch pieces are very nicely done and fit quite well.
The instrument panels and side consoles will need the raised detail sanded flush
prior to use. I used super glue to attach many of the pieces, though some were
attached using clear gloss paint (Vallejo).
There were a bunch of placards to attach into the tub and the seats got some
etched ejection handles. Naturally, one of these handles disappeared to wherever
etched bits go as a concerted search refused to locate it. As you might expect,
it showed up after the seats had been installed and the canopy glued shut. Meanwhile, I
assembled the wing halves, the tail halves and the drop tank halves. I had to
tape 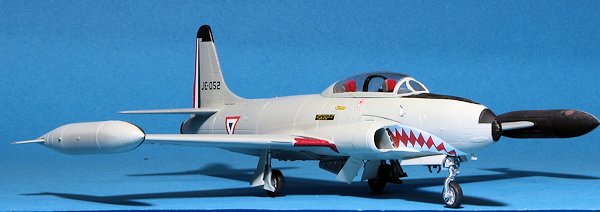 the wing edges closed while the glue dried. The wing has long alignment
pins that go into shallow slots on the upper wing. I think this is to help
maintain the wing shape over the wheel well. I should mention that the tailpipe
does not have a final compressor stage to install so if there are any light
leaks when the kit is done it may be an issue for some.
After installing the placards and map cases in the cockpit, I glued in the
control sticks and then the seats. I used a piece of 0125 wire to make another
eject handle to replace the one that disappeared. I had to sand down the sides
of the seats to get them to fit into the cockpit. This may well be due to the
additional p.e. installed. I then glued the p.e. rudder pedals to the back of
the instrument panel assemblies and glued
 those assemblies in place. The next
step was to add the decals for the seats provided by Platz.
Before installing the cockpit, I glued in a section that fit behind the cockpit that very much looks as if it would accept intake trunking. Perhaps this is in the works for a future kit or detail set. The nose gear well was a very positive fit, something that other kit companies should emulate. I placed about 4 grams of weight in the nose to ensure no worries with tail sitting.
With that done, the forward fuselage halves were cemented together. I also attached the rear fuselage at this time. All of the alignments are assisted by pins or tabs making correct fit no issue. Even the wings and the intake sections fit very well. There was some filler required between the wings and the intake sections, but nothing like what you might be using on many other kits. The canopy was masked, the interior brace and p.e. bits attached to it and it was cemented in place in preparation for painting.
| COLORS & MARKINGS |
There are a lot of markings options available for this
aircraft aside from those very nice ones provided in the kit and if have have
them in the stash, I tend to use them. In this case I decided on the new FCM
sheet,
 7232 recently reviewed.
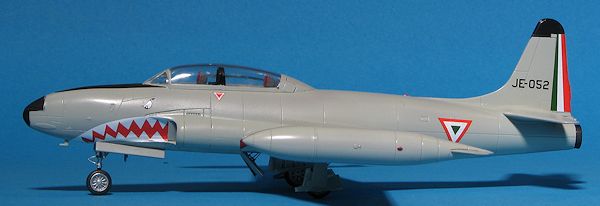
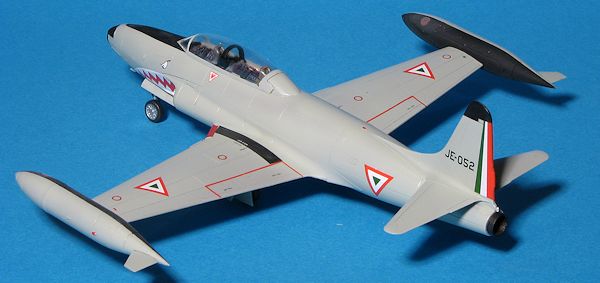
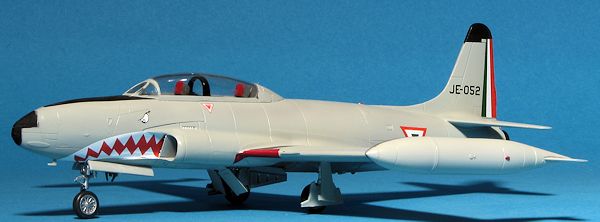
It has a lot of great options and I chose to do the one for the Mexican Air
Force. The Mexican Air Force has been a long time T-33 operator and may still be
flying the type. They have had a number of schemes, but I wanted one that looked
nice and wasn't too garish. This one is painted in an overall ADC Grey, a scheme
I have always found very nice. I used Model Master enamels on it and sprayed the
aircraft and tip tanks with this color. Once dry, the various black areas were
painted after the surrounding airframe was masked off. I had to do a bit of
additional painting once I realized that I had to remove two antennas from the
bottom of the plane. One is molded on right behind the pitot and the other had
to be installed and sanded flush. These are fine for the Japanese version, but
the Mexican AF version did not have them, according to photos on the web.
| FINAL CONSTRUCTION |
Then I returned to the bench to add on some parts prior to applying decals. Specifically the landing gear. These items had the oleo scissors and retraction struts cut away and replaced with photo etch bits from the p.e. sheet. The retraction struts need to be cut away carefully and handled in a similar way while bent. They proved to be a bit shorter than the kit parts. The air brakes were built up with each brake consisting of three parts and the retraction mechanism. These were the most difficult parts to build up and install, but they were finally done.
 Time for the decals. The first one I installed was the rudder
stripes. It was obvious that these were not designed for the Sword kit as they
are too thin at the top and too tall. I was hoping that the red would darken
when it was applied, but it did not. This means that the red bits on the sheet
are actually closer to international orange. The wing walk stripes are also too
long and need to be trimmed when applied. All that aside, the decals came off
the backing quickly, remained workable for a goodly amount of time on the paper
and went on without any fuss.
With the decals in place, I added the remainder of the bits which included the tip tanks, main gear doors and the nose wheel doors. The latter had a few p.e. bits to install and I found them to be a bit difficult to glue in place. I then glue in the exhaust piece and found that it sticks out a bit more than I would have thought. I then did some touch up painting of the rudder stripes and found that international orange did work to match the color. Before removing the canopy masks, I sprayed a semi-matte over the airframe and sprayed the wing walks and anti-glare panel in matte. Formation and anti-collision lights were painted. The masking was then removed and a bit of creep was scraped off with a toothpick to complete the project.
| CONCLUSIONS |
Overall, I found this to be a very enjoyable build. Despite
the inclusion of photo etch, it went fairly quickly. The p.e. set was well done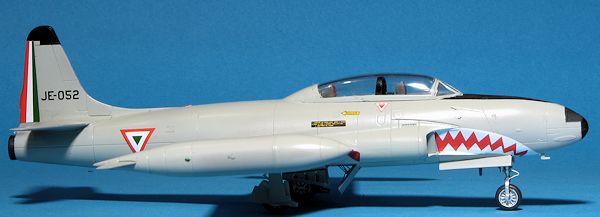 and everywhere it was used it enhanced the finished product. Fit of the kit is
good and it is probably the best T-33 available in this scale. The Sword kit is
nice but has intakes that are a bit too large and have a seam right in the
middle of them. Probably the only disappointment is in the wrong colors on the
FCM decal sheet. Were I FCM, I would have returned the sheets to Microscale and
had them reprint them with the proper red. Those kit decals I used worked very
well and one really could not do wrong using them. While perhaps not right away,
I can easily see building another of these as I have a fondness for the Shooting
Star line of aircraft.
| REFERENCES |
http://en.wikipedia.org/wiki/T-33A_Shooting_Star
September 2013
Thanks to www.platz-hobby.com for the review kit and the etched set. You can find this kit at your favorite hobby shop or on-line retailer.
If you would like your product reviewed fairly and fairly quickly, please contact the editor or see other details in the Note to Contributors.