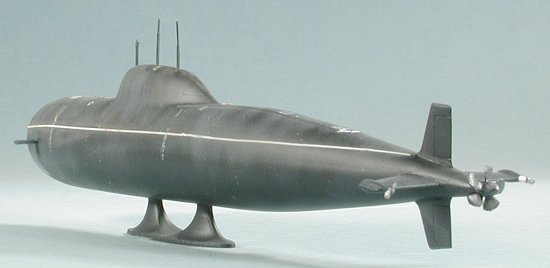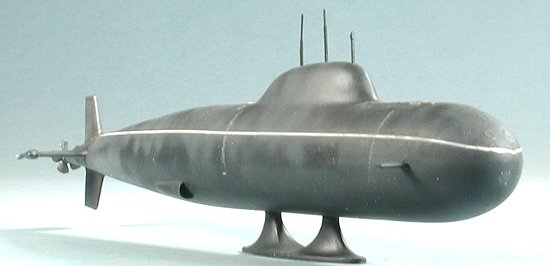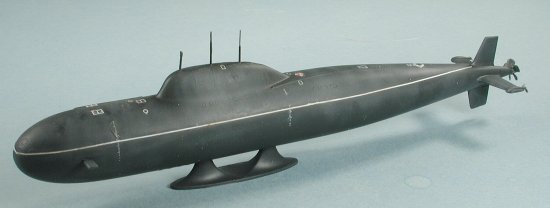
Maquette 1/400 Alfa submarine
| KIT: | Maquette 1/400 Alfa submarine |
| KIT # | 4004 |
| PRICE: | $6.98 MSRP |
| DECALS: | One sub |
| REVIEWER: | |
| NOTES: | Not a lot of parts |

| BACKGROUND |
I'll refer you to thepreview for all the info on the ship and a look at the parts.
| CONSTRUCTION |
As I mentioned, this kit isn't chock full of parts. However, that doesn't mean that it is a quick build, as sometimes the easiest kits can be a bit difficult. This one proved to be no exception, but not for all the reasons that one would normally think.
 There are two major subassemblies to this one. First is the majority of the sub, and this is an upper/lower half assembly. No real problems though the rear portion didn't seem very well done and there was quite a bit of filler needed for this section. A number of mold flaws on the upper hull section near the glue join also had to have filler applied and this area was smoothed out. The other major bit was the horizontal control fins at the back. Again, the fit was only fair with filler needed for the very aft end where the prop is attached.
Once these two subassemblies were dry, filled and sanded, it was time to mate them up. The fit is atrocious. There is a huge gap and the diameter of the horizontal fin assy is smaller than the attaching section on the back of the sub body. There are no positive locators so getting things aligned isn't fun. It al so doesn't help that the attachment angle of the horizontal stabs doesn't match the contour of the aft sub body. Much filler and sanding was needed to get a decent profile.
But the fun wasn't over. The slots for the vertical stabs on the sub body and aft section didn't align once the horiz stabs were installed. Now either my alignment of the horiz stabs is off or they just don't mate well. Regardless, I had to widen these slots before the vertical stabs were glued in place. Even then filler was needed to smooth things out.
When that was done, the dive planes and various periscopes and antennas were glued onto the top of the conning tower. The large rear prop has a ton of flash and a huge sink mark on it. That was filled and the flash removed as best I could before it was glued in place. The biggest problem other than fit is that most of the parts are flashy and the small ones are especially bad off. The sub was glued to the display stand and it was off for paint.
| CAMOUFLAGE & MARKINGS |
This is a piece of cake to paint. Black overall. Once it was painted and dry, it was given several coats of Future so that the decals could be added. Well, the decals are a bit of a mess. Though very thin and opaque, they just can't take any handling at all. That includes sliding them off the paper backing and onto the kit. I trashed a couple of them trying this before I gave up. Since aftermarket ones are problematical, I coated the remaining sheet with Microscale Super Film. When dry, I cut out the decals needed and applied them. This is a real problem as the decals are white and so is the decal paper backing! Though a few other died in the application, most of the rest were applied with various levels of s uccess. These subs have a white waterline. The instructions indicated that it needed to be painted on. Yeah, right! I had some old Scalemaster Stripes and I decided to use those. Problem is that because of their age, they tended to break into smaller segments and that happened to these. They also don't line to conform to a complex shape such as the bow of this ship so that area isn't the neatest it could be. After all were on and dry, a coat of matte clear was applied.
Well, there is little as uninteresting as an all black submarine. Time to try to add some 'interest' to it. I first tried drybrushing the raised detail with a dark grey. It was so subtle as to be invisible. I thought about applying some Rust-all to it. That was a total disaster. It reacted with the acrylic clear coat and left me with a white mess on all parts of the upper surface to which it was applied! Experience has taught me that if a clear coat frosts up, reapplication will take care of the situation and this was no exception. Though not quite back to square one, at least it wasn't the mess it was before and did look a bit more used than before. To enhance that a touch, I randomly sprayed RLM 66 dark grey over sections of the upper hull and that helped a lot to make things a lot less monochrome.
| FINAL CONSTRUCTION |
 The only parts not glued on were the little maneuvering props. These things are a mess as they are very thin and the flash isn't. If you can find replacements from some etched brass set, then do so as they are totally hosed. The props were all painted titanium as recommended by the instructions and the boat was done.
| CONCLUSIONS |
Once again, a simple kit proves that it isn't. Yeah, you could have this together in a day, but you'd have to be 7 years old and not care a whit about fit. I don't know if there is any other alternative to this kit in 1/400, but if there is, then perhaps it would be a better choice. May 2003 If you would like your product reviewed fairly and fairly quickly, please contact the editor or see other details in the Note to Contributors.
#1268 in a series