
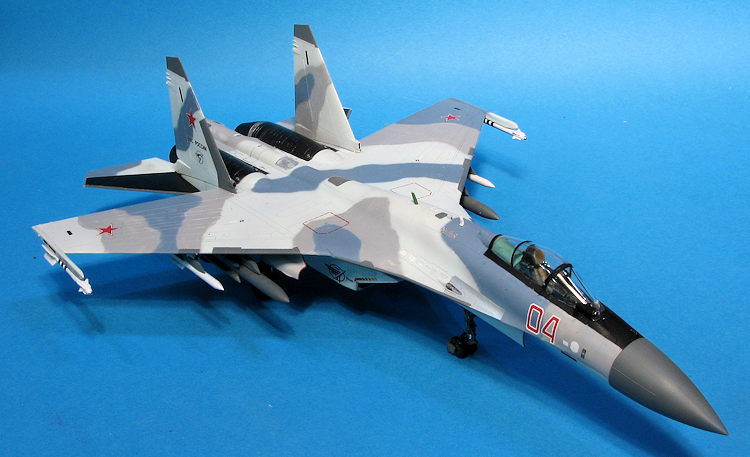
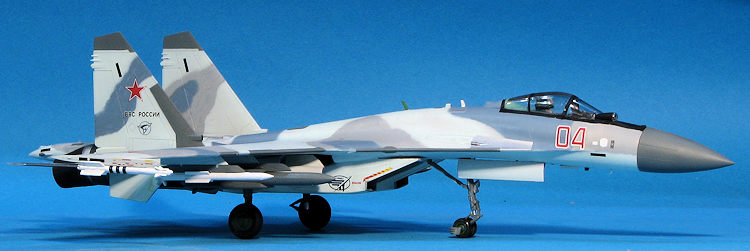
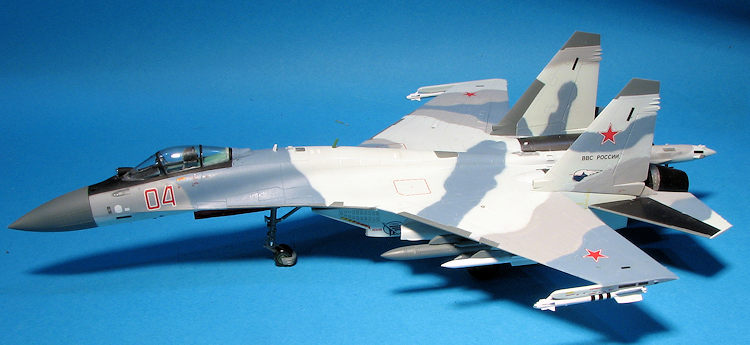
Hasegawa 1/72 Su-35S Flanker
| KIT #: | 01574 (E44) |
| PRICE: | 3240 yen (about $30 at current exchange rates) plus shipping from Japan |
| DECALS: | Two options shown but more can be done |
| REVIEWER: | Scott Van Aken |
| NOTES: | 2014 tooling. Base kit |

| HISTORY |
In 2003, even as Russia aimed to export the Su-27M, Sukhoi launched a project to produce a fighter to bridge the gap between upgraded variants of the Su-27 and Su-30MK, and Russia's fifth-generation Sukhoi PAK FA. The project's aim was a second modernization of the Su-27 airframe (hence its classification as a "4++ generation fighter") by incorporating several characteristics that would be implemented on the PAK FA. Additionally, the aircraft was to be an alternative to the Su-30 family on the export market. The design phase was to take place until 2007, when it would be available for sale. It was later reported that the programme was launched due to concerns that the PAK FA project would encounter funding shortages. The project's in-house designation is T-10BM (Bolshaya Modernizatsiya, "Big Modernization") while the aircraft is marketed as the Su-35.
While the aircraft maintains a strong superficial
resemblance to the Su-27, the airframe, avionics, propulsion and weapons systems
of the Su-35 have been thoroughly overhauled. Technological
 advancements have
produced more compact and lighter hardware, such as the radar, shifting the
centre of gravity to the aircraft's rear. These improvements removed the need
for canards and saw the abandonment of the "tandem triplane" featured on several
Su-27 derivatives. Also omitted was the Su-27's dorsal airbrake, which was
replaced by differential deflection of the vertical stabilizers. Other
aerodynamic refinements include a height reduction of the vertical stabilizers,
a smaller aft-cockpit hump, and shorter rearward-projecting "sting".
The reinforced airframe sees extensive use of titanium alloys, increasing its durability to some 30 years or 6,000 service hours, and raising the maximum takeoff weight to 34.5 tonnes. Internal fuel capacity was increased by more than 20% to 11.5 tonnes, and could be raised to 14.5 tonnes with the addition of drop tanks; in-flight refueling can also be used to extend missions.
Sukhoi has overhauled the avionics suite, at the heart of which is the information management system that enhances man-machine interaction. The system, which has two digital computers, collects and processes data from various tactical and flight-control systems and presents the relevant information to the pilot through the two main multi-function displays, which, together with three secondary MFDs, form the glass cockpit. The aircraft features many other upgrades to its avionics and electronic systems, including digital fly-by-wire flight-control system, and the pilot is equipped with a head-up display and night-vision goggles.
The Su-35 employs an Irbis-E passive electronically
scanned array radar that constitutes an essential component of the aircraft's
fire-control system. The radar is capable of detecting a 3-square-metre
(32 sq ft) aerial target at a distance of 400 km (250 mi), and can track 30
airborne targets and engage eight of them at the same time. Su-35S uses the N135
Irbis passive antenna array with electronic scanning radar for improved
locating. The radar can also map the ground using a variety of modes, including
the synthetic aperture mode. The Irbis-E is complemented by an OLS-35
optoelectronic targeting system that provides laser ranging, TV, Infra-red
search and track (IRST) functionality. The Su-35 is compatible with a multitude
of long- and short-range air-to-air missiles, precision and unguided
air-to-ground weaponry that include missiles, fuel-air bombs and rockets. A
maximum weapon payload of 8 tonnes can be carried on the fourteen hardpoints.
The fighter may use missiles with a range of up to 300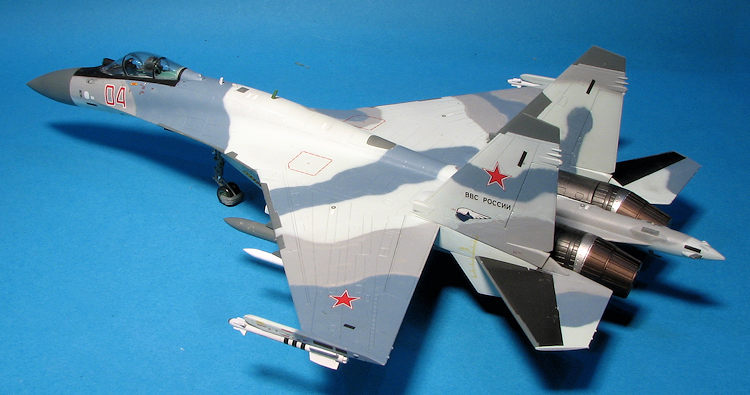 km.
km.
The Su-35 is powered by a pair of izdeliye (Product) 117S (AL-41F1S) turbofan engines. Developed jointly by Sukhoi, NPO Saturn and UMPO, the engine is a heavily upgraded AL-31F variant, and draws on the design of the fifth-generation PAK FA's Saturn 117 (AL-41F1) engines. Its thrust output is estimated at 142 kN (31,900 lbf), 20 kN (4,500 lbf) more than the Su-27M's AL-31F. It has a service life of 4,000 hours, compared to the AL-31F's 1,500; the two engines feature thrust-vectoring capability. Each thrust vectoring (TVC) nozzle has its rotational axis canted at an angle, similar to the configuration on the Su-30MKI. The thrust vectoring nozzles operate in one plane for pitch, but the canting allows the aircraft to produce both roll and yaw by vectoring each engine nozzle differently. A similar thrust vectoring system is also implemented on the PAK FA.
The engine may give the Su-35 limited supercruise capability, or sustained supersonic speed without the use of afterburners. Radar-absorbent material is applied to the engine inlets and the front stages of the engine compressor to halve the Su-35's frontal radar cross-section (RCS); the canopy was also modified to deflect radar waves.
| THE KIT |
 Rs, R-27ETs, R-73s, Kh-31s, KAB 1500s, B-8s and two R-77s. Since
there are eleven hard points, you will not only have a very loaded plane,
but will have spares for other projects. A load-out diagram is provided.
 | CONSTRUCTION |
 shade is not bright
enough, but it looks OK to me and isn't grey. There are decals for the side
consoles and the instrument panel. Be sure to cut the decals that will need
to go around things or they won't fit.
 | COLORS & MARKINGS |
 ible amount of masking to
get these areas properly done. I'm not steady enough with a brush to do some
of the really delicate bits. Also needing painted are the forward half of
the tailplanes. These get a coat of Alclad II steel. The area forward of the
gun port is aluminum.
 | CONCLUSIONS |
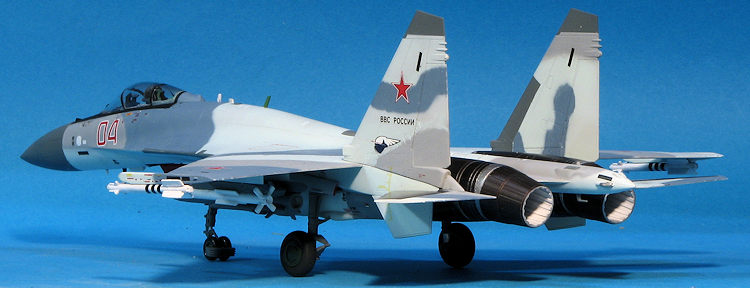 I have
wanted to build a Flanker for a number of years and have several in both 1/72
and 1/48. I'm not sure why I decided to do this one, but I felt it was about
time to add one to the collection. The build took longer than I'd anticipated,
not because it was difficult, but just because of the way it turned out with all
the masking and painting needed. It didn't help that there are a lot of decals,
either, but such is the case with modern military aircraft. The end result is
quite pleasing and though it won't be soon, I'll definitely do another.
One other thing. Add some nose weight. While it sits on its gear OK, it will also tail sit if the nose is raised more than about an inch.
| REFERENCES |
https://en.wikipedia.org/wiki/Sukhoi_Su-35#Modernization
20 January 2017 Copyright ModelingMadness.com. All
rights reserved. No reproduction in any form without express permission from the editor. Thanks to your editor's suffering credit card
for the review kit. If you would like your product reviewed fairly and fairly quickly, please
contact
the editor
or see other details in the
Note to
Contributors. Back to the Main Page
Back to the Review
Index Page
Back to the Previews Index Page