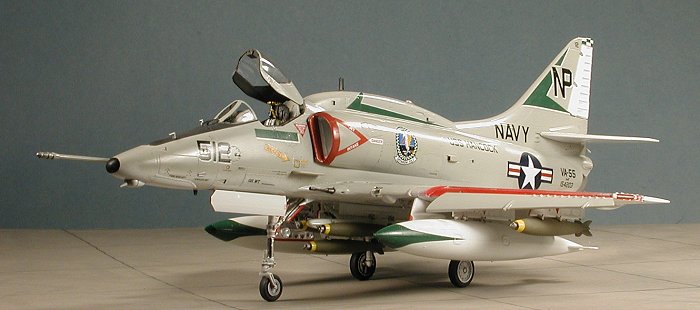
Hasegawa 1/48 A-4E/F Skyhawk
| KIT # | 7224 |
| PRICE: | $32.00 |
| DECALS: | Two aircraft: VA-22 and VA-145 |
| REVIEW : | |
| NOTES: |

| HISTORY & THE KIT |
There has been a great deal written about the Skyhawk. Basically, the aircraft was designed as a light attack plane of tremendous strength in the smallest package possible. The Skyhawk is like the DC-3 in that the number of flight hours that the airframe can handle is, for all practical purposes, unlimited. This robustness has been a blessing for the many pilots who were able to return from a mission with a badly damaged plane.
 Hasegawa has entered the 1/48 A-4 arena with probably the second most familiar version, the A-4E/F. Only the TA-4 is more recognizable. This initial boxing includes markings for a single A-4E and a single A-4F, VA-215 and VA-22 being chosen for these planes respectively. There are the usual bits and pieces that are only applicable to each variant, the biggest being the avionics hump for the A-4F. As one would expect from a modern Hasegawa kit, the detailing is very good and quite complete, making this the best 1/48 A-4 kit yet to hit the market. Though the kit comes with drop tanks, missing are any form of under wing weapons. This is a trait of most Hasegawa kits and one that I find particularly irritating as it requires the expenditure of another $20 or so for the weapons set.
Well, enough fussing, on to the build.
| CONSTRUCTION |
As with most of my models, the first thing I did was to assemble some subassemblies. This basically meant the cockpit , wings, and fuel tanks. Fit was very good for these. One big complaint that I have is the way Hasegawa packs the sprues. In addition to the usual scratches, here were also a few parts broken due to rubbing against each other in the single bag that all Hasegawa kits come it. You would think that Hasegawa would have realized that the kit buyer would prefer to have fewer parts per bag. OK, so it is nitpicking, but Hasegawa is supposed to be an industry standard, and I expect nothing but the best from them. Tamiya does a fine job in this area.
A bunch of the parts (flaps, racks, landing gear, etc) were pre-painted white. The exhaust pipe and rear engine compressor were painted 'jet exhaust' using Alclad II. It is quite convincing and dries very fast. At this time, the wings were also glued together. You need to open up any holes in the wings for your under wing stores. I opened the ones for the drop tanks and outer pylons. Still not sure about the centerline rack as of yet, but I have time to decide as there is much to be done to the fuselage before it comes time to glue on the wings.
Getting back to the fuselage, the engine intake and the exhaust sections were glued together and then glued into the fuselage. Not sure how much weight was needed, I overdid it a bit and glued that into the nose section ahead of the cockpit. Then the fuselage halves were glued together. The intakes are a really neat assembly and the fit of these is very good. Perhaps so good that no filler will be needed (well, not much, anyway)!
As usual for me, I needed some filler on the fuselage halves, more of it in the front than any other place. The avionics hump had been glued together and left to dry. Make sure you open up the required holes for the version you are doing. It was glued in place and any 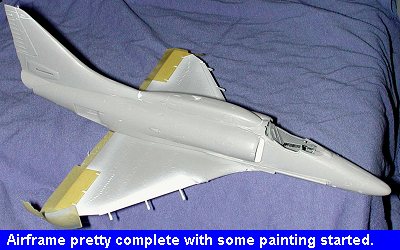 gaps there filled in. I found that the fit to the rear resulted in a rather large gap or two that needed filler. Perhaps if I had not glued the hump together prior to installation, it would not have been there. The fin tip was glued on at this time as well. There is a sink mark on one side that needs filled.
The intakes were painted white on the inside and then glued to the fuselage. Fit was quite good. I found the front of the intakes to be a touch larger than the part where they fit. Some sandpaper took care of that. A small amount of filler was also needed, mostly on the top and  bottom. The wings were then glued on and fit was good on one side, but there was a gap on the other. This was filled with Mr Surfacer 500 and sanded smooth. The next parts to be glued on were the gun ports on the wing leading edge. So far, these were the poorest fitting parts. They were smaller than the surrounding parts so needed several applications of filler to smooth in. Once that was done, there was some preliminary painting done. This involved painting control surfaces white. After that dried, I then attached some more additional bits like the under-nose ECM housing and the antenna that fits on the gear fairing. The instructions don't mention having to open any holes for this part so I had to take a best guess and drill some for it from the outside.
A few more bits and pieces were glued on like the under wing fuel dump and bridle attachment points.. The windscreen was then glued in place and masked. The canopy was also masked and then put in place with some white glue. The intakes were filled with tissue to prevent any problems with overspray getting in. Then it was off to the paint shop.
| PAINT |
 First, I painted the flap and slat areas white, then red. When dry, they were masked as were the white control surfaces. The cockpit area was painted black so that this color would show up on the inside of the clear bits. Gull grey and white are the required colors for this kit. I used Testors Modelmaster enamels for all these colors. They went on well with no problems at all. I prefer enamels to acrylics as they seem to be easier to use. Downside is that you have a lot of nasty solvents to use with them, so make sure that you use some sort of respirator when painting. That means a real respirator, not a paper dust mask!
At this same time, I painted the drop tanks, landing gear, gear doors, bomb racks and other bits either white or gull grey in preparation for the final assembly session. Painting the red on the inside lips of the doors is a chore that I really don't relish as it takes a steady hand. Just keep off the Coke and coffee and it will work out OK. Once the colors were on and dry, it was time to return to the bench for some additional work.
| CONSTRUCTION CONTINUES |
 At this time, a bunch of stuff was added on to make it easier towork with. The landing gear were glued in place and the wheels then attached. Fit here was quite good with no surprises. Actually, that isn't completely true. The attachment of the nose wheel steering parts is not clear in the kit instructions. Even leafing through a bunch of references wasn't a lot of help until I came across an Aeroguide on the A-4M. This had some very good photos of the area and were a lot of help.
The centerline and inboard bomb racks were installed at this time. Then the small sway braces were glued onto these and the outboard racks. The outboard racks were left off as they went over decals. Don't screw up and glue them in too early! Some touchup painting was required and when done, the small adjusters on the braces were painted steel. The tailplanes were test fit to make sure there were no problems and then removed for decaling.
| DECALS |
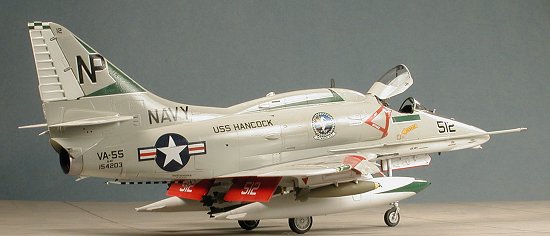
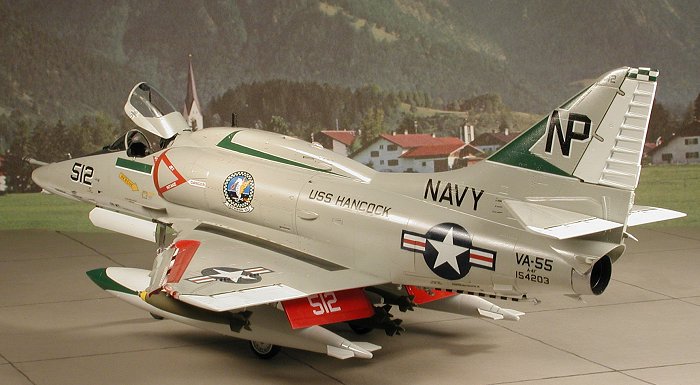
I chose to use the VA-55 scheme from Third Group Decals sheet
Then I went to work with the decals from the sheet. These decals are made for the Monogram 1/48 kit and are a bit large. They do fit, but take up more room than is shown in the instructions. This is really only noticeable on the fin where one needs to fudge things a bit. The decals for the drop tanks fit quite well, again with Solvaset help. What wasn't covered was the very tip of the tanks. This was touched up with some green paint. Naturally, getting an exact match was nearly impossible, but it looks quite nice.
| FINAL CONSTRUCTION |
Once the decals were all on and the model wiped down with clear water to remove residue, it was time to finish things up. A lot of bits needed to be added. First of all, the slats were attached. I like the way that Hasegawa did this with the actuating arms as part of the wing. It makes attachment much easier and eliminates any alignment problems. Next the flaps were glued in .These fit ok, but left rather large gaps where they meet the wing. Fixing this would be pretty near impossible at this stage.
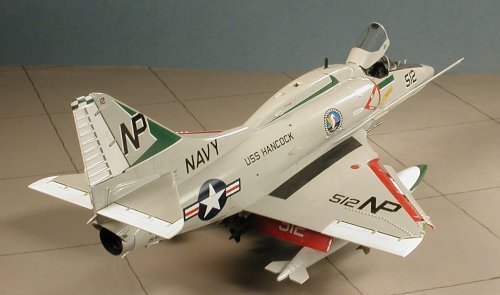 I then attached the outer bomb racks. Frankly, an A-4 should either be loaded to the gunwales or clean. There is something about empty racks that doesn't look right. Realizing that it needed weapons, I broke down and spent the bucks on a Hasegawa weapons set. You'd think that for the price that weapons would be included! Anyway, from the weapons set I chose a MER for the centerline and a bunch of bombs to fit the MER. Two more bombs were chosen for the outboard racks. A note on these sets. The level of detailing is fine for the mid 1980s when they were released, but are not up to current standards and really needs to be improved.
While the weapons were being assembled and painted, I turned my attention to the gear doors. These have red around the edges. Not having figured a way to spray paint these, I spent some quality time with a fine tipped brush and some Gunze acrylic red. I also used this red to touch up gapsin the intake decal. Once painted, they were glued in place.
Blowing the dust off the kit, I finished up by adding a bunch of small decals and other pieces. These bits included a couple of radio blade antenna, a pitot probe and air data sensor probe on the nose section. I also added the black sheath for the nose wheel steering cables, the landing gear light and the tail light. The nose anti-glare panel and wing walkway panels were sprayed with a flat clear.
The masking was taken off the clear bits (no problems despite the long lay-over), and a control box added to the inside of the canopy. The seat was then glued in place as was the canopy. Under the aircraft the various weapons pylons with ordnance were attached. No sweat with the outer racks, but the centerline station wasn't designed for the Hasegawa weapons set as the MER didn't line up very well. I ended up just slathering on superglue and hoping for the best. I had though about adding remove before flight tags, but figured if I did that, the kit would still be sitting around unfinished!
| CONCLUSIONS |
Hasegawa has provided us with a very nice Skyhawk that I'm sure will be the portent of more versions to come. I can only hope that they do a TA-4 as I've been wanting one in this scale for at least 15 years. The kit isn't a shake and bake, and it does take a bit of filler and careful building. It also has a lot of small parts that many will find to be rather fussy. However, it builds into a very nice model and is one that I am glad to add to my collection.
November 2001
| REFERENCES |
Aeroguide # 14: A-4M Skyhawk
Review kit courtesy of me and my wallet!
Copyright ModelingMadness.com. All rights reserved.
If you would like your product reviewed fairly and fairly quickly, please contact the editor or see other details in the